Sharp CD-DK890N CD-DK890N Operation Manual - Page 35
Recording from the radio, ing from ta, e to ta, ing recorded ta
 |
View all Sharp CD-DK890N manuals
Add to My Manuals
Save this manual to your list of manuals |
Page 35 highlights
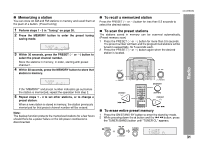
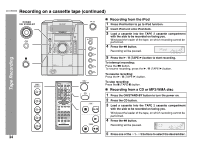
CD-DK890N Tape Recording 6 Within 5 seconds, press the / button to start recording. Recording is started from the selected disc. When the playback of the last track is finished or the end of the tape is reached, the disc and the cassette will stop automatically. Playback of the disc will start approximately 7 seconds after the tape starts. To stop recording: Press the (TAPE ) button. The disc and tape will stop. To perform programmed recording: 1 Program discs and tracks (see page 25). 2 Press the button. 3 Press the / (TAPE ) button to start recording. To stop recording: Press the (TAPE ) button. The disc and tape will stop. Dubbing from tape to tape You can record from TAPE 1 to TAPE 2. 1 Press the ON/STAND-BY button to turn the power on. 2 Load a prerecorded cassette into the TAPE 1 cassette compartment. Insert a blank tape into the TAPE 2 cassette compartment. CD PRESET TUNING - VOL. 5 4 3 PRESET 2 1 VOL. TUNING PLAYBACK (PLAY & STOP) PHONES RECORD/PLAYBACK TAPE 1 TAPE 2 It is recommended that the recording tape is the same length as the master tape. 3 Press the TAPE (1 2) button until "TAPE 1" appears on the display. 4 Press the button. Recording will be paused. Recording from the radio 1 Tune in to the desired station (see page 30). 2 Load a cassette into the TAPE 2 cassette compartment with the side to be recorded on facing you. Wind past the leader of the tape, on which recording cannot be performed. 5 Press the / (TAPE ) button to start dubbing. To stop dubbing: Press the (TAPE ) button. TAPE 1 and TAPE 2 will stop simultaneously. Erasing recorded tapes 3 Press the button. Recording will be paused. 1 Load the tape to be erased into the TAPE 2 cassette compartment with the side to be erased facing toward you. 2 Press the TAPE (1 2) button until "TAPE 2" appears on the 4 Press the / (TAPE ) button to start recording. To interrupt recording: Press the button. To resume recording, press the / (TAPE ) button. To stop recording: Press the (TAPE ) button. display. 3 Press the 4 Press the button. / (TAPE ) button to start erasing. Note: Make sure that the TAPE 1 is not in use. Note: If you hear a whistling noise while recording an AM station, move the AM loop antenna. 35
-
 1
1 -
2
-
3
-
4
-
5
-
6
-
7
-
8
-
9
-
10
-
11
-
12
-
13
-
14
-
15
-
16
-
17
-
18
-
19
-
20
-
21
-
22
-
23
-
24
-
25
-
26
-
27
-
28
-
29
-
 30
30 -
 31
31 -
 32
32 -
 33
33 -
 34
34 -
 35
35 -
 36
36 -
 37
37 -
 38
38 -
 39
39 -
 40
40 -
41
-
42
-
43
-
44
 |
 |
