Sharp CD-DK890N CD-DK890N Operation Manual - Page 39
Enchancing your
 |
View all Sharp CD-DK890N manuals
Add to My Manuals
Save this manual to your list of manuals |
Page 39 highlights
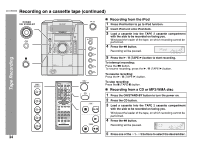
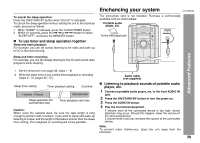
To cancel the sleep operation: Press the ON/STAND-BY button while "SLEEP" is indicated. To cancel the sleep operation without setting the unit to the stand-by mode, proceed as follows. 1 While "SLEEP" is indicated, press the CLOCK/TIMER button. 2 Within 10 seconds, press the or button to select "SLEEP OFF", and press the MEMORY button. To use timer and sleep operation together Sleep and timer playback: For example, you can fall asleep listening to the radio and wake up to CD in the next morning. Sleep and timer recording: For example, you can fall asleep listening to the CD and record radio programs while sleeping. Enchancing your system CD-DK890N The connection cord is not included. Purchase a commercially available cord as shown below. Portable audio player, etc. 5 4 3 2 1 To the line output jack TIMER CD 5 4 3 2 1 PLAYBACK (PLAY & STOP) PHONES AUDIO IN RECORD/PLAYBACK Advanced Features 1 Set the sleep time (see page 38, steps 1 - 5). 2 While the sleep timer is set, set the timer playback or recording (steps 2 - 10, pages 36 - 37). Audio cable (not supplied) Sleep timer setting Timer playback setting End time 1 minute - 3 hours Sleep operation will autimatically stop Desired time Timer playback start time Caution: When using the cassette deck, be sure the tape length is long enough to perform both functions. If you want to sleep and wake up listening to a tape, and the length of the tape is shorter than the sleep timer setting, timer playback or recording will not be possible. Listening to playback sounds of portable audio player, etc. 1 Connect a portable audio player, etc. to the front AUDIO IN jack. 2 Press the ON/STAND-BY button to turn the power on. 3 Press the AUDIO IN button. 4 Play the connected equipment. If volume level of the connected device is too high, sound distortion may occur. Should this happen, lower the volume of the connected device. If volume level is too low, increase the volume of the connected device. Note: To prevent noise interference, place the unit away from the television. 39
-
 1
1 -
2
-
3
-
4
-
5
-
6
-
7
-
8
-
9
-
10
-
11
-
12
-
13
-
14
-
15
-
16
-
17
-
18
-
19
-
20
-
21
-
22
-
23
-
24
-
25
-
26
-
27
-
28
-
29
-
30
-
31
-
32
-
33
-
 34
34 -
 35
35 -
 36
36 -
 37
37 -
 38
38 -
 39
39 -
 40
40 -
 41
41 -
 42
42 -
 43
43 -
 44
44
 |
 |
