Sharp CD-E500 Service Manual - Page 9
Cd-e500, Cd-e55/e44, Cd Player
 |
View all Sharp CD-E500 manuals
Add to My Manuals
Save this manual to your list of manuals |
Page 9 highlights
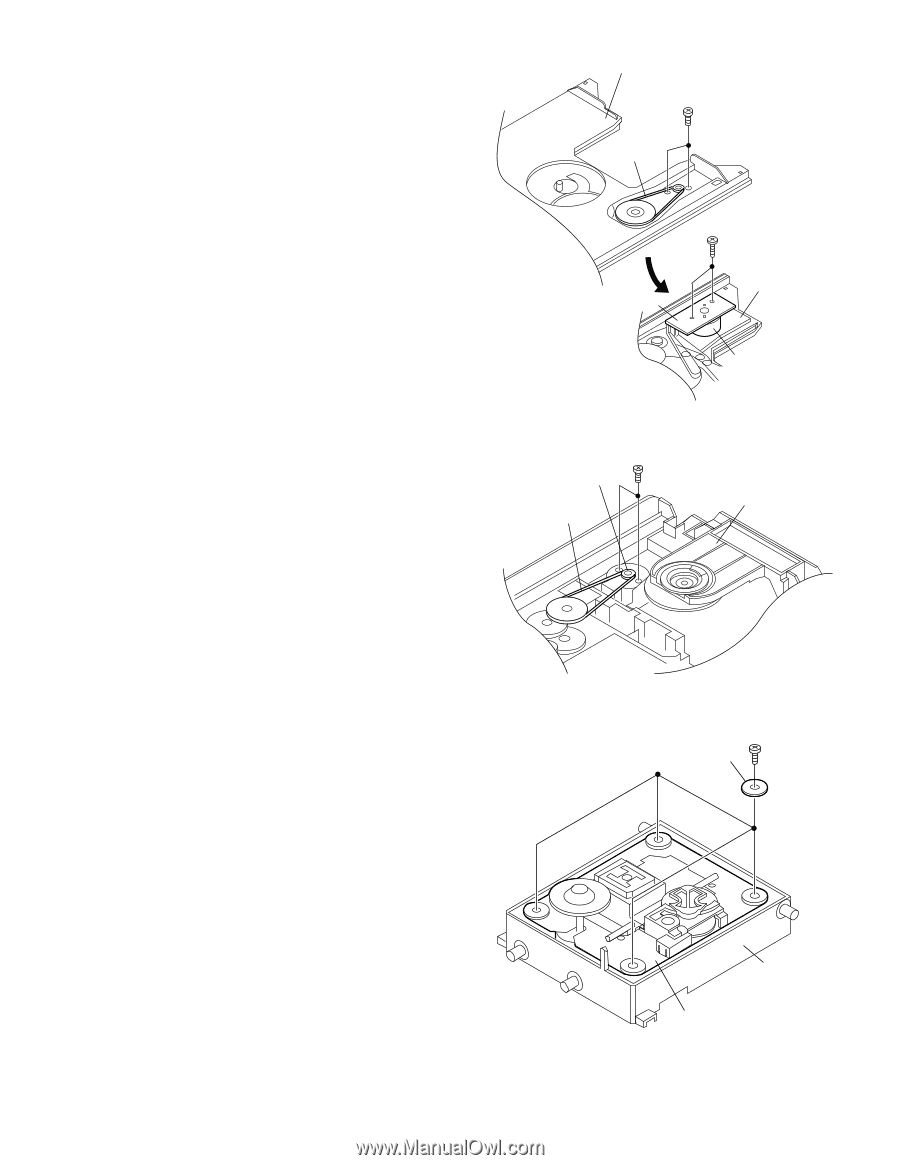
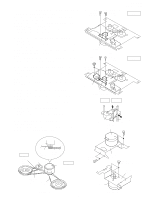
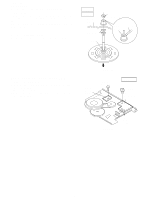
CD PLAYER SECTION Perform steps 1, 2, 3, 10,11, and 12 of the disassembly method to remove the CD mechanism. How to remove the T/T rotate motor (See Figs. 9-1) 1. Remove the screws (A1) x 2 pcs. 2. Remove the belt (A2) x 1 pc. 3. Remove the screws (A3) x 2 pcs., to remove the T/T rotate motor. How to remove the up/down loading motor (See Figs. 9-2) 1. Remove the screws (B1) x 2 pcs. 2. Remove the belt (B2) x 1 pc. CD-E500 CD-E55/E44 Loading Tray (A1)x2 ø2.4x3mm (A2)x1 T/T Motor PWB (A3)x2 ø3x10mm Loading Tray (Bottom View) T/T Rotate Motor Figure 9-1 Up/Down Loading Motor (B1)x2 ø2.4x5mm (B2)x1 CD Player Unit How to remove the CD mechanism unit (See Fig. 9-3) Perform steps 1, 2, 3, 10and 13 of the disassembly method to remove the CD mechanism. 1. Remove the screws (C1) x 4 pcs., to remove the mechanism unit. Note After removing the connector for the optical pickup from the connector wrap the conductive aluminium foil around the front end of connector so as to protect the optical pickup from electrostatic damage. - 9 - Figure 9-2 Holder PWB (C1)x4 ø2.5x10mm Holder CD Mechanism Unit Figure 9-3
-
 1
1 -
2
-
3
-
 4
4 -
 5
5 -
 6
6 -
 7
7 -
 8
8 -
 9
9 -
 10
10 -
 11
11 -
 12
12 -
 13
13 -
 14
14 -
15
-
16
-
17
-
18
-
19
-
20
-
21
-
22
-
23
-
24
-
25
-
26
-
27
-
28
-
29
-
30
-
31
-
32
-
33
-
34
-
35
-
36
-
37
-
38
-
39
-
40
-
41
-
42
-
43
-
44
-
45
-
46
-
47
-
48
-
49
-
50
-
51
-
52
-
53
-
54
-
55
-
56
-
57
-
58
-
59
-
60
 |
 |