Sharp FO-2080 FO-2080 Online Operation Manual
Sharp FO-2080 Manual
 |
View all Sharp FO-2080 manuals
Add to My Manuals
Save this manual to your list of manuals |
Sharp FO-2080 manual content summary:
- Sharp FO-2080 | FO-2080 Online Operation Manual - Page 1
FO-2080 Online Manual Start Click this "Start" button. - Sharp FO-2080 | FO-2080 Online Operation Manual - Page 2
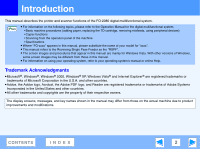
the Operation Manual for the digital multifunctional system. Note • Basic machine procedures (adding paper, replacing the TD cartridge, removing misfeeds, using peripheral devices) • Copier functions • Scanning from the operation panel of the machine • Specifications ● Where "FO-xxxx" appears - Sharp FO-2080 | FO-2080 Online Operation Manual - Page 3
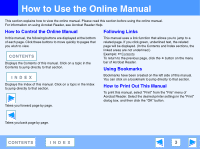
manual. You can click on a bookmark to jump directly to that section. How to Print Out This Manual To print this manual, select "Print" from the "File" menu of Acrobat Reader. Select the desired printer settings in the "Print" dialog box, and then click the "OK" button. Takes you back page by page - Sharp FO-2080 | FO-2080 Online Operation Manual - Page 4
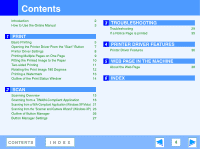
to Use the Online Manual 1 PRINT 2 3 TROUBLESHOOTING 3 Troubleshooting 29 If a Notice Page is printed 35 Basic Printing Opening the Printer Driver From the "Start" Button 5 7 4 PRINTER DRIVER FEATURES Printer Driver Settings 8 Printer Driver Features 36 Printing Multiple Pages on One - Sharp FO-2080 | FO-2080 Online Operation Manual - Page 5
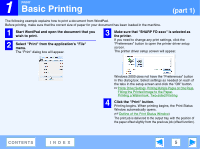
box will appear. 3 Make sure that "SHARP FO-xxxx" is selected as the printer. If you need to change any print settings, click the "Preferences" button to open the printer driver setup screen. The printer driver setup screen will appear. CONTENTS INDEX Windows 2000 does not have the "Preferences - Sharp FO-2080 | FO-2080 Online Operation Manual - Page 6
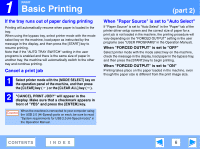
(Hi-Speed) ports on each, be sure to read "System requirements for USB 2.0 (Hi-Speed mode)" in the Operation Manual. (part 2) When "Paper Source" is set to "Auto Select" If "Paper Source" is set to "Auto Select" in the "Paper" tab of the printer driver setup screen and the correct size of paper for - Sharp FO-2080 | FO-2080 Online Operation Manual - Page 7
the "Start" button and point to "Settings", and then select "Printers". In Windows XP, if "Printers and Faxes" does not appear in the Note "start" menu, select "Control Panel", select "Printers and Other Hardware", and then select "Printers and Faxes". 2 Click the "SHARP FO-xxxx" printer driver icon - Sharp FO-2080 | FO-2080 Online Operation Manual - Page 8
the dialog box. 8 "Cancel" button Click this button to exit the dialog box without making any changes to the settings. 9 "Apply" button Click to save your settings without closing the dialog box. 10 "Help" button Click this button to display the help file for the printer driver. CONTENTS INDEX 8 - Sharp FO-2080 | FO-2080 Online Operation Manual - Page 9
1 PRINT Printing Multiple Pages on One Page This feature allows you to reduce and print two or four document pages on a single sheet of paper. To use this function, open the printer driver setup screen and select "2-Up" or "4-Up" for "N-Up Printing" on the "Main" tab. ☞See Basic Printing for - Sharp FO-2080 | FO-2080 Online Operation Manual - Page 10
Up Printing" is selected. Note ☞Printing Multiple Pages on One Page 1 Click the "Paper" tab in the printer driver setup screen. 2 Select the original size ( match the paper loaded in the machine. Paper Size: Letter Fit To Paper Size: Invoice 3 Check the "Fit to Page" box. CONTENTS INDEX Letter - Sharp FO-2080 | FO-2080 Online Operation Manual - Page 11
Printing This feature allows you to print on both sides of the paper. To use this function, open the printer driver setup screen and select "2-Sided (Book)" or "2-Sided (Tablet)" from "Document Style" in the "Main" tab. ☞See Basic Printing for details on how to open the printer driver. ● Paper - Sharp FO-2080 | FO-2080 Online Operation Manual - Page 12
is used to enable correct printing on envelopes and other paper with flaps that can only be loaded in one orientation. To use the feature, select the image orientation in "Image Orientation" on the "Paper" tab, and then select the "Rotate 180 degrees" checkbox. ☞See Basic Printing for details - Sharp FO-2080 | FO-2080 Online Operation Manual - Page 13
, click the "Watermarks" tab, and follow the steps below. See Basic Printing for details on how to open the printer driver. How to Print a Watermark From the "Watermark" drop-down list, select the watermark that you wish to print (for example "CONFIDENTIAL"), and start printing. Print - Sharp FO-2080 | FO-2080 Online Operation Manual - Page 14
explained document currently being 4 below. Follow the instructions printed. in the status window to solve 5 "Cancel Job" button the problem. Printing can be canceled by Icon Print Status clicking this button before the An error has machine receives the job. 5 occurred that 6 "Help - Sharp FO-2080 | FO-2080 Online Operation Manual - Page 15
. The WIA driver for this machine can only be used in Windows XP/Vista. *3 To scan using the machine's operation panel, you must first install Button Manager and establish the appropriate settings in the Control Panel. For details, see "SETTING UP BUTTON MANAGER" in the Operation Manual. CONTENTS - Sharp FO-2080 | FO-2080 Online Operation Manual - Page 16
Operation Manual. 2 Start up a Twain-compliant application and select "Select Scanner" from the "File" menu. 3 Select "SHARP MFP TWAIN X", and then click the "Select" button. ● If you are using Windows XP/Vista, you can also select Note "WIA-SHARP FO-xxxx" to scan using the WIA driver. ☞Scanning - Sharp FO-2080 | FO-2080 Online Operation Manual - Page 17
the orientation without resetting the original. ☞Preview screen ● If you set multiple pages in the RSPF, the machine previews only the top page of the originals, and then sends it to the original exit area. Return the previewed original to the RSPF before starting the scanning job. CONTENTS INDEX - Sharp FO-2080 | FO-2080 Online Operation Manual - Page 18
. ☞Scanner Driver Settings Caution Scanning a large area in full color at high resolution results in a large quantity of data and a prolonged scanning time. It is recommended that you set appropriate scanning preferences for the type of original being scanned, i.e., Web page (monitor), Photo, FAX - Sharp FO-2080 | FO-2080 Online Operation Manual - Page 19
SCAN Scanning from a TWAIN-Compliant Application (part 4) Scanner Driver Settings The scanner driver setup screen consists of the "Set-up screen", which lets you select scan settings, and the "Preview screen", which shows the scanned image. For details on the scan settings, click the "Help" button - Sharp FO-2080 | FO-2080 Online Operation Manual - Page 20
automatically set the scanning area to the entire preview image. Click the "Auto Scan Area Adjustment" button to automatically set the scanning area to the entire preview image. Preview image Preview window 5 "Help" button Click to display the help file for the scanner driver. CONTENTS INDEX 20 - Sharp FO-2080 | FO-2080 Online Operation Manual - Page 21
, refer to "NORMAL COPYING" in the Operation Manual. 2 Start Paint and then click the "File" menu and select "From Scanner or Camera". The scan screen of the WIA driver will appear. 3 Select the paper source and picture type, and click the "Preview" button. ● The preview image will appear. ● If - Sharp FO-2080 | FO-2080 Online Operation Manual - Page 22
4 Click the "Scan" button. ● Scanning begins and the image is acquired into Paint. ● Use "Save" in your application to specify a file name and folder for the scanned image, and save the image. ● To cancel a scanning job after clicking the "Scan" button, click the "Cancel" button. (part 2) CONTENTS - Sharp FO-2080 | FO-2080 Online Operation Manual - Page 23
on setting an original for scanning, refer to "NORMAL COPYING" in the Operation Manual. 4 Click the "Next" button. 2 Click the "start" button, click "Control Panel", click "Printers and Other Hardware", and then click "Scanners and Cameras". 3 Click the "SHARP FO-xxxx" icon and then click - Sharp FO-2080 | FO-2080 Online Operation Manual - Page 24
2 SCAN Scanning from the "Scanner and Camera Wizard" (Windows XP) (part 2) 5 Select the "Picture type" and "Paper source", and click the "Next" button. "Paper source" and specify the original size in "Page size". ● You can click the "Preview" button to display the preview image. ● If you select - Sharp FO-2080 | FO-2080 Online Operation Manual - Page 25
2 SCAN Scanning from the "Scanner and Camera Wizard" (Windows XP) (part 3) 7 When scanning ends, the following screen will appear. Select the next task that you wish to perform, and then click the "Next" button. If you are ready to end the session, click "Nothing. I'm finished working with these - Sharp FO-2080 | FO-2080 Online Operation Manual - Page 26
the Control Panel settings, see "SETTING UP BUTTON MANAGER" in the Operation Manual. For information on scanning using the machine's operation panel, see "USING THE SCANNER MODE" in the Operation Manual. 1 Tab Some applications 1 Click to set scan menu options. Each tab contains Note may - Sharp FO-2080 | FO-2080 Online Operation Manual - Page 27
2 SCAN Button Manager Settings (part 1) Once installed, Button Manager normally runs in the background in the Windows operating system. If you need to change Button Manager settings, follow the steps below. For details on Button Manager settings, see Button Manager Help. ☞Outline of Button Manager - Sharp FO-2080 | FO-2080 Online Operation Manual - Page 28
will appear in the machine display when you select a scan menu at the machine. (Example: SC1:xxxxx) If a character that the machine cannot display is entered Note in the "Menu Name", "?" is displayed on the machine. 5 Click the "OK" button. This completes the settings. (part 2) CONTENTS INDEX 28 - Sharp FO-2080 | FO-2080 Online Operation Manual - Page 29
. → Reconfigure the port setting of the shared printer. The machine is not selected in the application. → After choosing "Print" from the "File" menu, make sure that "SHARP FO-xxxx" is selected as the printer in the "Print" window. Page Operation Manual Operation Manual - 5 CONTENTS INDEX 29 - Sharp FO-2080 | FO-2080 Online Operation Manual - Page 30
Hardware", and then click "Printers and Faxes". ● On Windows Vista, click the "Start" button, select "Control Panel", and then click "Printer". ● On Windows 2000, click the "Start" button, select "Settings" and then click "Printers". 2 Does the "SHARP FO-xxxx" printer driver icon appear? 3 If the - Sharp FO-2080 | FO-2080 Online Operation Manual - Page 31
Troubleshooting (part 3) Problem The machine does not print. Printing is slow. The printed image is light and uneven. The printed image is dirty. Cause and solution The "FORCED OUTPUT" setting is set to "OFF". → When "FORCED OUTPUT" is set to "OFF" and there is no paper in the machine - Sharp FO-2080 | FO-2080 Online Operation Manual - Page 32
Troubleshooting (part 4) Problem The printed image is skewed or it runs off the paper. The printed image is skewed or it runs off the paper. Error indicator is lit or blinking. Poor scanning quality. Cause and solution The size of paper loaded in the tray is not the size specified in the printer - Sharp FO-2080 | FO-2080 Online Operation Manual - Page 33
may be degraded. This is because the scanned data is transferred using JPEG compression. If image quality is poor, then perform scanning again without selecting the "Quick Scan" option. ("Quick Scan" is not selected by default.) Page - - Operation Manual Operation Manual - CONTENTS INDEX 33 - Sharp FO-2080 | FO-2080 Online Operation Manual - Page 34
3 TROUBLESHOOTING Troubleshooting (part 6) Problem Unable to scan the image. Scanner transfer speed is slow. Cause and solution If scanning is not possible, shut down your computer, turn off the machine's power switch, and unplug the machine's power cord. Next, start your computer, restore power - Sharp FO-2080 | FO-2080 Online Operation Manual - Page 35
the "Configuration" tab of the printer driver setup screen. If you wish to use the ROPM function, set the print quality to "Draft". Notice Page The IMC memory full error had occurred, a normal output was not able to be executed. Please refer to the operation manual for the solution method. The - Sharp FO-2080 | FO-2080 Online Operation Manual - Page 36
PRINTER DRIVER FEATURES Printer Driver Features (part 1) Tab Setting Selections Initial setting Main Copies 1 to 999 1 Collate On/Off On N-Up Printing 1-Up/2-Up/4-Up 1-Up Border On/Off Off Document Style 1-Sided/2-Sided (Book)/2-Sided (Tablet) 1-Sided User Settings - Factory - Sharp FO-2080 | FO-2080 Online Operation Manual - Page 37
4 PRINTER DRIVER FEATURES Printer Driver Features (part 2) Tab Advanced Watermarks Configuration Setting Print Quality 2 Gradation Print [Image Adjustment] Brightness Contrast Watermark Text Size Angle Gray Scale On First Page Only Input Tray Options ROPM Draft/Normal/Photo On/Off Selections 0 - Sharp FO-2080 | FO-2080 Online Operation Manual - Page 38
5 About the Web Page WEB PAGE IN THE MACHINE If the machine is used as a network printer, you can access the Web page in the machine using a Web browser. You can check and change network settings in the Web page, and check the printer status. ● To access the Web page in the machine, the IP address - Sharp FO-2080 | FO-2080 Online Operation Manual - Page 39
PAGE IN THE MACHINE Configuration via the Web Page To change network settings, click "NIC Setup". The following screen will appear. [NIC Setup] After changing the network settings, click the "Submit" button to store the new settings. If you wish to cancel the new settings, click the "Reset" button - Sharp FO-2080 | FO-2080 Online Operation Manual - Page 40
Configuration 37 D Document Style 11 F Fit to Page 10 Help Button Manager 26 Print Status Window ....... 14 Printer driver 8 Scanner driver TWAIN driver 20 How to Use the Online Manual. 3 I Image Orientation 12 "Image Size" button 20 IMC memory 35 Introduction 2 M Main 36 Menu Name 26 - Sharp FO-2080 | FO-2080 Online Operation Manual - Page 41
FO2080-US1
-
 1
1 -
 2
2 -
 3
3 -
 4
4 -
 5
5 -
 6
6 -
 7
7 -
8
-
9
-
10
-
11
-
12
-
13
-
14
-
15
-
16
-
17
-
18
-
19
-
20
-
21
-
22
-
23
-
24
-
25
-
26
-
27
-
28
-
29
-
30
-
31
-
32
-
33
-
34
-
35
-
36
-
37
-
38
-
39
-
40
-
41
 |
 |

FO-2080 Online Manual
Start
Start
Click this "Start" button.