Sharp FO-2080 FO-2080 Operation Manual Suite - Page 222
If the tray runs out of paper during printing, Cancel a print job, When \
 |
View all Sharp FO-2080 manuals
Add to My Manuals
Save this manual to your list of manuals |
Page 222 highlights
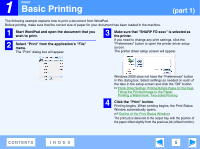
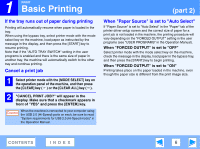
1 PRINT Basic Printing If the tray runs out of paper during printing Printing will automatically resume when paper is loaded in the tray. When using the bypass tray, select printer mode with the mode select key on the machine, load paper as instructed by the message in the display, and then press the [START] key to resume printing. Note that if the "AUTO TRAY SWITCH" setting in the user programs is enabled and there is the same size of paper in another tray, the machine will automatically switch to the other tray and continue printing. Cancel a print job 1 Select printer mode with the [MODE SELECT] key on the operation panel of the machine, and then press the [CLEAR] key ( ) or the [CLEAR ALL] key ( ). 2 "CANCEL PRINT JOB?" will appear in the display. Make sure that a checkmark appears in front of "YES" and press the [ENTER] key. Caution When the machine is connected to your computer using the USB 2.0 (Hi-Speed) ports on each, be sure to read "System requirements for USB 2.0 (Hi-Speed mode)" in the Operation Manual. (part 2) When "Paper Source" is set to "Auto Select" If "Paper Source" is set to "Auto Select" in the "Paper" tab of the printer driver setup screen and the correct size of paper for a print job is not loaded in the machine, the printing procedure will vary depending on the "FORCED OUTPUT" setting in the user programs (see "USER PROGRAMS" in the Operation Manual). When "FORCED OUTPUT" is set to "OFF" Select printer mode with the mode select key on the machine, check the message in the display, load paper in the bypass tray, and then press the [START] key to begin printing. When "FORCED OUTPUT" is set to "ON" Printing takes place on the paper loaded in the machine, even though the paper size is different from the print image size. CONTENTS INDEX 6
-
 1
1 -
2
-
3
-
4
-
5
-
6
-
7
-
8
-
9
-
10
-
11
-
12
-
13
-
14
-
15
-
16
-
17
-
18
-
19
-
20
-
21
-
22
-
23
-
24
-
25
-
26
-
27
-
28
-
29
-
30
-
31
-
32
-
33
-
34
-
35
-
36
-
37
-
38
-
39
-
40
-
41
-
42
-
43
-
44
-
45
-
46
-
47
-
48
-
49
-
50
-
51
-
52
-
53
-
54
-
55
-
56
-
57
-
58
-
59
-
60
-
61
-
62
-
63
-
64
-
65
-
66
-
67
-
68
-
69
-
70
-
71
-
72
-
73
-
74
-
75
-
76
-
77
-
78
-
79
-
80
-
81
-
82
-
83
-
84
-
85
-
86
-
87
-
88
-
89
-
90
-
91
-
92
-
93
-
94
-
95
-
96
-
97
-
98
-
99
-
100
-
101
-
102
-
103
-
104
-
105
-
106
-
107
-
108
-
109
-
110
-
111
-
112
-
113
-
114
-
115
-
116
-
117
-
118
-
119
-
120
-
121
-
122
-
123
-
124
-
125
-
126
-
127
-
128
-
129
-
130
-
131
-
132
-
133
-
134
-
135
-
136
-
137
-
138
-
139
-
140
-
141
-
142
-
143
-
144
-
145
-
146
-
147
-
148
-
149
-
150
-
151
-
152
-
153
-
154
-
155
-
156
-
157
-
158
-
159
-
160
-
161
-
162
-
163
-
164
-
165
-
166
-
167
-
168
-
169
-
170
-
171
-
172
-
173
-
174
-
175
-
176
-
177
-
178
-
179
-
180
-
181
-
182
-
183
-
184
-
185
-
186
-
187
-
188
-
189
-
190
-
191
-
192
-
193
-
194
-
195
-
196
-
197
-
198
-
199
-
200
-
201
-
202
-
203
-
204
-
205
-
206
-
207
-
208
-
209
-
210
-
211
-
212
-
213
-
214
-
215
-
216
-
 217
217 -
 218
218 -
 219
219 -
 220
220 -
 221
221 -
 222
222 -
 223
223 -
 224
224 -
 225
225 -
 226
226 -
 227
227 -
228
-
229
-
230
-
231
-
232
-
233
-
234
-
235
-
236
-
237
-
238
-
239
-
240
-
241
-
242
-
243
-
244
-
245
-
246
-
247
-
248
-
249
-
250
-
251
-
252
-
253
-
254
-
255
-
256
-
257
 |
 |
