Sharp LL-T15S1 Operation Manual - Page 16
Adjusting the backlight
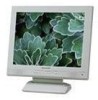 |
View all Sharp LL-T15S1 manuals
Add to My Manuals
Save this manual to your list of manuals |
Page 16 highlights
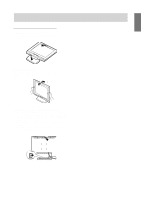
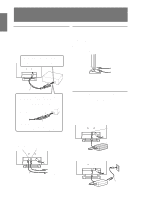
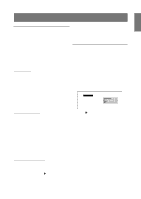
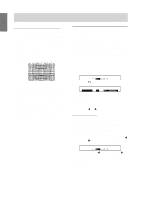
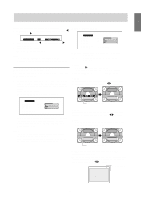
Adjusting the screen display and speaker volume Opening the Adjustment Pattern (for Windows) If you are using Windows, you can use the Adjustment Pattern on the accompanying Utility Disk. This explanation is for Windows 95/98/Me/2000, and assumes that the floppy disk drive is "A drive". 1. Place the Utility Disk (provided) into the computer's A drive. 2. Open [My Computer] and select [3 ½ Floppy (A:)]. If using Windows 3.1, open [File Manager] and choose "A drive". 3. Double click on [Adj_uty.exe] to run the Adjustment Program. The Adjustment Pattern will appear. Adjustment pattern Adjusting the backlight The backlight brightness can be set to change automatically for use in different surroundings. (Automatic brightness adjustment) If the surroundings become brighter, the backlight will become brighter. If the surroundings become darker, the backlight will become darker. The brightness sensor measures the brightness of the surrounding environment. Never place anything in front of the brightness sensor. Use the BRIGHT button to switch between automatic brightness adjustment or no automatic brightness adjustment. Notes: - After completing the adjustments, press the computer's [Esc] key to exit the Adjustment Program. - If the floppy disk drive of your computer is not "A drive", please read the below substituting the floppy disk drive you are using in place of "A drive" or "A". - If your computer's display mode is set to 65K colors, you may see the different color levels in each color pattern or the gray scale may look colored. (This is due to the specification of the input signal and is not a malfunction.) Automatic brightness adjustment [ AUTO BRIGHTNESS ON ] [ ] !" Press BRIGHT button No automatic brightness adjustment [ AUTO BRIGHTNESS OFF ] B R I G H T 31 [ ] Notes: - The backlight adjustment bar automatically disappears several seconds after the last command. - On the screen that appears after the values have been set, the brightness can be further adjusted by pressing the and buttons. Adjusting the brightness Carry out the commands without the On Screen Display (OSD) Menu displayed. If the OSD Menu is displayed, press the MENU button (several times may be required) and begin when the OSD Menu has disappeared. When adjusting brightness automatically Using the adjusted backlight brightness as a base, the brightness can be adjusted automatically. 1. Without the OSD Menu being displayed, press the button or the button. The BRIGHT bar will appear at the bottom section of the screen. [ AUTO BRIGHTNESS ON ] [ ] 2. Adjust by pressing the button (darker) or the button (lighter). Depending on the brightness of the surrounding environment, the parameters for adjustment may be limited. 3. Press the MENU button. The OSD will disappear. 16
-
 1
1 -
2
-
3
-
4
-
5
-
6
-
7
-
8
-
9
-
10
-
 11
11 -
 12
12 -
 13
13 -
 14
14 -
 15
15 -
 16
16 -
 17
17 -
 18
18 -
 19
19 -
 20
20 -
 21
21 -
22
-
23
-
24
-
25
-
26
-
27
-
28
-
29
-
30
-
31
-
32
-
33
-
34
-
35
-
36
-
37
-
38
-
39
-
40
-
41
-
42
-
43
-
44
-
45
-
46
-
47
-
48
-
49
-
50
-
51
-
52
-
53
-
54
-
55
-
56
-
57
-
58
-
59
-
60
-
61
-
62
-
63
-
64
-
65
-
66
-
67
-
68
-
69
-
70
-
71
-
72
-
73
-
74
-
75
-
76
-
77
-
78
-
79
-
80
-
81
-
82
-
83
-
84
-
85
-
86
-
87
-
88
-
89
-
90
-
91
-
92
-
93
-
94
-
95
-
96
-
97
-
98
-
99
-
100
-
101
-
102
-
103
-
104
-
105
-
106
-
107
-
108
-
109
-
110
-
111
-
112
-
113
 |
 |
