Sharp LL-T15S1 Operation Manual - Page 24
Instructions for installing a VESA compliant arm
 |
View all Sharp LL-T15S1 manuals
Add to My Manuals
Save this manual to your list of manuals |
Page 24 highlights
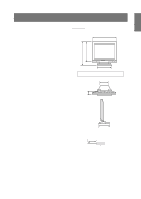
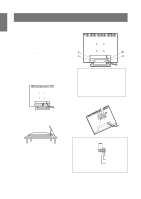
Instructions for installing a VESA compliant arm An arm based on the VESA standard can be attached to the monitor. The arm must be purchased separately. When choosing the arm to be installed please take note of the following points. - The arm should be compatible with the VESA standard, and there must be a gap of 75 mm x 75 mm between the screw holes on the section to be attached. - The arm must not fall off or break off after being attached to the monitor. Note: - Do not bend the RGB signal cable or the AC adapter cable nor place weight on them. Doing so could lead to damage. 1. Turn off the power switch and remove the AC adapter from the monitor's power terminal. 2. Remove the stand cover. Pull the lower section of the stand cover upward. 4. Remove the four screws and then remove the stand from the monitor. Information The stand is specially made for use with this monitor. Once having removed the stand, never attempt to attach it to another device. Once having removed the screws, store them together with the stand and if the stand is ever re-attached be sure to use the original screws. Using different screws could lead to malfunction 5. Attach the arm to the monitor with four screws. Stand cover 3. Being careful not to damage the monitor, spread out a soft cloth and lay the monitor on it display-side down. Information The screws used to attach the arm should be M4 screws with a length of 4 mm ~ 6 mm protruding from the surface to be attached. Using different screws could lead to malfunction or may lead to the monitor falling off, internal damaged, personal injuly. 4 ~ 6 mm Screw used to attach arm Arm Part of monitor to which arm is attached 6. Connect the AC adapter to the monitor's power terminal. 24
-
 1
1 -
2
-
3
-
4
-
5
-
6
-
7
-
8
-
9
-
10
-
11
-
12
-
13
-
14
-
15
-
16
-
17
-
18
-
 19
19 -
 20
20 -
 21
21 -
 22
22 -
 23
23 -
 24
24 -
 25
25 -
 26
26 -
 27
27 -
 28
28 -
 29
29 -
30
-
31
-
32
-
33
-
34
-
35
-
36
-
37
-
38
-
39
-
40
-
41
-
42
-
43
-
44
-
45
-
46
-
47
-
48
-
49
-
50
-
51
-
52
-
53
-
54
-
55
-
56
-
57
-
58
-
59
-
60
-
61
-
62
-
63
-
64
-
65
-
66
-
67
-
68
-
69
-
70
-
71
-
72
-
73
-
74
-
75
-
76
-
77
-
78
-
79
-
80
-
81
-
82
-
83
-
84
-
85
-
86
-
87
-
88
-
89
-
90
-
91
-
92
-
93
-
94
-
95
-
96
-
97
-
98
-
99
-
100
-
101
-
102
-
103
-
104
-
105
-
106
-
107
-
108
-
109
-
110
-
111
-
112
-
113
 |
 |
