Sharp PG-D120U PG-D120U Operation Manual - Page 6
Operating the Wireless Mouse Remote Control - lcd projector
 |
UPC - 074000347502
View all Sharp PG-D120U manuals
Add to My Manuals
Save this manual to your list of manuals |
Page 6 highlights
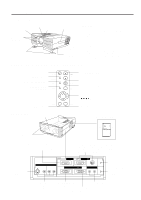
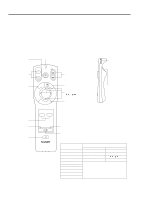
Operating the Wireless Mouse Remote Control The functions of your personal computer's mouse have been built into the remote control enabling you to operate your projector and personal computer with only the remote control. 1. Slide the main power switch on the side of the unit on. 2. Press the POWER ON button on the front panel of the remote control to turn the projector power on. 3. When using the remote control as a wireless mouse, move the MOUSE/ADJUSTMENT sliding switch to the MOUSE position. When using the remote control to operate the projector, move the MOUSE/ADJUSTMENT sliding switch to the ADJ. position. To activate the remote control key back-light feature, press the LIGHT button on the remote control. The colors of the buttons will change as shown in the table at the bottom of this page. Wireless Mouse Remote Control FRONT VIEW MUTE button TRANSMIT indicator POWER ON/OFF buttons E-ZOOM button ON VOL MUTE OFF E-ZOOM E-Z LASER/ MENU MN SIDE VIEW ON VOLUME UP-DOWN buttons LASER POINTER/MENU button R/C OFF Main power switch of REMOTE CONTROL Note: When transporting the remote control, turn off the main power switch to avoid draining the batteries. LEFT-CLICK button MOUSE/ADJUSTMENT buttons INPUT SELECT buttons MOUSE label LIGHT button Using the remote control in a dark room • Press the LIGHT button to turn on the back-lights for the operation buttons for about 10 seconds. The back-light colors are explained in the table to the right. R-CLICK/ENTER INPUT SELECT VIDEO DATA MOUSE ADJ. LIGHT LCD PROJECTOR E-6 RIGHT-CLICK/ENTER button Remote control handling precautions ADJ. label • The laser beam used in this product is harmless when directed onto the skin, however please be careful not to project the beam directly into the eyes. Do not stare into the beam using any optical instrument. • Do not expose the remote control to shocks, liquids or high humidity. The remote control may not operate normally if exposed to direct sunlight or other intense light sources. Should this happen, reposition the light source or the LCD Projector. MOUSE/ADJUSTMENT switch When you change the setting of the MOUSE/ADJUSTMENT switch, the functions of certain buttons on the remote control change. You can tell which function the button currently possesses by the color of its back-light display. Button name LASER POINTER/MENU RIGHT-CLICK/ENTER MOUSE/ADJUSTMENT LEFT-CLICK POWER ON/OFF VOLUME UP-DOWN MUTE E-ZOOM VIDEO DATA Position of MOUSE/ADJUSTMENT Switch MOUSE LASER POINTER (GREEN) ADJ. MENU (RED) RIGHT-CLICK (GREEN) ENTER (RED) MOUSE (NOT LIT) ADJ. / , / (NOT LIT) Yes (NOT LIT) --- Yes (RED) If the main power switch on the remote contol is left on and the remote control is not used for ten or more minutes, the energy save mode will activate and turn off the power. When in this state, any button operation exceding one second will reactivate the power.
-
 1
1 -
 2
2 -
 3
3 -
 4
4 -
 5
5 -
 6
6 -
 7
7 -
 8
8 -
 9
9 -
 10
10 -
 11
11 -
 12
12 -
13
-
14
-
15
-
16
-
17
-
18
-
19
-
20
-
21
-
22
-
23
-
24
-
25
-
26
-
27
-
28
-
29
-
30
-
31
-
32
-
33
-
34
-
35
-
36
-
37
-
38
 |
 |
