Singer 1 One Instruction Manual 34 - Page 10
looper, cover, remove, cylinder, replace, thread, machine
 |
View all Singer 1 One manuals
Add to My Manuals
Save this manual to your list of manuals |
Page 10 highlights
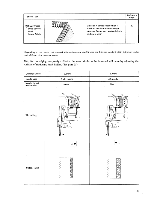
• How to open looper cover bl SINGER C) Push the cover to the right as far as it will go and 0 Pull cover down toward you. • 11 I I I - --I I I I 14, - - 11,1 1 II I 11 J) * Be sure looper cover is closed when sewing. • How to remove cylinder cover To replace cover 0 e 40 ), 0 4l* Tab A Throat plate 0 While pulling the cylinder cover to the left, 0 Lift cover upward and off the machine. 0 Place tab A under the throat plate. 0 Press cover downward to the right. * Do not hold the cylinder cover when lifting or carrying the machine. • How to thread the machine To thread the machine correctly, simply follow the steps on the following pages making reference to the threading chart on the inner side of the looper cover showing the threading paths in different colors. 8
-
 1
1 -
2
-
3
-
4
-
 5
5 -
 6
6 -
 7
7 -
 8
8 -
 9
9 -
 10
10 -
 11
11 -
 12
12 -
 13
13 -
 14
14 -
 15
15 -
16
-
17
-
18
-
19
-
20
-
21
-
22
-
23
-
24
-
25
-
26
-
27
-
28
-
29
-
30
-
31
-
32
-
33
-
34
-
35
-
36
-
37
-
38
-
39
-
40
 |
 |
