Singer 1 One Instruction Manual 34 - Page 14
knife
 |
View all Singer 1 One manuals
Add to My Manuals
Save this manual to your list of manuals |
Page 14 highlights
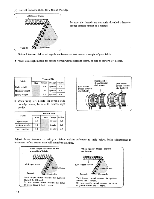
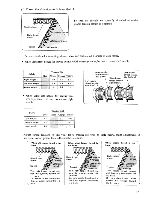
(3a) Thread the right needle for standard 3.5mm stitch width 0 • • To thread the right needle Thread right needle thread in the order 0 8 ot as shown. (Green thread oath) For easy thread- ing of needle 0 , set movable knife in non-operating position. CD 2 While holding thread with finger wrap thread around tension disk clockwise till caught in hook and pull 6 thread down to mark cert- ain it is properly locat- ed in between the tension tt discs. 3 4 2 0 0 0 • Lower needle bar when threading ® and ©. 0 • Use tweezers to thread needle eye 0. SINGER • Draw about 5cm (2 inches) of thread from needle eye. 5cm 1 (2 inches) Or (3b) Thread the left needle for 5.7mm width (blue path)(page 12) • 0 Thread left needle thread in the order 0 to ® as shown. (Blue thread path) For easy threading of needle C), set movable knife in non-operating position. (See page 21 for setting movable knife to non-operating position) While holding thread with finger wrap thread around tension disk clockwise till caught in hook and pull thread down to mark cert- ain it is properly locat- ed in between the tension discs. 6 2 3 4 2 3 ,® III • Lower needle bar when threading C) and . 7 O • Use tweezers to thread 1110 needle eye ® . sit4GER C Ii • Draw about 5cm (2 inches) of thread from needle eye. 5cm (2 inches) 12
-
 1
1 -
2
-
3
-
4
-
5
-
6
-
7
-
8
-
 9
9 -
 10
10 -
 11
11 -
 12
12 -
 13
13 -
 14
14 -
 15
15 -
 16
16 -
 17
17 -
 18
18 -
 19
19 -
20
-
21
-
22
-
23
-
24
-
25
-
26
-
27
-
28
-
29
-
30
-
31
-
32
-
33
-
34
-
35
-
36
-
37
-
38
-
39
-
40
 |
 |
