Singer 1 One Instruction Manual 34 - Page 19
sewing
 |
View all Singer 1 One manuals
Add to My Manuals
Save this manual to your list of manuals |
Page 19 highlights
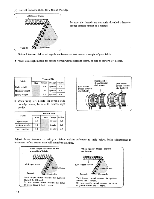
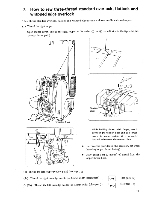
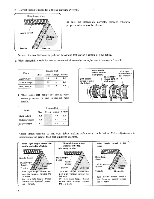
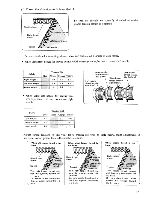
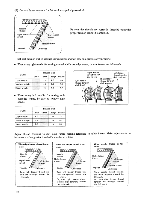
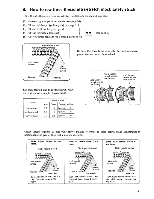
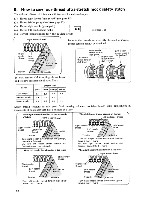
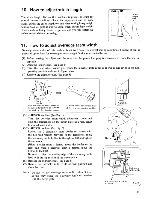
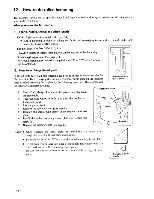
(5) Correct thread tensions for 3-thread flatlock. Needle thread Right looper thread Topside Be sure the threads are correctly threaded otherwise proper tension cannot be obtained. Needle thread Left looper thread Underside Set each tension dial to settings shown below and test sew on a sample of your fabric. • When using right needle for sewing normal width overedge seams, be sure to remove left needle. Fabric Light weight Medium weight Heavy weight Blue Tension Dial Green Orange Yellow 1.0 4.0 6.0 1.0 3.5 6.0 1.0 4.5 7.0 • When using left needle for sewing wide overedge seams, be sure to remove right needle. Right needle thread tension dial (green) Right looper Left looper thread tension dial (yellow) Left needle thread tension thread tension dial (orange) dial (blue) 2 /.4 3 2 3 3 2 4 Fabric Light weight Medium weight Heavy weight Blue 1.0 1.0 1.0 Tension Dial Green Orange Yellow 3.0 6.0 3.0 6.5 3.0 7.5 Adjust thread tensions to suit your fabric making reference to table below. Make adjustments in increments of no greater than half a number at a time. When left looper thread is too loose. When right looper thread is too loose. When needle thread is too loose. Right looper thread Topside Needle thread Left looper thread Turn left looper thread tension dial (yellow) toward the (+) mark. Or, needle thread tension dial (blue or green) toward the (-) mark. Right looper thread Needle thread Left looper Topside thread Underside Turn right looper thread ten- sion dial (orange) toward the (+) mark. Or, turn needle thread tension dial (blue or green) toward the (-) mark. Right looper thread \ Needle ► thread Left looper Topside thread Underside Turn needle thread tension dial (blue or green) toward the (+) mark. Or, turn right looper thread tension dial (orange) toward the (-) mark. 17
-
 1
1 -
2
-
3
-
4
-
5
-
6
-
7
-
8
-
9
-
10
-
11
-
12
-
13
-
 14
14 -
 15
15 -
 16
16 -
 17
17 -
 18
18 -
 19
19 -
 20
20 -
 21
21 -
 22
22 -
 23
23 -
 24
24 -
25
-
26
-
27
-
28
-
29
-
30
-
31
-
32
-
33
-
34
-
35
-
36
-
37
-
38
-
39
-
40
 |
 |
