Singer 1 One Instruction Manual 34 - Page 30
Three, thread, flatlock, stitch
 |
View all Singer 1 One manuals
Add to My Manuals
Save this manual to your list of manuals |
Page 30 highlights
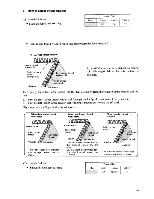
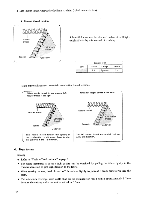
17. Three-thread flatlock stitch Flatlock stitch can be used for various applications. Preparation • Use ordinary overedge throat plate. • Use left or right needle. • The right looper thread forms the decorative stitch, therefore fine and unobtrusive threads should be used for the needle and left looper. Example: Right looper thread Left looper thread Needle thread Stitch length woolly nylon or decorative thread extra fine extra fine 2-3 Note: If heavy thread such as pearl cotton is used in the right looper, you should skip the 2nd thread guide C) as shown on page 15. 1. Set thread tensions to normal sewing condition for 1 needle, 3 thread overedge stitch and make a test sample. (See page 16) Needle thread (green dial) • When making above adjustment, the right looper thread tension should be adjusted as light as possible. Right looper thread (orange dial) Left looper thread (yellow dial) • Make a test sample with two ply fabric. 2. Turn left looper thread tension dial (yellow) toward (1-) mark so that the right looper thread Topside Needle thread (green dial) Underside will come as close as possible to the needle thread as shown in figure 1. 3. Turn needle thread tension dial (green) toward (-) mark so that right looper thread, left looper thread and needle thread will all come to the edge of Needle thread fabric as shown in figure 2. 4. Open looper cover. 5. Turn hand wheel toward you to bring movable knife to its lowest position and place it in the nonoperating position. (See page 21) 6. Attach edge guide to machine. Right looper thread Topside Needle thread Left looper thread Underside 7. Fold fabric in half with the wrong sides together. 8. Place fabric under the foot with the fold resting against the wall of edge guide. Adjust edge guide so that it is positioned in the center of the seam width as shown in the sketch. 9. When stitching is completed, unfold fabric and press the stitching from the underside of the fabric. Topside Topside 1 Underside 18. Two-thread flatlock stitch You can also flatlock with the 2-thread overedge stitch. Set tension as shown on page 14. Heavy decorative threads such as pearl cotton are not suggested for 2-thread flatlocking. 28
-
 1
1 -
2
-
3
-
4
-
5
-
6
-
7
-
8
-
9
-
10
-
11
-
12
-
13
-
14
-
15
-
16
-
17
-
18
-
19
-
20
-
21
-
22
-
23
-
24
-
 25
25 -
 26
26 -
 27
27 -
 28
28 -
 29
29 -
 30
30 -
 31
31 -
 32
32 -
 33
33 -
 34
34 -
 35
35 -
36
-
37
-
38
-
39
-
40
 |
 |
