Sony BDV-IS1000/C Operating Instructions - Page 55
Inserting the external memory, Press, to turn the system off.
 |
View all Sony BDV-IS1000/C manuals
Add to My Manuals
Save this manual to your list of manuals |
Page 55 highlights
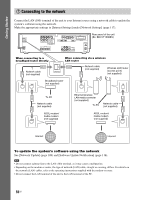
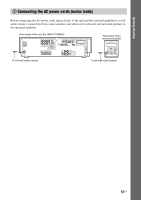
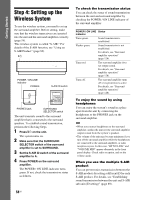
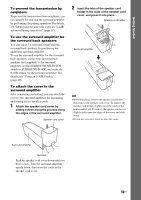
Getting Started 6 Inserting the external memory Insert the external memory (local storage) (not supplied: USM1GH (as of April 2008)) into the EXTERNAL slot. By connecting an external memory, you can enjoy additional contents (BonusView) depending on the disc. Rear panel of the unit (Ex. BDV-IT1000ES) LAN(100) COMPONENT VIDEO OUT VIDEO OUT Y PB/ PR/ CB CR VIDEO S-VIDEO Y PB / CB PR / CR SAT/CABLE COMPONENT VIDEO IN DC5V 500mA MAX EXTERNAL FRONT R SPEAKER FRONT L CENTER WOOFER HDMI IR REMOTE TV OPTICAL SAT/CABLE DIGITAL IN OUT IN IN 1 IN 2 COAXIAL OUT TV AUDIO IN R L A.CAL MIC ECM-AC2 R L AUDIO VIDEO SAT/CABLE IN DMPORT DC5V 700mA MAX EZW-RT10 ANTENNA 75 COAXIAL FM AM USM1GH (as of April 2008) DC5V EXTER50N0mAALMAX With the terminal side up Note • Insert the external memory in the V direction into the EXTERNAL slot as far as it will go. • Check that "EXT" lights up in the front panel display when turning the system on. To enjoy BonusView See "Enjoying BonusView" (page 69). To remove the external memory 1 Press "/1 to turn the system off. 2 Pull out the external memory from the EXTERNAL slot. Note • Insert the external memory straight. If you force the external memory into the slot, this will cause damage to both the external memory and the unit. • Keep the external memory away from small children to prevent them from accidentally swallowing the external memory. • Do not apply too much pressure to the external memory in the slot, as it may cause a malfunction. • Use the USM1GH (as of April 2008) external memory only. • To avoid data corruption or damage to the external memory, turn the system off when inserting or removing the external memory. • Do not insert the external memory that contains photo or music files to avoid corrupting the external memory data. 55US
-
 1
1 -
2
-
3
-
4
-
5
-
6
-
7
-
8
-
9
-
10
-
11
-
12
-
13
-
14
-
15
-
16
-
17
-
18
-
19
-
20
-
21
-
22
-
23
-
24
-
25
-
26
-
27
-
28
-
29
-
30
-
31
-
32
-
33
-
34
-
35
-
36
-
37
-
38
-
39
-
40
-
41
-
42
-
43
-
44
-
45
-
46
-
47
-
48
-
49
-
 50
50 -
 51
51 -
 52
52 -
 53
53 -
 54
54 -
 55
55 -
 56
56 -
 57
57 -
 58
58 -
 59
59 -
 60
60 -
61
-
62
-
63
-
64
-
65
-
66
-
67
-
68
-
69
-
70
-
71
-
72
-
73
-
74
-
75
-
76
-
77
-
78
-
79
-
80
-
81
-
82
-
83
-
84
-
85
-
86
-
87
-
88
-
89
-
90
-
91
-
92
-
93
-
94
-
95
-
96
-
97
-
98
-
99
-
100
-
101
-
102
-
103
-
104
-
105
-
106
-
107
-
108
-
109
-
110
-
111
-
112
-
113
-
114
-
115
-
116
-
117
-
118
-
119
-
120
-
121
-
122
-
123
-
124
-
125
-
126
-
127
-
128
-
129
-
130
-
131
-
132
-
133
-
134
-
135
-
136
-
137
-
138
-
139
-
140
-
141
-
142
-
143
-
144
-
145
-
146
-
147
-
148
-
149
-
150
-
151
-
152
-
153
-
154
-
155
 |
 |
