Sony BDV-IS1000/C Operating Instructions - Page 61
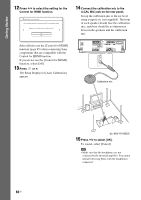
Press, to select the setting that, matches your TV type., The Setup Display for the [Control - problems
 |
View all Sony BDV-IS1000/C manuals
Add to My Manuals
Save this manual to your list of manuals |
Page 61 highlights
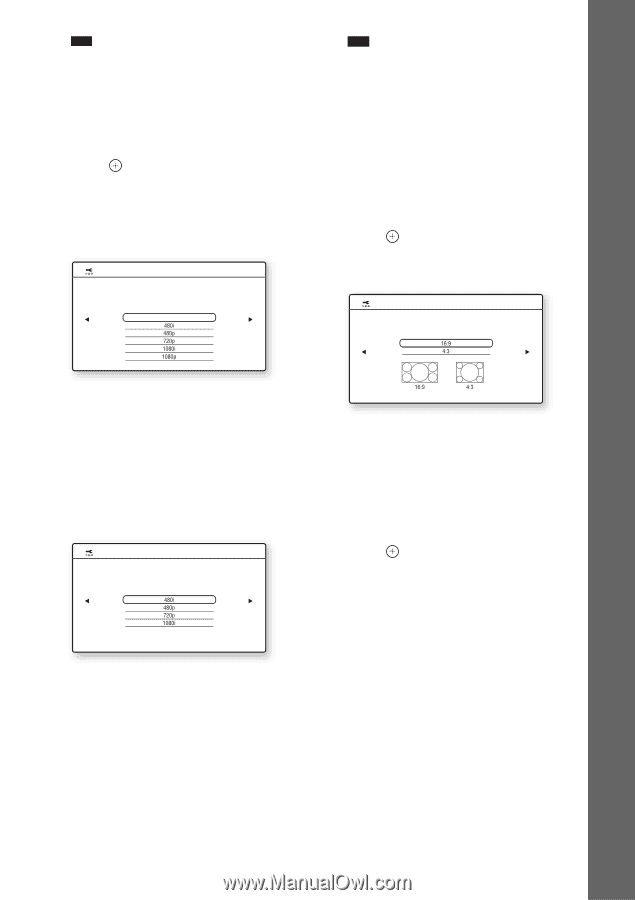
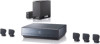
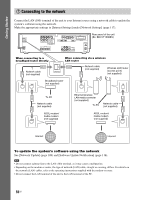
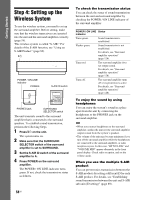
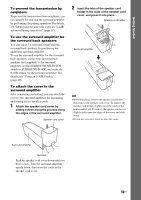
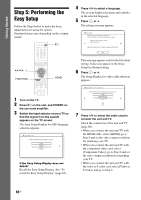
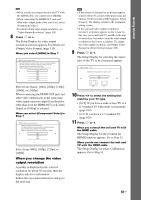
Getting Started Note • When you do not connect the unit and TV with the HDMI cable, you cannot select [HDMI]. • When connecting the HDMI OUT jack and other video output jacks at the same time, select [Component Video]. • For details about video output resolution, see "Video Output Resolution" (page 134). 8 Press or c. The Setup Display for video output resolution selection appears. For details, see [Output Video Format] (page 110). When you select [HDMI] in Step 7 Easy Setup - HDMI Resolution Select the resolution to output to the TV. "Auto" is the standard selection. The video switches for 30 seconds when this setting is changed. Check that there are no problems with the video. Nothing is displayed on the screen if the resolution is incorrect. Auto Note • If the picture is distorted or no picture appears, wait for about 30 seconds without pressing any buttons. [Is this resolution OK?] appears. Select [Cancel]. The display returns to the resolution setting screen. • If the selected video output resolution is incorrect, no picture appears on the screen. In this case, press and hold H and A on the unit for more than 5 seconds to reset the video output resolution to the lowest resolution. To change the video output resolution, set [Output Video Format] in [Video Settings] (page 109). 9 Press or c. The Setup Display for selecting the aspect ratio of the TV to be connected appears. Easy Setup - TV Type Select the screen aspect ratio to match your TV. Select from [Auto], [480i], [480p], [720p], [1080i], or [1080p]. When connecting the HDMI OUT jack and other video output jacks at the same time, video signals may not output from the jacks, other than from the HDMI OUT jack, when [Auto] or [1080p] is selected. When you select [Component Video] in Step 7 Easy Setup - Component Resolution Select the resolution to output to the TV. The video switches for 30 seconds when this setting is changed. Check that there are no problems with the video. Nothing is displayed on the screen if the resolution is incorrect. Select from [480i], [480p], [720p], or [1080i]. When you change the video output resolution A picture is displayed in the selected resolution for about 30 seconds, then the display asks for confirmation. Follow the on-screen instructions and go to the next step. 10 Press X/x to select the setting that matches your TV type. • [16:9]: If you have a wide-screen TV or a 4:3 standard TV with a wide-screen mode. (page 109) • [4:3]: If you have a 4:3 standard TV. (page 109) 11 Press or c. When you connect the unit and TV with the HDMI cable The Setup Display for the [Control for HDMI] function appears. Go to Step 12. When you do not connect the unit and TV with the HDMI cable The Setup Display for [Auto Calibration] appears. Go to Step 14. 61US
-
 1
1 -
2
-
3
-
4
-
5
-
6
-
7
-
8
-
9
-
10
-
11
-
12
-
13
-
14
-
15
-
16
-
17
-
18
-
19
-
20
-
21
-
22
-
23
-
24
-
25
-
26
-
27
-
28
-
29
-
30
-
31
-
32
-
33
-
34
-
35
-
36
-
37
-
38
-
39
-
40
-
41
-
42
-
43
-
44
-
45
-
46
-
47
-
48
-
49
-
50
-
51
-
52
-
53
-
54
-
55
-
 56
56 -
 57
57 -
 58
58 -
 59
59 -
 60
60 -
 61
61 -
 62
62 -
 63
63 -
 64
64 -
 65
65 -
 66
66 -
67
-
68
-
69
-
70
-
71
-
72
-
73
-
74
-
75
-
76
-
77
-
78
-
79
-
80
-
81
-
82
-
83
-
84
-
85
-
86
-
87
-
88
-
89
-
90
-
91
-
92
-
93
-
94
-
95
-
96
-
97
-
98
-
99
-
100
-
101
-
102
-
103
-
104
-
105
-
106
-
107
-
108
-
109
-
110
-
111
-
112
-
113
-
114
-
115
-
116
-
117
-
118
-
119
-
120
-
121
-
122
-
123
-
124
-
125
-
126
-
127
-
128
-
129
-
130
-
131
-
132
-
133
-
134
-
135
-
136
-
137
-
138
-
139
-
140
-
141
-
142
-
143
-
144
-
145
-
146
-
147
-
148
-
149
-
150
-
151
-
152
-
153
-
154
-
155
 |
 |