Sony CCD-FX311 Primary User Manual - Page 15
Start/stop
 |
View all Sony CCD-FX311 manuals
Add to My Manuals
Save this manual to your list of manuals |
Page 15 highlights
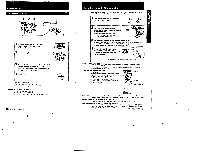
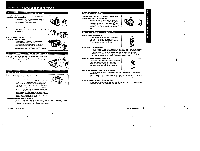
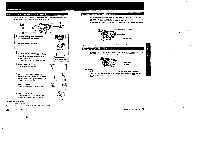
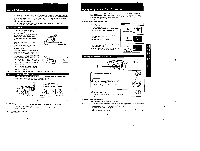
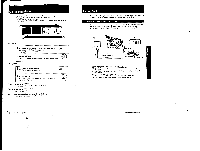
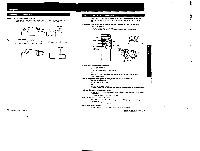
Camera Recording Inserting a Scene in the Middle of a Recorded Tape You can insert a scene in the middle of a recorded tape by setting the starting point and ending point. A previously recorded portion will be erased. 3,5 4 • 00'I 6 1 Press the smell green button and slide the POWER switch to CAMERA. 2 Set the STANDBY switch up. 1 EMIL, or 7111 0 E 3 While looking in the viewfinder, keep pressing the ♦ or - side of EDITSEARCH and release the button where you want to end the insertion. The camcorder enters the standby mode again. 4 Press COUNTER RESET. 0U The counter is reset to zero. START/STOP eonMM. -Kt o g 5 While looking in the viewfinder, keep pressing the - side of EDITSEARCH and release the button at the point where you went to start the Insertion. 6 Press ZERO MEM. The insert ending point rs stored in memory. ♦ Eorr SEARCH -tg.) 7 Press START/STOP. Insert recording begins The insert recording stops automatically at the counter zero poMt To cancel the ZERO MEM Press ZERO MEM. Note The picture may be distorted el the ending point sof plaved back. • Recording with an External Microphone You can connect an external microphone Mot supplied) to the MIC jack. This lack also accepts a "plug-in-power" microphone Attach the microphone to the accessory shoe ci the camcorder. If the microphone has toe Plugs, connect the DC IN plug to the RFU DC OUT lack on the camcorder. ACCMIGIY shoo MIC jaCk RFU DC OUT leek Note When recording nth an external microphone, wind noise is not muted. Connecting a Wired Remote Control Unit When you connect a wired remote control unit or editing controller (not supplied) to the e REMOTE control connector, you can operate your camcorder from a distance. at REMOTE control connecter • About It (LANG) stands tot Local Application Control Bus System. The 4 connector is used for controlling the tape transport of video equipment and peripherals connected to it This connector has the same !unction as the connectors indicated as CONTROL L or REMOTE. 29 Advanced Camera Operation
-
 1
1 -
2
-
3
-
4
-
5
-
6
-
7
-
8
-
9
-
 10
10 -
 11
11 -
 12
12 -
 13
13 -
 14
14 -
 15
15 -
 16
16 -
 17
17 -
 18
18 -
 19
19 -
 20
20 -
21
-
22
-
23
-
24
-
25
-
26
-
27
 |
 |
