Sony CCD-FX311 Primary User Manual - Page 4
Charging, Installing, Battery, tiawr, IlltillIVIk
 |
View all Sony CCD-FX311 manuals
Add to My Manuals
Save this manual to your list of manuals |
Page 4 highlights
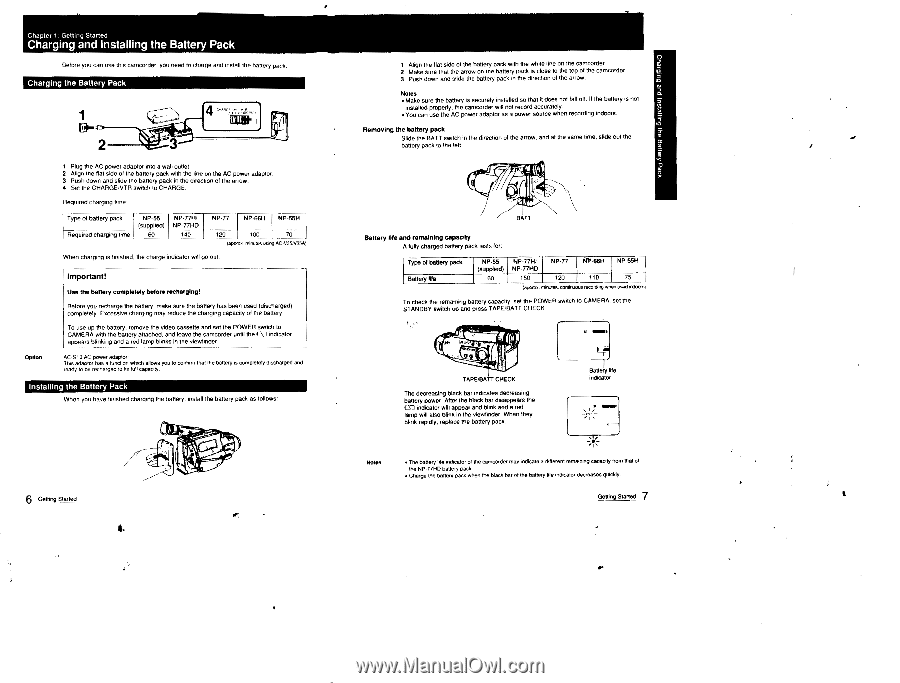
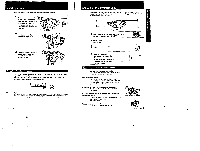
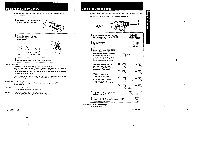
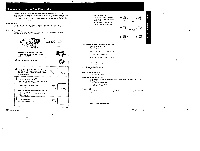
• Chapter I Getting Started Charging and Installing the Battery Pack Before you can use this camcorder, you need to charge and install the battery peck Charging the Battery Pack 1 6 2 BIM 3 1 Plug the AC power adaptor into a wall outlet. 2 Align the flat ode of the battery pack with the line on the AC power adaptor 3 Push donor and slide the battery pack In the daemon& the arrow. 4 Set the CHARGEVTR switch to CHARGE. Required charging time Type of battery pack Required charging time NP-55 (supplied) 60 NP-77H/ NP-77HD 140 NP.77 NP-66H NP-55H 120 100 70 tapPor minutes or, AC-V35..V35A, When charging is finished, the charge indicator will go out. Option Important! Use the battery completely before recharging! Before you recharge the battery, make sure the battery has been used (discharged) compietely. EKG°Salve charging may reduce the charging capacity of the battery. To use up the battery. remove the video cassette and set the POWER switch to CAMERA with the battery attached. and leave the camcorder until the CCI indicator appears blinking and a red lamp blinks In the viewlInder. AC.S10 AC power edwnw: Ibis adaptor has a function which allows you to confirm Pat the battery is completely discharged and ready to he recharged To Its full cape.), Installing the Battery Pack When you have finished charging the battery. install the battery pack as follows: '1011tio; 6 Getting Staged 1 Align the flat side of the battery pack with the white line on the camcorder. 2 Make sure that the arrow on the battery pack is close to the lop of the camcorder. 3 Push down and aide the battery pack in the direction of the arrow. Notes Make sure to battery hi securely installed so that it does not fall oft the batterynot installed properly. the camcorder will net mooed accurately. • You can use the AC power adaptor age power source when retarding indoors. Removing the battery pack Slide the BATT switch In the direction of the arrow, and at the same tune slide tot the battery pack to the left. BATT Battery life and remaining capacity A fully charged battery pack lasts for. Type of battery peck Battery life NP-55 (supplied) 60 NP-7761 NP.77HD NP.77 tat soh NP-55H 150 120 75 Ismer minutes continuous recording when used ind0015) To check the remaining battery capacity, set the POWER switch to CAMERA set the STANDBY switch up and press TAPE/BATT CHECK i C IltlitailwlIrVIk,) TAPE/BATT CHECK The decreasing black bar indicates decreasing battery power After the black bar disappears the al indicator will appear and blink and a red lamp will also blink in the viewfinder. When they blink rapidly, replace the battery pack. Battery la indicate Mee Notes • The loamy lie indicator or the camcorder may indicate • different remaining cepeon anew, c4 the NP-77HD batten pack. cow, toe bed's,' pack when the Heck bee elms battery U.Indicator &cream wieldy. 7 Getting Started
-
 1
1 -
 2
2 -
 3
3 -
 4
4 -
 5
5 -
 6
6 -
 7
7 -
 8
8 -
 9
9 -
 10
10 -
11
-
12
-
13
-
14
-
15
-
16
-
17
-
18
-
19
-
20
-
21
-
22
-
23
-
24
-
25
-
26
-
27
 |
 |