Sony CDX-M600 Operating Instructions - Page 22
Adjusting the volume of, the subwoofers - diagram
 |
View all Sony CDX-M600 manuals
Add to My Manuals
Save this manual to your list of manuals |
Page 22 highlights
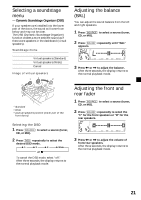
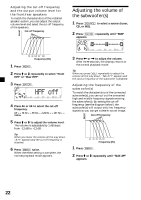
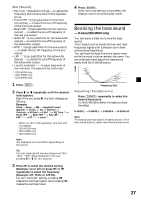
Level Adjusting the cut-off frequency and the output volume level for the front/rear speakers To match the characteristics of the installed speaker system, you can adjust the output volume level and select the cut-off frequency of the speakers. Cut-off frequency Adjusting the volume of the subwoofer(s) 1 Press (SOURCE) to select a source (tuner, CD, or MD). 2 Press (SOUND) repeatedly until "SUB" appears. Frequency (Hz) 1 Press (MENU). 2 Press M or m repeatedly to select "Front HPF" or "Rear HPF" 3 Press (ENTER). 4 Press < or , to select the cut-off frequency. off y 78 Hz y 99 Hz y 125 Hz y 157 Hz y 198 Hz 5 Press M or m to adjust the volume level. The volume is adjustable by 1 dB steps from -12 dB to +12 dB. Tip When you lower the volume all the way down, "ATT" appears and the cut-off frequency is disabled. 6 Press (MENU) twice. When the effect setting is complete, the normal playback mode appears. 3 Press < or , to adjust the volume. After three seconds, the display returns to the normal playback mode. Tip When you press (VOL) repeatedly to adjust the volume all the way down, "Sub ATT" appears and the cutout frequency of the subwoofer is disabled. Adjusting the frequency of the subwoofer(s) To match the characteristics of the connected subwoofer(s), you can cut out the unwanted high and middle frequency signals entering the subwoofer(s). By setting the cut-off frequency (see the diagram below), the subwoofer(s) will output only low frequency signals so you can get a clearer sound image. Cut-off frequency Level 1 Press (MENU). Frequency (Hz) 2 Press M or m repeatedly until "SUB LPF" appears. 22
-
 1
1 -
2
-
3
-
4
-
5
-
6
-
7
-
8
-
9
-
10
-
11
-
12
-
13
-
14
-
15
-
16
-
 17
17 -
 18
18 -
 19
19 -
 20
20 -
 21
21 -
 22
22 -
 23
23 -
 24
24 -
 25
25 -
 26
26 -
 27
27 -
28
-
29
-
30
-
31
-
32
-
33
-
34
-
35
-
36
-
37
-
38
-
39
-
40
-
41
-
42
-
43
-
44
-
45
-
46
-
47
-
48
-
49
-
50
-
51
-
52
-
53
-
54
-
55
-
56
-
57
-
58
-
59
-
60
-
61
-
62
-
63
-
64
-
65
-
66
-
67
-
68
-
69
-
70
-
71
-
72
-
73
-
74
-
75
-
76
-
77
-
78
-
79
-
80
-
81
-
82
-
83
-
84
-
85
-
86
-
87
-
88
-
89
-
90
-
91
-
92
-
93
-
94
-
95
-
96
-
97
-
98
-
99
-
100
-
101
-
102
-
103
-
104
-
105
-
106
-
107
-
108
-
109
-
110
-
111
-
112
-
113
-
114
-
115
-
116
 |
 |
