Sony DCR-HC52 Operating Guide
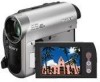
Sony DCR-HC52 - Handycam Camcorder - 680 KP Manual
 |
UPC - 027242727427
View all Sony DCR-HC52 manuals
Add to My Manuals
Save this manual to your list of manuals |
Sony DCR-HC52 manual content summary:
- Sony DCR-HC52 | Operating Guide - Page 1
11(1) Digital Video Camera Recorder Operating Guide DCR-HC52/HC54 Getting Started 11 Recording/ Playback 19 Using the Menu 29 Dubbing/Editing 44 Using a Computer 48 Troubleshooting 52 Additional Information 59 Quick Reference 69 Spanish Quick Guide/ Guía rápida en español 78 © 2008 Sony - Sony DCR-HC52 | Operating Guide - Page 2
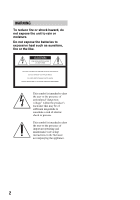
. Do not expose the batteries to excessive heat such as sunshine, fire or the like. This symbol is intended to alert the user to the presence of uninsulated intended to alert the user to the presence of important operating and maintenance (servicing) instructions in the literature accompanying the - Sony DCR-HC52 | Operating Guide - Page 3
battery power, or other sources, refer to the operating instructions. Polarization This set may be equipped with a polarized ac power cord (mains lead) plug (a plug having one blade wider than the other). This plug will fit into the power voltage points or short out parts that could result in a fire - Sony DCR-HC52 | Operating Guide - Page 4
antenna or cable system. This will prevent damage to the set due to lightning and power-line surges. Service Damage Requiring Service Unplug the servicing to qualified service personnel. Replacement parts When replacement parts are required, be sure the service technician has used replacement parts - Sony DCR-HC52 | Operating Guide - Page 5
Lithium-Ion batteries. Battery pack This device complies with Part 15 Owner's Record The model and serial numbers are located on the bottom. Record the serial number in the space provided below. Refer to these numbers whenever you call your Sony dealer regarding this product. Model No. DCR-HC52/HC54 - Sony DCR-HC52 | Operating Guide - Page 6
the manuals supplied with your camcorder - "Operating Guide" (This manual) - For DCR-HC54 "First Step Guide" for connecting the camcorder to a computer and using the supplied software (stored on the supplied CD-ROM) Type of cassette you can use in your camcorder • You can use mini DV cassettes - Sony DCR-HC52 | Operating Guide - Page 7
of the LCD screen and the viewfinder used in this manual for illustration purposes are captured using a digital still camera, and therefore may appear different. • The illustrations used on this manual are based on the model DCR-HC54. The model name is indicated on the bottom of your camcorder - Sony DCR-HC52 | Operating Guide - Page 8
Read thid first (Continued) video cameras and offers a quality typical of a Carl Zeiss lens. * MTF stands for Modulation Transfer Function. The number value indicates the amount of light from a subject coming into the lens. 8 - Sony DCR-HC52 | Operating Guide - Page 9
44 Recording pictures from a VCR, etc 46 Using a Computer What you can do with Windows computer (DCR-HC54 48 Installing the "First Step Guide" and software (DCR-HC54 49 Viewing "First Step Guide" (DCRHC54 51 Troubleshooting Troubleshooting 52 Warning indicators and messages 57 Continued , 9 - Sony DCR-HC52 | Operating Guide - Page 10
Usable cassette tapes 60 About the "InfoLITHIUM" battery pack 61 About i.LINK 62 On using your camcorder 63 Specifications 66 Quick Reference Identifying parts and controls ....... 69 Indicators displayed during recording/playback 72 Index 75 Spanish Quick Guide/ Guía rápida en español 78 10 - Sony DCR-HC52 | Operating Guide - Page 11
item supplied. AC Adaptor (1) (p. 12) USB cable (1) (DCR-HC54) (p. 70) Rechargeable battery pack NP-FH30 (1) (p. 12, 61) Power cord (Mains lead) (1) (p. 12) A/V connecting cable (1) (p. 28, 44) CD-ROM "Handycam Application Software" (1) (DCR-HC54)(p. 48) Operating Guide (This manual) (1) Getting - Sony DCR-HC52 | Operating Guide - Page 12
down DC IN jack 4 To the wall outlet (wall socket) AC Adaptor Power cord (Mains lead) POWER switch You can charge the "InfoLITHIUM" battery pack (H series) (p. 61) after attaching it to your camcorder. b Notes • You cannot attach any "InfoLITHIUM" battery pack other than the H series to your - Sony DCR-HC52 | Operating Guide - Page 13
capacity (approx.) You can check the remaining battery charge on the LCD screen. Indicator Status Sufficient power remaining Battery low, recording/ playback will stop soon. Replace the battery with a fully charged one, or charge the battery. Charging time Approximate time (min.) required when - Sony DCR-HC52 | Operating Guide - Page 14
is worn-out (for Battery Info only). • The power will not be supplied from the battery as long as the AC Adaptor is connected to the DC IN jack of your camcorder, even when the power cord (mains lead) is disconnected from the wall outlet (wall socket). On the charging/recording/playback time • Times - Sony DCR-HC52 | Operating Guide - Page 15
if you leave your camcorder without any operation attempted for approximately 5 minutes, to save battery power ([A.SHUT OFF], p. 43). z Tips • The date and time are not displayed while recording, but they are automatically recorded on the tape, and can be displayed during playback (see page 34 for - Sony DCR-HC52 | Operating Guide - Page 16
Step 3: Turning the power on and setting the date and time (Continued) Changing the language setting You can change the on-screen displays to show messages in a specified language. Touch t [MENU] t (SETUP MENU) t [ LANGUAGE], then select the desired language. 16 - Sony DCR-HC52 | Operating Guide - Page 17
camcorder b Notes • Do not press the buttons on the LCD frame accidentally when you open or adjust the LCD panel. z Tips • If you rotate the LCD panel 180 degrees to the lens side, you can close the LCD panel with the LCD screen facing out. This is convenient during playback operations. • See [LCD - Sony DCR-HC52 | Operating Guide - Page 18
a Cassette You can use mini DV (p. 60). cassettes only 1 Slide and hold the OPEN/ EJECT lever in the direction of the arrow and open the lid. OPEN/EJECT lever Lid The cassette compartment automatically comes out and opens up. 2 Insert a cassette with its window facing outwards, then press - Sony DCR-HC52 | Operating Guide - Page 19
Recording/Playback (Easy Handycam) With this Easy Handycam operation, most of the camera settings are automatically optimally adjusted, which frees you from detailed adjustments. The screen font size increases for easy viewing. Open the lens cover (p. 17) A B Recording E DC 1 Slide the POWER - Sony DCR-HC52 | Operating Guide - Page 20
follows. If the POWER switch is set to OFF(CHG), slide it while pressing the green button. Touch , then touch to start playback. A D B C A GUIDE (p. 25) B Easy Handycam During Easy Handycam operation, the . (back light) button (p. 23) is unavailable. [Invalid during Easy Handycam operation - Sony DCR-HC52 | Operating Guide - Page 21
Recording/Playback Recording Open the lens cover (p. 17). POWER switch REC START/ STOP A REC START/STOP B Slide the POWER switch in the direction of the arrow repeatedly to turn on the CAMERA lamp. If the POWER switch is set to OFF(CHG), slide it while pressing the green button. Press REC START/ - Sony DCR-HC52 | Operating Guide - Page 22
power zoom lever, the operation sound of the power zoom lever may also be recorded. • You cannot change the zoom speed with the zoom buttons on the LCD frame. • The minimum possible distance between camcorder optional) if it is attached. • Adjust the focus manually ([FOCUS], p. 30) when it is hard to - Sony DCR-HC52 | Operating Guide - Page 23
To cancel the backlight function, press . (back light) again. Recording in mirror mode Open the LCD panel 90 degrees to the camcorder (1), then rotate it 180 degrees to the lens side (2). z Tips • A mirror-image of the subject appears on the LCD screen, but the image will be normal when recorded. 23 - Sony DCR-HC52 | Operating Guide - Page 24
/EDIT lamp. If the POWER switch is set to OFF(CHG), slide it while pressing the green button. Start playing back. Touch to rewind the tape to the desired point, then touch Play/Pause* toggles as you touch it to start playback. Stop Rewind/Fast forward * Playback automatically stops if pause is - Sony DCR-HC52 | Operating Guide - Page 25
Recording/Playback Using the guide functions (USAGE GUIDE) You can easily select the desired setting screens by using the guide functions (USAGE GUIDE). Your camcorder has 2 guide functions as shown below. SHOOT GUIDE: DISP GUIDE: Takes you to the setting screens related to recording. Enables - Sony DCR-HC52 | Operating Guide - Page 26
DISP FOCUS METER GUIDE MENU SCENE END will not work correctly when there is a blank section between recorded sections on the tape. z Tips • This operation is also available when the POWER switch is set to PLAY/EDIT. Searching manually . Reviewing the most recently recorded scenes (Rec review) - Sony DCR-HC52 | Operating Guide - Page 27
3 Select [EDITSEARCH] with / , then touch [EXEC]. 4 Select [ON] with / , then touch [EXEC] t . 60min STBY 0:00:00 EDIT GUIDE FN 5 Touch . The last 2 seconds (approx.) of the most recently recorded scene are played back. Then, your camcorder is set to standby. Recording/Playback 27 - Sony DCR-HC52 | Operating Guide - Page 28
of a TV or a VCR using the A/V connecting cable (1) or the A/V connecting cable with S VIDEO (2). Connect your camcorder to the wall outlet (wall socket) using the supplied AC Adaptor for this operation (p. 12). Refer also to the instruction manuals supplied with the devices to be connected. Device - Sony DCR-HC52 | Operating Guide - Page 29
POWER switch in the direction of the arrow repeatedly to turn on the respective lamp. CAMERA lamp: settings for recording on a tape PLAY/EDIT lamp: settings for viewing/editing 2 Touch the LCD screen to select the menu item. Unavailable items will menu items during Easy Handycam operation 1 Touch - Sony DCR-HC52 | Operating Guide - Page 30
functions during Easy Handycam operation are set to [MANUAL]. FOCUS You can adjust the focus manually. You can The minimum possible distance between camcorder and subject while maintaining sharp focus easier to focus on the subject by moving the power zoom lever towards T (telephoto) to adjust the - Sony DCR-HC52 | Operating Guide - Page 31
If you set [SPOT METER], [EXPOSURE] is automatically set to [MANUAL]. DISP GUIDE (Display Guide)* See page 73. MENU See page 37. SCENE SEL. You clearly. This setting also prevents your camcorder from focusing on glass or metal mesh in windows between the camcorder and the subject. PORTRAIT (Soft - Sony DCR-HC52 | Operating Guide - Page 32
. Adjust the brightness when the subject is too bright or too dark. 60min STBY 0:00:00 OK AUTO EXPOSURE 1 MANU- AL 2 1 Touch [MANUAL]. appears. 2 Adjust the exposure by touching / . To return the setting to automatic exposure, touch [AUTO]. [PAGE2] FADER You can add the following effects - Sony DCR-HC52 | Operating Guide - Page 33
- Under video lamps in a studio, or under sodium lamps or incandescent-like color lamps ONE PUSH ( ) The white balance will be adjusted is canceled. z Tips • If you have changed the battery pack while [AUTO] was selected, or taken your camcorder outdoors after inside use with the [EXPOSURE] set (or - Sony DCR-HC52 | Operating Guide - Page 34
LCD screen. The recorded picture will not be affected by this operation. Adjust the brightness with / . When the PLAY/EDIT lamp lights up You can use the video operation buttons ( / / / ) on every PAGE. [PAGE1] MENU See page 37. VOL* (Volume) See page 24. END SCH (END SEARCH) See page 26. DISP GUIDE - Sony DCR-HC52 | Operating Guide - Page 35
will not be output from the A/V Remote Connector. Check the picture on the LCD screen or the viewfinder. • You can only record additional audio over a tape recorded on your camcorder. The sound may deteriorate when you dub audio on a tape recorded on other camcorders (including other DCR-HC52/HC54 - Sony DCR-HC52 | Operating Guide - Page 36
the new sound (ST2), then touch [EXEC]. b Notes • The original sound (ST1) is output at the default setting. REC CTRL (Recording control) See page 46. LCD BRT (LCD bright) See page 34. 36 - Sony DCR-HC52 | Operating Guide - Page 37
z z AUTO SETUP MENU menu (p. 42) USB STREAM (DCR-HC54) z z OFF LANGUAGE z z z DEMO MODE z - ON OTHERS menu (p. 43) WORLD TIME z z -* A.SHUT OFF z z 5min DISP OUT z z LCD GUIDEFRAME z - OFF * The value set before Easy Handycam operation will be retained during Easy - Sony DCR-HC52 | Operating Guide - Page 38
appear as an illustration with strong contrast. MOSAIC* Pictures appear mosaic-patterned. * Not available during playback. b Notes • Effects added to the playback pictures are not output via the DV Interface (i.LINK). Only the original pictures can be output. • You cannot add effects to externally - Sony DCR-HC52 | Operating Guide - Page 39
digitally. WIDE SEL (Wide select) You can record a picture in a ratio suitable for the screen on which it will be displayed. Refer also to the operating instructions not display LCD screen. or on the ON Displays and on the LCD screen, and enables the EDIT SEARCH function and Rec review (p. 26 - Sony DCR-HC52 | Operating Guide - Page 40
CAMERA SET menu ( (Continued) N.S.LIGHT (NightShot Light) When using the NightShot plus (p. 22) function to record, you can record clearer pictures by setting [N.S.LIGHT], which emits infrared light (invisible), to [ON] (the default setting). b Notes • Do not cover the infrared port with your - Sony DCR-HC52 | Operating Guide - Page 41
When you select [BRIGHT], battery life is slightly reduced during recording. LCD COLOR You can adjust the color on the LCD screen with / . The recorded picture will not be affected by this operation. b Notes • When you connect your camcorder to outside power sources, [BRIGHT] is automatically - Sony DCR-HC52 | Operating Guide - Page 42
STREAM (DCR-HC54) You can view the pictures displayed on the screen of your camcorder on your computer (USB Streaming) via the USB cable. See "First Step Guide" in the supplied CDROM for details (p. 51). LANGUAGE You can select the language to be used on the LCD screen. • Your camcorder offers [ENG - Sony DCR-HC52 | Operating Guide - Page 43
settings are marked with B. See page 29 for details on selecting menu items. WORLD TIME When using your camcorder abroad, you can set the time difference by touching / , the clock will be adjusted in accordance with the time difference. If you set the time difference to 0, the clock returns - Sony DCR-HC52 | Operating Guide - Page 44
/HDD recorders, using the A/V connecting cable (1), the A/V connecting cable with S VIDEO (2), or the i.LINK cable (3). Connect your camcorder to the wall outlet (wall socket) using the supplied AC Adaptor for this operation (p. 12). Refer also to the instruction manuals supplied with the devices to - Sony DCR-HC52 | Operating Guide - Page 45
input jack on the device. • When you connect a device via an A/V connecting cable, set [DISP OUT] to [LCD] (the default setting) (p. 43). 1 Prepare your camcorder for playback. Insert the recorded cassette. Slide the POWER switch repeatedly to turn on the PLAY/EDIT lamp. 2 Insert the recording media - Sony DCR-HC52 | Operating Guide - Page 46
to a VCR or an i.LINK-compatible device using the i.LINK cable (optional). Connect your camcorder to the wall outlet (wall socket) using the supplied AC Adaptor for this operation (p. 12). Refer also to the instruction manuals supplied with the devices to be connected. b Notes • You cannot record - Sony DCR-HC52 | Operating Guide - Page 47
VCR. The picture played on the connected device appears on the LCD screen of your camcorder. 6 Touch [REC START] at the point you want to start Notes • The indicator appears when you connect your camcorder and other devices via an i.LINK cable. (This indicator may also appear on the connected - Sony DCR-HC52 | Operating Guide - Page 48
your camcorder. 48 About "First Step Guide" The "First Step Guide" is an instruction manual you can refer to on your computer. This describes basic operations, from initial hookup of your camcorder and computer and making settings, to general operation the first time you use the software "Picture - Sony DCR-HC52 | Operating Guide - Page 49
Adaptor as the power source. Otherwise, the software will not work properly due to the power saving function of the PC. Installing the "First Step Guide" and software (DCR-HC54) You need to install the "First Step Guide" and software to your Windows computer before connecting your camcorder to the - Sony DCR-HC52 | Operating Guide - Page 50
Installing the "First Step Guide" and software (DCR-HC54) (Continued) 5 Select the desired language and the model name of your camcorder from the pull-down menu. 6 Click [FirstStepGuide(HTML)]. Installation starts. When [Save is complete] appears, click [OK] to finish the installation. To view the - Sony DCR-HC52 | Operating Guide - Page 51
" (DCR-HC54) To view "First Step Guide" on your computer, Microsoft Internet Explorer Ver.6.0 or later is recommended. Double-click the short-cut icon for your camcorder's "First Step Guide" on the desktop. z Tips • You can also start by selecting [Start] t [Programs] ([All Programs] for Windows XP - Sony DCR-HC52 | Operating Guide - Page 52
camcorder, use the following table to troubleshoot the problem. If the problem persists, disconnect the power source and contact your Sony dealer. • Overall operations/Easy Handycam ..... 52 • Batteries/Power sources 52 • LCD screen/viewfinder 53 • Cassette tapes 53 • Recording 54 • Playback - Sony DCR-HC52 | Operating Guide - Page 53
malfunction. These dots are not recorded. Cassette tapes The cassette cannot be ejected from the compartment. • Make sure the power source (battery pack or AC Adaptor) is connected correctly (p. 12). • Moisture condensation has occurred inside the camcorder (p. 63). Troubleshooting Continued , 53 - Sony DCR-HC52 | Operating Guide - Page 54
Troubleshooting (Continued) The Cassette Memory indicator or title display does not appear while using a cassette with Cassette Memory. • This camcorder does not support Cassette Memory, so the indicator does not appear. The remaining tape indicator is not displayed. • Set [ REMAIN] to [ON] to - Sony DCR-HC52 | Operating Guide - Page 55
Your camcorder is not compatible with 4ch microphone recording. Dubbing/Editing/Connecting to other devices Time code and other information appear on the display of the connected device. • Set [DISP OUT] to [LCD] while connected with an A/V connecting cable (p. 43). Continued , 55 Troubleshooting - Sony DCR-HC52 | Operating Guide - Page 56
the (USB) jack on the computer. • Disconnect the cable from the computer and camcorder, restart the computer, then connect them again correctly. You cannot install the supplied software, "Picture Motion Browser," on a Macintosh computer. • You can install "Picture Motion Browser" only on a Windows - Sony DCR-HC52 | Operating Guide - Page 57
the power source. Reconnect it and operate your camcorder again. • Change the cassette. Press RESET (p. 70), and operate your camcorder again. E:61:ss / E:62:ss • Contact your Sony dealer or local authorized Sony service facility. Inform them of the 5-digit code, which starts from "E." E (Battery - Sony DCR-HC52 | Operating Guide - Page 58
Warning indicators and messages (Continued) Examples of warning messages If messages appear on the screen, follow the instructions. %Z Moisture condensation. Eject the cassette (p. 63) % Moisture condensation. Turn off for 1H. (p. 63) Z Reinsert the cassette. (p. 18) • Check if the cassette is - Sony DCR-HC52 | Operating Guide - Page 59
Additional Information Using your camcorder abroad Power supply You can use your camcorder in any country/region using the AC Adaptor supplied with your camcorder within the AC 100 V to 240 V, 50/60 Hz range. Use a commercially available AC plug adaptor [a], if necessary, depending on the design of - Sony DCR-HC52 | Operating Guide - Page 60
it to a tape in another video camera connected to your camcorder. x When you record You cannot record software on your camcorder that contains copyright control signals for copyright protection of software. [Cannot record due to copyright protection.] appears on the LCD screen, or on the viewfinder - Sony DCR-HC52 | Operating Guide - Page 61
the LCD screen or a frequent playback, fast forward or rewind operation wears out the battery pack faster. We recommend using a large capacity battery pack: NP-FH70/FH100 (optional). • Be sure to set the POWER switch to OFF(CHG) when not recording or playing back on your camcorder. The battery pack - Sony DCR-HC52 | Operating Guide - Page 62
cable. When connecting this unit to an i.LINK-compatible device having two or more DV Interfaces, refer to the operating instructions DV Interface) compatible devices made by Sony (e.g. a VAIO series personal computer) as well as to video devices. Some i.LINK compatible video devices, such as Digital - Sony DCR-HC52 | Operating Guide - Page 63
be sure to turn off the power of the device and disconnect the AC Adaptor from the wall outlet (wall socket) before connecting or disconnecting the i.LINK cable. About the required i.LINK cable Use the Sony i.LINK 4-pin-to-4-pin cable (during DV dubbing). On using your camcorder On use and care • Do - Sony DCR-HC52 | Operating Guide - Page 64
(optional), it might be because the video heads are worn. Please contact your Sony dealer or local authorized Sony service facility to have the video heads replaced. LCD screen • Do not exert excessive pressure on the LCD screen, as it may cause damage. • If your camcorder is used in a cold place - Sony DCR-HC52 | Operating Guide - Page 65
"×" changes. If you did not press the right spot, start from step 2 again. • You cannot calibrate the LCD screen if it is rotated. On handling the casing • If the casing is soiled, clean the camcorder body with a soft cloth lightly moistened with water, and then wipe the casing with a dry soft cloth - Sony DCR-HC52 | Operating Guide - Page 66
settings even when the POWER switch is set to OFF(CHG). The preinstalled rechargeable battery is always charged while your camcorder is connected to the wall outlet (wall socket) via the AC Adaptor or while the battery pack is attached. The rechargeable battery will be fully discharged in about - Sony DCR-HC52 | Operating Guide - Page 67
2.2 kΩ (kilohms) USB jack (DCR-HC54) mini-B DV input/output jack i.LINK Interface (IEEE1394, 4-pin connector S100) LCD screen Picture 6.2 cm (2.5 type) Total dot number 123 200 (560 × 220) General Power requirements DC 6.8 V/7.2 V (battery pack) DC 8.4 V (AC Adaptor) Average power consumption During - Sony DCR-HC52 | Operating Guide - Page 68
without notice. On trademarks • "Handycam" and are registered trademarks of Sony Corporation. • "InfoLITHIUM" is a trademark of Sony Corporation. • i.LINK and are trademarks of Sony Corporation. • is a trademark. • Microsoft, Windows, Windows Media, Windows Vista, and DirectX are either - Sony DCR-HC52 | Operating Guide - Page 69
Quick Reference Identifying parts and controls The numbers in ( ) are reference pages. A NIGHTSHOT PLUS switch (22) B Power zoom lever (22) C OPEN/EJECT lever (18) D Hooks for a shoulder belt Attach a shoulder belt (optional). E Grip belt (17) F Lens (Carl Zeiss Lens) (7) G LENS COVER switch ( - Sony DCR-HC52 | Operating Guide - Page 70
and time. D LCD screen/touch panel (17, 72) E Zoom buttons (22) F REC START/STOP button (19, 21) G Speaker Playback sounds comes out from the speaker. For how to adjust the volume, see page 24. H BATT (battery release) PUSH button (13) I CHG (charge) lamp (12) J For DCR-HC54: (USB) jack K . (back - Sony DCR-HC52 | Operating Guide - Page 71
Quick Reference A POWER switch (15) B Viewfinder (17) C Eyecup (65) D Viewfinder lens adjustment lever (17) E DV interface (44, 46) F DC IN jack (12) G A/V Remote Connector (28, 44) H CAMERA, PLAY/EDIT lamp (15) I REC START/STOP button (19, 21) J Tripod receptacle Attach - Sony DCR-HC52 | Operating Guide - Page 72
([STBY] (standby) or [REC] (recording)) D Recording: Tape counter (hour: minute: second) Playback: Time code (hour: minute: second: frame) E Recording capacity of the tape (approx.) (42) F Function button (29) G Guide button (25) H Tape transport indicator I Video operation buttons (24) 7 9 6 72 - Sony DCR-HC52 | Operating Guide - Page 73
setting data will be recorded automatically. They do not appear on the screen during recording, but you can check them as [DATA CODE] during playback (p. 34). Checking the screen indicators (Display guide) You can easily check the meaning of each indicator that appears on the LCD screen. 1 Touch - Sony DCR-HC52 | Operating Guide - Page 74
Indicators displayed during recording/playback (Continued) To finish the operation, touch [END]. z Tips • You can also operate by touching t [DISP GUIDE]. 74 - Sony DCR-HC52 | Operating Guide - Page 75
Step Guide 48, 51 Flexible spot meter 31 FOCUS 30, 54 Frame-by-frame Playback .... 35 G Getting started 11 GUIDEFRAME 43 I INDOOR 33 "InfoLITHIUM" battery pack 61 Install 49 i.LINK 62 i.LINK cable 44, 46 L LANDSCAPE 31 LANGUAGE 42 LCD 43 LCD BRT (LCD bright)....... 34 LCD B.L. (LCD back - Sony DCR-HC52 | Operating Guide - Page 76
Continued) Recording time 14 REMAIN 42 Reversal Playback 35 S S VIDEO cable 28, 44 SCENE SEL 31 Searching for USAGE GUIDE 25 USB STREAM 42 Using abroad 59 V V SPD PLAY (Various speed playback) .....34 76 VCR SET menu 40 VF B.L. (Viewfinder back light)........ 41 VOL (Volume 24 V-OUT/LCD - Sony DCR-HC52 | Operating Guide - Page 77
77 Quick Reference - Sony DCR-HC52 | Operating Guide - Page 78
mero entre paréntesis indica la cantidad del elemento. Adaptador de alimentación de ca (1) Cable USB (1) (DCR-HC54) Batería recargable NP-FH30 (1) Cable de alimentación (1) Cable de conexión de A/V (1) CD-ROM "Handycam Application Software" (1) (DCR-HC54) Guía de operaciones (este manual) (1) 78 - Sony DCR-HC52 | Operating Guide - Page 79
Spanish Quick Guide/Guía rápida en español Paso 2: Carga de la batería 1 2 2 3 1 Batería Con la marca v hacia abajo Toma de entrada de cc 4 Al tomacorriente de pared Interruptor POWER Adaptador de alimentación de ca Cable de alimentación Puede cargar la batería "InfoLITHIUM" (serie H) - Sony DCR-HC52 | Operating Guide - Page 80
restante de la batería (información sobre la batería) Ajuste el interruptor POWER en la posición OFF (CHG) y, a continuación, presione DISP/BATT dicha información. Batería restante (aprox.) BATTERY INFO NIVEL CARGA BATERÍA 0% 50% 100% TIEMPO GRAB DISPON PANT. LCD : 85 min VISOR : 99 min - Sony DCR-HC52 | Operating Guide - Page 81
siguientes condiciones: Parte superior: Grabación con pantalla LCD. Parte inferior: Grabación mediante el visor con el panel LCD cerrado. Tiempo la toma de entrada de cc de la videocámara, incluso cuando el cable de alimentación esté desconectado del tomacorriente de pared. Acerca del tiempo de - Sony DCR-HC52 | Operating Guide - Page 82
[AJ. RELOJ] aparecerá cada vez que encienda la videocámara o cambie la posición del interruptor POWER. Toque el botón de la pantalla LCD. Interruptor POWER 1 Deslice el interruptor POWER en el sentido de la flecha para que se encienda el indicador correspondiente mientras mantiene presionado el bot - Sony DCR-HC52 | Operating Guide - Page 83
Spanish Quick Guide/Guía rápida en español 3 Vaya a [M] ([CÓD. DATOS] (durante el modo de operación Easy Handycam, únicamente podrá ajustar [FECHA HORA])). • Si el idioma que desee. Para apagar la videocámara Deslice el interruptor POWER hasta la posición OFF (CHG). Para restablecer la fecha y la - Sony DCR-HC52 | Operating Guide - Page 84
mala. Visor Luego de grabar, ajuste el interruptor LENS COVER en la posición CLOSE para cerrar la cubierta del objetivo. Panel LCD Abra el panel LCD a 90 grados con respecto a la videocámara (1), luego gírelo hacia el mejor ángulo para grabar o reproducir (2). 180 grados (máx.) 2 DISP/BATT INFO - Sony DCR-HC52 | Operating Guide - Page 85
mini DV . 1 Deslice la palanca OPEN/ EJECT en el sentido de la flecha y manténgala en esa posición para abrir la tapa. Palanca OPEN/EJECT b Notas • No fuerce el compartimiento del videocasete presionando la parte ligeramente el centro de la parte posterior del videocasete. Ventanilla Para - Sony DCR-HC52 | Operating Guide - Page 86
varias veces en el sentido de la flecha para que se encienda el indicador CAMERA. Si el interruptor POWER está en la posición OFF (CHG), deslícelo mientras presiona el botón verde. Presione REC START/STOP A (o B). ESPERA GRAB. GUÍA GUÍA [ESPERA] [GRAB.] Para detener - Sony DCR-HC52 | Operating Guide - Page 87
Spanish Quick Guide/Guía rápida en español Reproducción Deslice el indicador POWER en el sentido de la flecha varias veces para encender el indicador PLAY/EDIT. Si el interruptor POWER está en la posición OFF (CHG), deslícelo mientras presiona el botón verde. Inicie la reproducción. Toque para - Sony DCR-HC52 | Operating Guide - Page 88
US Additional information on this product and answers to frequently asked questions can be found at our Customer Support Website. http://www.sony.net/ Printed in Japan
-
 1
1 -
 2
2 -
 3
3 -
 4
4 -
 5
5 -
 6
6 -
 7
7 -
8
-
9
-
10
-
11
-
12
-
13
-
14
-
15
-
16
-
17
-
18
-
19
-
20
-
21
-
22
-
23
-
24
-
25
-
26
-
27
-
28
-
29
-
30
-
31
-
32
-
33
-
34
-
35
-
36
-
37
-
38
-
39
-
40
-
41
-
42
-
43
-
44
-
45
-
46
-
47
-
48
-
49
-
50
-
51
-
52
-
53
-
54
-
55
-
56
-
57
-
58
-
59
-
60
-
61
-
62
-
63
-
64
-
65
-
66
-
67
-
68
-
69
-
70
-
71
-
72
-
73
-
74
-
75
-
76
-
77
-
78
-
79
-
80
-
81
-
82
-
83
-
84
-
85
-
86
-
87
-
88
 |
 |

3-278-983-
11
(1)
© 2008 Sony Corporation
Digital Video Camera Recorder
Operating Guide
DCR-HC52/HC54
Getting Started
11
Recording/
Playback
19
Using the Menu
29
Dubbing/Editing
44
Using a Computer
48
Troubleshooting
52
Additional Information
59
Quick Reference
69
Spanish Quick Guide/
Guía rápida en español
78