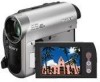
Sony DCR-HC52 Operating Guide - Page 35
A DUB CTRL Audio dubbing, Recording sound - dv cable
 |
UPC - 027242727427
View all Sony DCR-HC52 manuals
Add to My Manuals
Save this manual to your list of manuals |
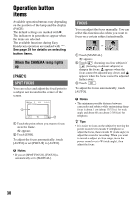
Page 35 highlights
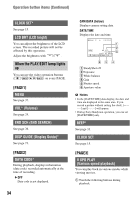
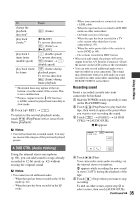
To Touch change the playback direction* play back slowly** play back 2 times faster (double speed) play back frame by frame (frame) [ySLOW] To reverse direction: (frame) t [ySLOW] (double speed) To reverse direction: (frame) t (double speed) (frame) during playback pause. To reverse direction: (frame) during frame playback. * Horizontal lines may appear at the top, bottom, or in the center of the screen. This is not a malfunction. **Pictures output from the DV Interface (i.LINK) cannot be played back smoothly in slow mode. 2 Touch [ RET.] t . To return to the normal playback mode, touch (Play/Pause) twice (once from frame playback). b Notes • You will not hear the recorded sound. You may see mosaic-like images of the previously played picture. A DUB CTRL (Audio dubbing) Using the internal stereo microphone (p. 69), you can add sound to a tape already recorded in 12-bit mode (p. 42) without erasing the original sound. b Notes • You cannot record additional audio: - When the tape has been recorded in the 16-bit mode (p. 42). - When the tape has been recorded in the LP mode. - When your camcorder is connected via an i.LINK cable. - When the tape has been recorded in 4CH MIC mode on other camcorders. - On blank sections of the tape. - When the tape has been recorded in a TV color system other than that of your camcorder (p. 59). - When the write-protect tab of the cassette is set to SAVE (p. 60). - On sections recorded in HDV format. • When you add sound, the picture will not be output from the A/V Remote Connector. Check the picture on the LCD screen or the viewfinder. • You can only record additional audio over a tape recorded on your camcorder. The sound may deteriorate when you dub audio on a tape recorded on other camcorders (including other DCR-HC52/HC54 camcorders). Recording sound Insert a recorded cassette into your camcorder beforehand. 1 Slide the POWER switch repeatedly to turn on the PLAY/EDIT lamp. 2 Touch (Play/Pause) to play back the tape, then touch it again at the point where you want to start recording the sound. 3 Touch t [PAGE3] t [A DUB CTRL] t [AUDIO DUB]. X appears. 60min A DUB CTRL 0:00:00:00 RET. AUDIO DUB 4 Touch (Play). Your camcorder starts audio recording via the internal stereo microphone. appears while recording the new sound in stereo 2 (ST2) during the playback of the tape. 5 Touch (Stop) when you want to stop recording. To dub on other scenes, repeat step 2 to select scenes, then touch [AUDIO DUB]. Continued , 35 Using the Menu
-
 1
1 -
2
-
3
-
4
-
5
-
6
-
7
-
8
-
9
-
10
-
11
-
12
-
13
-
14
-
15
-
16
-
17
-
18
-
19
-
20
-
21
-
22
-
23
-
24
-
25
-
26
-
27
-
28
-
29
-
 30
30 -
 31
31 -
 32
32 -
 33
33 -
 34
34 -
 35
35 -
 36
36 -
 37
37 -
 38
38 -
 39
39 -
 40
40 -
41
-
42
-
43
-
44
-
45
-
46
-
47
-
48
-
49
-
50
-
51
-
52
-
53
-
54
-
55
-
56
-
57
-
58
-
59
-
60
-
61
-
62
-
63
-
64
-
65
-
66
-
67
-
68
-
69
-
70
-
71
-
72
-
73
-
74
-
75
-
76
-
77
-
78
-
79
-
80
-
81
-
82
-
83
-
84
-
85
-
86
-
87
-
88
 |
 |
