Sony DCR-PC109 Camera Operations Guide - Page 105
Dubbing sound to a recorded tape
 |
View all Sony DCR-PC109 manuals
Add to My Manuals
Save this manual to your list of manuals |
Page 105 highlights
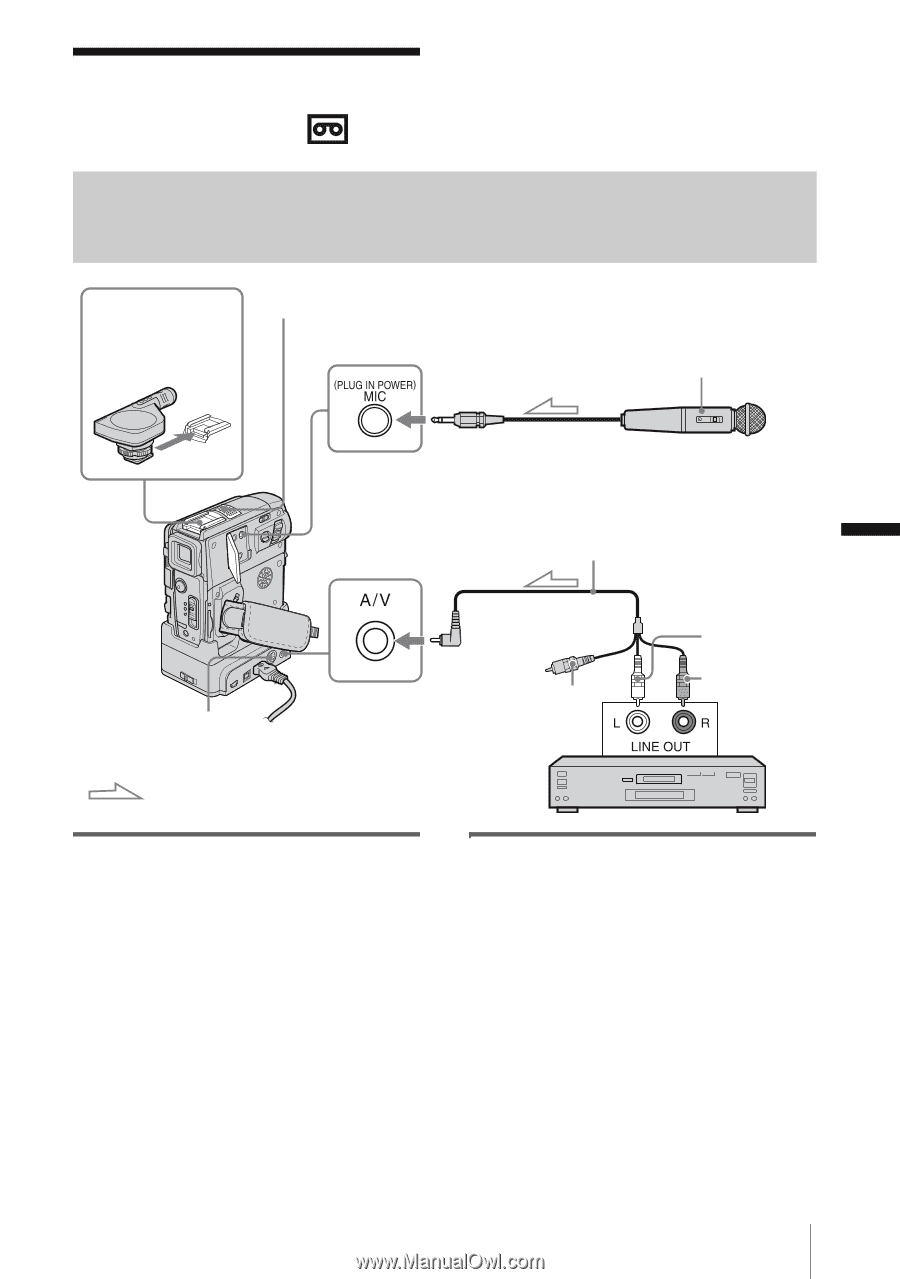
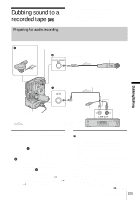
Dubbing sound to a recorded tape Preparing for audio recording You can record additional audio to the original sound on the tape. You can add sound to a tape already recorded in the 12-bit mode without erasing the original sound. B Intelligent accessory shoe for DCR-PC109 Internal microphone AMIC (PLUG IN POWER) jack Microphone (optional) Dubbing/Editing CA/V jack A/V connecting cable (supplied) S VIDEO jack Signal flow Do not connect the Video plug (yellow). Audio output jacks Audio device (such as CD/MD players) Audio L (white) Audio R (red) Record audio in one of the following ways. • Using the internal microphone (no connection required). • Connecting a microphone (optional) to the MIC jack. (A) • Connecting a microphone (optional) to the Intelligent accessory shoe for DCR-PC109. (B) • Connecting audio device to the Handycam Station or your camcorder using an A/V connecting cable. (C) The audio input to be recorded takes precedence over others in the order of MIC jack t Intelligent accessory shoe for DCR-PC109 t A/V jack t internal microphone. b Notes • You cannot record additional audio: - When the tape is recorded in the 16-bit mode. - When the tape is recorded in the LP mode. - When your camcorder is connected via the i.LINK cable. - On blank sections of the tape. - When the write-protect tab of the cassette is set to SAVE. • When you are using the A/V jack or the internal microphone to record additional sound, the picture will not be output from the S VIDEO jack or the A/V jack. Check the picture on the LCD screen or the viewfinder. • When you use an external microphone (optional) to record additional audio, you can check the picture and the sound by connecting your camcorder to a TV ,continued Dubbing/Editing 105
-
 1
1 -
2
-
3
-
4
-
5
-
6
-
7
-
8
-
9
-
10
-
11
-
12
-
13
-
14
-
15
-
16
-
17
-
18
-
19
-
20
-
21
-
22
-
23
-
24
-
25
-
26
-
27
-
28
-
29
-
30
-
31
-
32
-
33
-
34
-
35
-
36
-
37
-
38
-
39
-
40
-
41
-
42
-
43
-
44
-
45
-
46
-
47
-
48
-
49
-
50
-
51
-
52
-
53
-
54
-
55
-
56
-
57
-
58
-
59
-
60
-
61
-
62
-
63
-
64
-
65
-
66
-
67
-
68
-
69
-
70
-
71
-
72
-
73
-
74
-
75
-
76
-
77
-
78
-
79
-
80
-
81
-
82
-
83
-
84
-
85
-
86
-
87
-
88
-
89
-
90
-
91
-
92
-
93
-
94
-
95
-
96
-
97
-
98
-
99
-
 100
100 -
 101
101 -
 102
102 -
 103
103 -
 104
104 -
 105
105 -
 106
106 -
 107
107 -
 108
108 -
 109
109 -
 110
110 -
111
-
112
-
113
-
114
-
115
-
116
-
117
-
118
-
119
-
120
-
121
-
122
-
123
-
124
-
125
-
126
-
127
-
128
-
129
-
130
-
131
-
132
-
133
-
134
-
135
-
136
-
137
-
138
-
139
-
140
-
141
-
142
-
143
-
144
-
145
-
146
-
147
-
148
-
149
-
150
-
151
-
152
 |
 |