Sony DCR VX2100 Operating Instructions - Page 168
SEL/PUSH EXEC dial, AUDIO LEVEL button
 |
UPC - 027242639812
View all Sony DCR VX2100 manuals
Add to My Manuals
Save this manual to your list of manuals |
Page 168 highlights
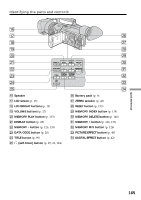
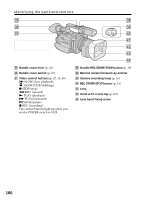
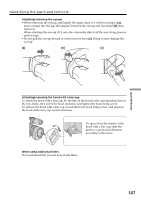
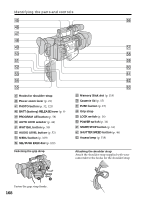
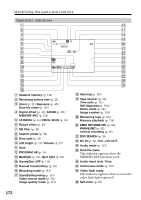
Identifying the parts and controls rg th rh rj rk rl tj t; tk ta tl ts y; td ya tf ys tg yd rg Hooks for shoulder strap rh Power zoom lever (p. 21) rj PHOTO button (p. 32, 121) rk BATT (battery) RELEASE lever (p. 9) rl PROGRAM AE button (p. 58) t; AUTO LOCK selector (p. 44) ta WHT BAL button (p. 50) ts AUDIO LEVEL button (p. 52) td MENU button (p. 109) tf SEL/PUSH EXEC dial (p. 109) tg Memory Stick slot (p. 118) th Cassette lid (p. 15) tj PUSH button (p. 15) tk Grip strap tl LOCK switch (p. 16) y; POWER switch (p. 16) ya START/STOP button (p. 16) ys SHUTTER SPEED button (p. 46) yd Access lamp (p. 118) Fastening the grip strap Attaching the shoulder strap Attach the shoulder strap supplied with your camcorder to the hooks for the shoulder strap. Fasten the grip strap firmly. 168
-
 1
1 -
2
-
3
-
4
-
5
-
6
-
7
-
8
-
9
-
10
-
11
-
12
-
13
-
14
-
15
-
16
-
17
-
18
-
19
-
20
-
21
-
22
-
23
-
24
-
25
-
26
-
27
-
28
-
29
-
30
-
31
-
32
-
33
-
34
-
35
-
36
-
37
-
38
-
39
-
40
-
41
-
42
-
43
-
44
-
45
-
46
-
47
-
48
-
49
-
50
-
51
-
52
-
53
-
54
-
55
-
56
-
57
-
58
-
59
-
60
-
61
-
62
-
63
-
64
-
65
-
66
-
67
-
68
-
69
-
70
-
71
-
72
-
73
-
74
-
75
-
76
-
77
-
78
-
79
-
80
-
81
-
82
-
83
-
84
-
85
-
86
-
87
-
88
-
89
-
90
-
91
-
92
-
93
-
94
-
95
-
96
-
97
-
98
-
99
-
100
-
101
-
102
-
103
-
104
-
105
-
106
-
107
-
108
-
109
-
110
-
111
-
112
-
113
-
114
-
115
-
116
-
117
-
118
-
119
-
120
-
121
-
122
-
123
-
124
-
125
-
126
-
127
-
128
-
129
-
130
-
131
-
132
-
133
-
134
-
135
-
136
-
137
-
138
-
139
-
140
-
141
-
142
-
143
-
144
-
145
-
146
-
147
-
148
-
149
-
150
-
151
-
152
-
153
-
154
-
155
-
156
-
157
-
158
-
159
-
160
-
161
-
162
-
 163
163 -
 164
164 -
 165
165 -
 166
166 -
 167
167 -
 168
168 -
 169
169 -
 170
170 -
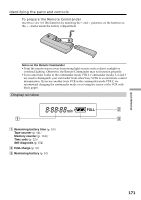 171
171 -
 172
172 -
 173
173 -
174
-
175
-
176
 |
 |
