Sony DCR VX2100 Operating Instructions - Page 84
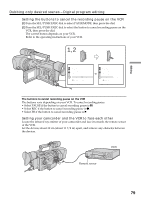
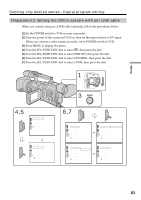
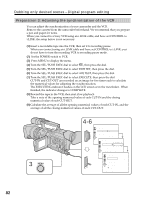
Dubbing only desired scenes - Digital program editing, Operation 1: Making Programs
 |
UPC - 027242639812
View all Sony DCR VX2100 manuals
Add to My Manuals
Save this manual to your list of manuals |
Page 84 highlights
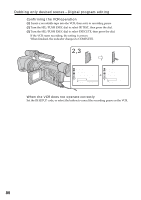
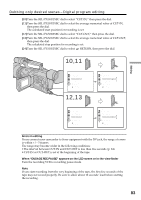
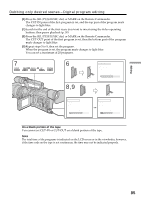
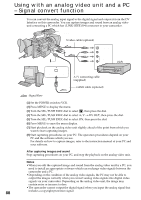
Dubbing only desired scenes - Digital program editing If the VCR does not operate correctly Make sure the IR SETUP code is correct; reset if necessary. When the operations of the VCR do not work with an i.LINK cable Keep the i.LINK connection, and carry out Preparation 2 (p. 77) again. The audio and video signals are sent as digital signals. Operation 1: Making Programs (1) Insert the tape for playback into your camcorder, and insert a tape for recording into the VCR. (2) Press MENU to display the menu. (3) Turn the SEL/PUSH EXEC dial to select , then press the dial. (4) Turn the SEL/PUSH EXEC dial to select VIDEO EDIT, then press the dial. (5) Search for the beginning of the first scene you want to insert using the video control buttons, then pause playback (p. 30). 5 STOP REW PLAY FF PAUSE 2 MENU 3,4 OTHERS BEEP MELODY COMMANDER D I SPLAY V I DEO ED I T ED I T SET RETURN [MENU] : END V I DEO ED I T MARK UNDO ERASE AL L START 0:32:30:14 1 IN TOTAL SCENE 0:00:00:00 0 [MENU] : END 84
-
 1
1 -
2
-
3
-
4
-
5
-
6
-
7
-
8
-
9
-
10
-
11
-
12
-
13
-
14
-
15
-
16
-
17
-
18
-
19
-
20
-
21
-
22
-
23
-
24
-
25
-
26
-
27
-
28
-
29
-
30
-
31
-
32
-
33
-
34
-
35
-
36
-
37
-
38
-
39
-
40
-
41
-
42
-
43
-
44
-
45
-
46
-
47
-
48
-
49
-
50
-
51
-
52
-
53
-
54
-
55
-
56
-
57
-
58
-
59
-
60
-
61
-
62
-
63
-
64
-
65
-
66
-
67
-
68
-
69
-
70
-
71
-
72
-
73
-
74
-
75
-
76
-
77
-
78
-
 79
79 -
 80
80 -
 81
81 -
 82
82 -
 83
83 -
 84
84 -
 85
85 -
 86
86 -
 87
87 -
 88
88 -
 89
89 -
90
-
91
-
92
-
93
-
94
-
95
-
96
-
97
-
98
-
99
-
100
-
101
-
102
-
103
-
104
-
105
-
106
-
107
-
108
-
109
-
110
-
111
-
112
-
113
-
114
-
115
-
116
-
117
-
118
-
119
-
120
-
121
-
122
-
123
-
124
-
125
-
126
-
127
-
128
-
129
-
130
-
131
-
132
-
133
-
134
-
135
-
136
-
137
-
138
-
139
-
140
-
141
-
142
-
143
-
144
-
145
-
146
-
147
-
148
-
149
-
150
-
151
-
152
-
153
-
154
-
155
-
156
-
157
-
158
-
159
-
160
-
161
-
162
-
163
-
164
-
165
-
166
-
167
-
168
-
169
-
170
-
171
-
172
-
173
-
174
-
175
-
176
 |
 |
