Sony DSC-G1 Instruction Manual - Page 15
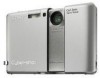
Turning the camera on/setting the clock, To change the date and time, When you turn on the power
 |
UPC - 027242701298
View all Sony DSC-G1 manuals
Add to My Manuals
Save this manual to your list of manuals |
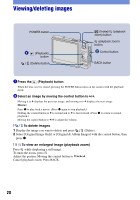
Page 15 highlights
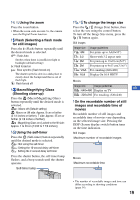
3 Turning the camera on/setting the clock Lens cover OPEN (CAMERA) lever POWER button Left: Move the button to the LCD screen side. Up Right: Move the button to the lens side. Press z Down ɟ Control button HOME button 4 1 2 3 5 GB 1Press the POWER button or open the lens cover. 2Set the clock with the control button. 1 -1Select [Area], then press z. -2Select the desired area, then press z. 2 -1Select [Daylight Savings], then press z. -2Select [On] or [Off] of the daylight saving time, then press z. 3 -1Select [Date display order], then press z. -2Select the desired order, then press z. 4 -1Select each item and set the numeric value, then press z. -2Set up all the items. 5 Select [OK], then press z. [ To change the date and time Press the HOME button, and select [ Settings] t [ Clock Set] (page 25). [ When you turn on the power • If the camera is running on battery power and you do not operate the camera for about three minutes, the camera turns off automatically to prevent wearing down the battery pack (Auto power-off function). 15
-
 1
1 -
2
-
3
-
4
-
5
-
6
-
7
-
8
-
9
-
 10
10 -
 11
11 -
 12
12 -
 13
13 -
 14
14 -
 15
15 -
 16
16 -
 17
17 -
 18
18 -
 19
19 -
 20
20 -
21
-
22
-
23
-
24
-
25
-
26
-
27
-
28
-
29
-
30
-
31
-
32
-
33
-
34
-
35
-
36
-
37
-
38
-
39
-
40
-
41
-
42
-
43
-
44
-
45
-
46
-
47
-
48
-
49
-
50
-
51
-
52
-
53
-
54
-
55
-
56
-
57
-
58
-
59
-
60
-
61
-
62
-
63
-
64
-
65
-
66
-
67
-
68
-
69
-
70
-
71
-
72
-
73
-
74
-
75
-
76
 |
 |