Sony DSC-RX100M2COS Cyber-shot® User Guide (Printable PDF) - Page 178
View on TV, Slideshow setting
 |
View all Sony DSC-RX100M2COS manuals
Add to My Manuals
Save this manual to your list of manuals |
Page 178 highlights
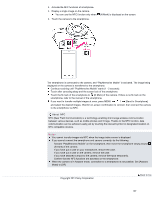
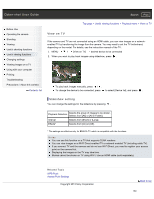
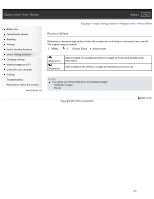
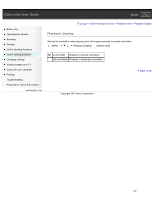
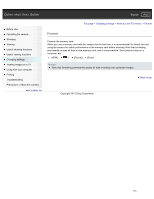
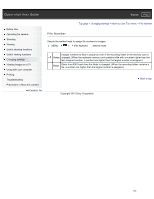
Cyber-shot User Guide Search Print Before Use Operating the camera Shooting Viewing Useful shooting functions Useful viewing functions Changing settings Viewing images on a TV Using with your computer Printing Troubleshooting Precautions / About this camera Contents list Top page > Useful viewing functions > Playback menu > View on TV View on TV If the camera and TV are not connected using an HDMI cable, you can view images on a networkenabled TV by transferring the image from the camera. You may need to set the TV beforehand, depending on the model. For details, see the instruction manual of the TV. 1. MENU 1 [View on TV] desired device to be connected 2. When you want to play back images using slideshow, press . To play back images manually, press / . To change the device to be connected, press to select [Device list], and press . Slideshow setting You can change the settings for the slideshow by pressing . Playback Selection Selects the group of images to be shown. Selects from [All] or [All in Folder]. Interval Selects from [Short] or [Long]. Effects* Selects from [On] or [Off]. * The settings are effective only for BRAVIA TV which is compatible with the functions. Notes You can use this function on a TV that supports DLNA renderer. You can view images on a Wi-Fi Direct-enabled TV or network-enabled TV (including cable TV). If you connect TV and the camera and do not use Wi-Fi Direct, you need to register your access point on the camera first. Displaying the images on the TV may take time. Movies cannot be shown on TV using Wi-Fi. Use an HDMI cable (sold separately). Related Topic WPS Push Access Point Settings Copyright 2013 Sony Corporation Back to top 169
-
 1
1 -
2
-
3
-
4
-
5
-
6
-
7
-
8
-
9
-
10
-
11
-
12
-
13
-
14
-
15
-
16
-
17
-
18
-
19
-
20
-
21
-
22
-
23
-
24
-
25
-
26
-
27
-
28
-
29
-
30
-
31
-
32
-
33
-
34
-
35
-
36
-
37
-
38
-
39
-
40
-
41
-
42
-
43
-
44
-
45
-
46
-
47
-
48
-
49
-
50
-
51
-
52
-
53
-
54
-
55
-
56
-
57
-
58
-
59
-
60
-
61
-
62
-
63
-
64
-
65
-
66
-
67
-
68
-
69
-
70
-
71
-
72
-
73
-
74
-
75
-
76
-
77
-
78
-
79
-
80
-
81
-
82
-
83
-
84
-
85
-
86
-
87
-
88
-
89
-
90
-
91
-
92
-
93
-
94
-
95
-
96
-
97
-
98
-
99
-
100
-
101
-
102
-
103
-
104
-
105
-
106
-
107
-
108
-
109
-
110
-
111
-
112
-
113
-
114
-
115
-
116
-
117
-
118
-
119
-
120
-
121
-
122
-
123
-
124
-
125
-
126
-
127
-
128
-
129
-
130
-
131
-
132
-
133
-
134
-
135
-
136
-
137
-
138
-
139
-
140
-
141
-
142
-
143
-
144
-
145
-
146
-
147
-
148
-
149
-
150
-
151
-
152
-
153
-
154
-
155
-
156
-
157
-
158
-
159
-
160
-
161
-
162
-
163
-
164
-
165
-
166
-
167
-
168
-
169
-
170
-
171
-
172
-
 173
173 -
 174
174 -
 175
175 -
 176
176 -
 177
177 -
 178
178 -
 179
179 -
 180
180 -
 181
181 -
 182
182 -
 183
183 -
184
-
185
-
186
-
187
-
188
-
189
-
190
-
191
-
192
-
193
-
194
-
195
-
196
-
197
-
198
-
199
-
200
-
201
-
202
-
203
-
204
-
205
-
206
-
207
-
208
-
209
-
210
-
211
-
212
-
213
-
214
-
215
-
216
-
217
-
218
-
219
-
220
-
221
-
222
-
223
-
224
-
225
-
226
-
227
-
228
-
229
-
230
-
231
-
232
-
233
-
234
-
235
-
236
-
237
-
238
-
239
-
240
-
241
-
242
-
243
-
244
-
245
-
246
-
247
-
248
-
249
-
250
-
251
-
252
-
253
-
254
-
255
-
256
-
257
-
258
-
259
-
260
-
261
-
262
-
263
-
264
-
265
-
266
-
267
-
268
-
269
 |
 |
