Sony DSC-RX100M2COS Cyber-shot® User Guide (Printable PDF) - Page 219
Viewing an image on a “BRAVIA” Sync-compatible TV, CTRL FOR HDMI]
 |
View all Sony DSC-RX100M2COS manuals
Add to My Manuals
Save this manual to your list of manuals |
Page 219 highlights
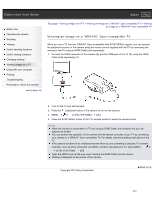
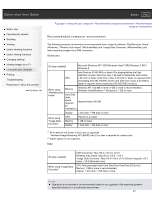
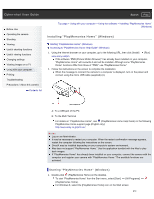
Cyber-shot User Guide Search Print Before Use Operating the camera Shooting Viewing Useful shooting functions Useful viewing functions Changing settings Viewing images on a TV Using with your computer Printing Troubleshooting Precautions / About this camera Contents list Top page > Viewing images on a TV > Viewing an image on a "BRAVIA" Sync-compatible TV > Viewing an image on a "BRAVIA" Sync-compatible TV Viewing an image on a "BRAVIA" Sync-compatible TV When you use a TV that has "BRAVIA" Sync (compatible with SYNC MENU) support, you can operate the playback functions of the camera using the remote control supplied with the TV by connecting the camera to the TV using an HDMI Cable (sold separately). 1. Connect the HDMI connector of the camera (A) and the HDMI jack of the TV (B) using the HDMI Cable (sold separately) (C). 2. Turn on the TV and set the input. 3. Press the (playback) button of the camera to turn on the camera. 4. MENU 2 [CTRL FOR HDMI] [On] 5. Press the SYNC MENU button of the TV's remote control to select the desired mode. Notes When the camera is connected to a TV set using an HDMI Cable, the functions that you can operate are limited. You can perform the operation of the camera with the remote controller of your TV by connecting your camera to a "BRAVIA" Sync-compatible TV. For details, see the operating instructions of the TV. If the camera functions in an undesired manner when you are controlling it using the TV's remote controller, such as when connected via HDMI to another manufacturer's TV, press MENU 2 [CTRL FOR HDMI] [Off]. Open the HDMI cover all the way when inserting the HDMI Cable into the camera. Nothing is displayed on the screen of the camera. Copyright 2013 Sony Corporation Back to top 210
-
 1
1 -
2
-
3
-
4
-
5
-
6
-
7
-
8
-
9
-
10
-
11
-
12
-
13
-
14
-
15
-
16
-
17
-
18
-
19
-
20
-
21
-
22
-
23
-
24
-
25
-
26
-
27
-
28
-
29
-
30
-
31
-
32
-
33
-
34
-
35
-
36
-
37
-
38
-
39
-
40
-
41
-
42
-
43
-
44
-
45
-
46
-
47
-
48
-
49
-
50
-
51
-
52
-
53
-
54
-
55
-
56
-
57
-
58
-
59
-
60
-
61
-
62
-
63
-
64
-
65
-
66
-
67
-
68
-
69
-
70
-
71
-
72
-
73
-
74
-
75
-
76
-
77
-
78
-
79
-
80
-
81
-
82
-
83
-
84
-
85
-
86
-
87
-
88
-
89
-
90
-
91
-
92
-
93
-
94
-
95
-
96
-
97
-
98
-
99
-
100
-
101
-
102
-
103
-
104
-
105
-
106
-
107
-
108
-
109
-
110
-
111
-
112
-
113
-
114
-
115
-
116
-
117
-
118
-
119
-
120
-
121
-
122
-
123
-
124
-
125
-
126
-
127
-
128
-
129
-
130
-
131
-
132
-
133
-
134
-
135
-
136
-
137
-
138
-
139
-
140
-
141
-
142
-
143
-
144
-
145
-
146
-
147
-
148
-
149
-
150
-
151
-
152
-
153
-
154
-
155
-
156
-
157
-
158
-
159
-
160
-
161
-
162
-
163
-
164
-
165
-
166
-
167
-
168
-
169
-
170
-
171
-
172
-
173
-
174
-
175
-
176
-
177
-
178
-
179
-
180
-
181
-
182
-
183
-
184
-
185
-
186
-
187
-
188
-
189
-
190
-
191
-
192
-
193
-
194
-
195
-
196
-
197
-
198
-
199
-
200
-
201
-
202
-
203
-
204
-
205
-
206
-
207
-
208
-
209
-
210
-
211
-
212
-
213
-
 214
214 -
 215
215 -
 216
216 -
 217
217 -
 218
218 -
 219
219 -
 220
220 -
 221
221 -
 222
222 -
 223
223 -
 224
224 -
225
-
226
-
227
-
228
-
229
-
230
-
231
-
232
-
233
-
234
-
235
-
236
-
237
-
238
-
239
-
240
-
241
-
242
-
243
-
244
-
245
-
246
-
247
-
248
-
249
-
250
-
251
-
252
-
253
-
254
-
255
-
256
-
257
-
258
-
259
-
260
-
261
-
262
-
263
-
264
-
265
-
266
-
267
-
268
-
269
 |
 |
