Sony DSC-W190/R Cyber-shot® Handbook - Page 75
Enjoying images on your computer
 |
UPC - 027242766389
View all Sony DSC-W190/R manuals
Add to My Manuals
Save this manual to your list of manuals |
Page 75 highlights
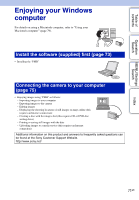
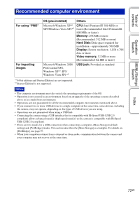
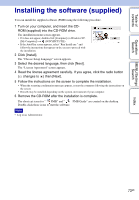
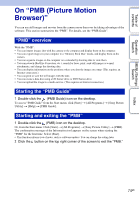
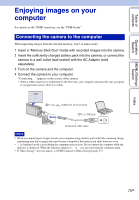
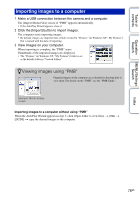
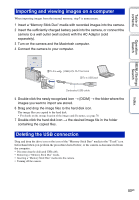
Table of contents Operation Search MENU/Settings Search Enjoying images on your computer For details on the "PMB" functions, see the "PMB Guide". Connecting the camera to the computer When importing images from the internal memory, step 1 is unnecessary. 1 Insert a "Memory Stick Duo" media with recorded images into the camera. 2 Insert the sufficiently charged battery pack into the camera, or connect the camera to a wall outlet (wall socket) with the AC Adaptor (sold separately). 3 Turn on the camera and the computer. 4 Connect the camera to your computer. "Connecting..." appears on the screen of the camera. • When a USB connection is established for the first time, your computer automatically runs a program to recognize the camera. Wait for a while. 2To the (USB)·A/V OUT terminal 1To a USB jack Dedicated USB cable Notes • When you import/export images from/to your computer using a battery pack with little remaining charge, transferring may fail or image data may become corrupted if the battery pack shuts down too soon. • is displayed on the screen during the communication session. Do not operate the computer while the indicator is displayed. When the indicator changes to , you can start using the computer again. • If "Mass Storage" does not appear, set [USB Connect] to [Mass Storage] (page 57). Index 75GB
-
 1
1 -
2
-
3
-
4
-
5
-
6
-
7
-
8
-
9
-
10
-
11
-
12
-
13
-
14
-
15
-
16
-
17
-
18
-
19
-
20
-
21
-
22
-
23
-
24
-
25
-
26
-
27
-
28
-
29
-
30
-
31
-
32
-
33
-
34
-
35
-
36
-
37
-
38
-
39
-
40
-
41
-
42
-
43
-
44
-
45
-
46
-
47
-
48
-
49
-
50
-
51
-
52
-
53
-
54
-
55
-
56
-
57
-
58
-
59
-
60
-
61
-
62
-
63
-
64
-
65
-
66
-
67
-
68
-
69
-
 70
70 -
 71
71 -
 72
72 -
 73
73 -
 74
74 -
 75
75 -
 76
76 -
 77
77 -
 78
78 -
 79
79 -
 80
80 -
81
-
82
-
83
-
84
-
85
-
86
-
87
-
88
-
89
-
90
-
91
-
92
-
93
-
94
-
95
-
96
-
97
-
98
-
99
-
100
-
101
-
102
-
103
-
104
 |
 |