Sony HDR HC7 Operating Guide - Page 48
NS LIGHT NightShot Light, COLOR SLOW S Color Slow, Shutter, ZEBRA, HISTOGRAM, SELF-TIMER
 |
UPC - 027242701458
View all Sony HDR HC7 manuals
Add to My Manuals
Save this manual to your list of manuals |
Page 48 highlights
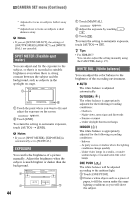
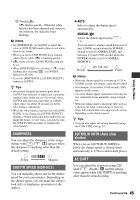
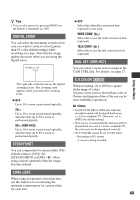
CAMERA SET menu (Continued) NS LIGHT (NightShot Light) When using either the NightShot (p. 28) or [SUPER NS] (p. 47) function to record, you can record clearer pictures by setting [NS LIGHT], which emits infrared light (invisible), to [ON] (the default setting). b Notes • Do not cover the infrared port with your fingers or other objects (p. 107). • Remove the conversion lens (optional). • The maximum shooting distance using [NS LIGHT] is about 3 m (10 feet). COLOR SLOW S (Color Slow Shutter) When you set [COLOR SLOW S] to [ON], you can record an image brighter in color even in dark places. and [COLOR SLOW SHUTTER] appear on the screen. To cancel [COLOR SLOW S], touch [OFF]. b Notes • Adjust the focus manually ([FOCUS], p. 46) when it is hard to focus automatically. • The shutter speed of your camcorder changes depending on the brightness. The motion of the picture may slow down at this time. ZEBRA Diagonal stripes appear in portions of the screen where brightness is at a preset level. This is useful as a guide when adjusting the brightness. When you change the default setting, is displayed. The zebra pattern is not recorded. B OFF The zebra pattern is not displayed. 70 The zebra pattern appears at a screen brightness level of about 70 IRE. 48 100 The zebra pattern appears at a screen brightness level of about 100 IRE or higher. b Notes • Portions of the screen where brightness is about 100 IRE or higher may appear overexposed. z Tips • IRE represents the screen brightness. HISTOGRAM When you set [HISTOGRAM] to [ON], the [HISTOGRAM] (a graph to display a distribution of tones in your picture) window appears on the screen. This item is useful when you adjust exposure. You can adjust the [EXPOSURE] or [AE SHIFT] checking the [HISTOGRAM] window. The [HISTOGRAM] will not be recorded on a tape or "Memory Stick Duo." 80 Pixels Darker Brighter Brightness z Tips • The left area on the graph shows the darker areas of the picture while the right area shows the brighter areas. SELF-TIMER A still image is recorded after about 10 seconds. Press PHOTO when [SELF-TIMER] is set to [ON] and appears. To cancel the count down, touch [RESET]. To cancel the self-timer, select [OFF].
-
 1
1 -
2
-
3
-
4
-
5
-
6
-
7
-
8
-
9
-
10
-
11
-
12
-
13
-
14
-
15
-
16
-
17
-
18
-
19
-
20
-
21
-
22
-
23
-
24
-
25
-
26
-
27
-
28
-
29
-
30
-
31
-
32
-
33
-
34
-
35
-
36
-
37
-
38
-
39
-
40
-
41
-
42
-
 43
43 -
 44
44 -
 45
45 -
 46
46 -
 47
47 -
 48
48 -
 49
49 -
 50
50 -
 51
51 -
 52
52 -
 53
53 -
54
-
55
-
56
-
57
-
58
-
59
-
60
-
61
-
62
-
63
-
64
-
65
-
66
-
67
-
68
-
69
-
70
-
71
-
72
-
73
-
74
-
75
-
76
-
77
-
78
-
79
-
80
-
81
-
82
-
83
-
84
-
85
-
86
-
87
-
88
-
89
-
90
-
91
-
92
-
93
-
94
-
95
-
96
-
97
-
98
-
99
-
100
-
101
-
102
-
103
-
104
-
105
-
106
-
107
-
108
-
109
-
110
-
111
-
112
-
113
-
114
-
115
-
116
-
117
-
118
-
119
-
120
-
121
-
122
-
123
-
124
-
125
-
126
-
127
-
128
-
129
-
130
-
131
 |
 |