Sony KE-42M1 Operating Instructions (primary manual) - Page 28
Connecting a DVD Player with S Video and Audio Connectors
 |
View all Sony KE-42M1 manuals
Add to My Manuals
Save this manual to your list of manuals |
Page 28 highlights
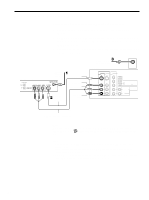
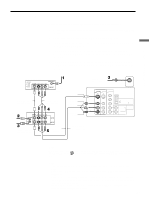
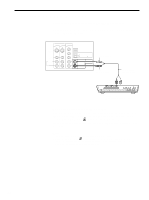
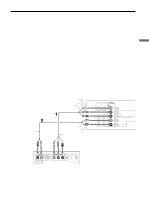
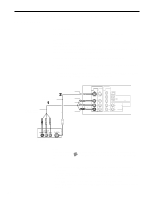
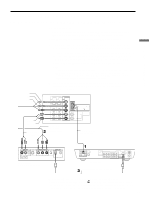
Connecting a DVD Player with S Video and Audio Connectors Use this hookup if: • Your DVD player does not have component (Y, PB, PR) jacks. Tip If your DVD player has component video output connectors, for best picture quality, use the connection described on page 27. The Y, PB and PR jacks on your DVD player are sometimes labeled as Y, CB and CR, or Y, B-Y and R-Y. If so, connect the cables to the matching colors. Disconnect all power sources before making any connections. 1 Using an AUDIO cable, connect the DVD player's AUDIO OUT jacks to the TV's AUDIO IN jacks. 2 Using an S VIDEO cable, connect the DVD player's S VIDEO OUT jack to the TV's S VIDEO IN jack (VIDEO IN 1 or 3). S VIDEO cable (not supplied) AUDIO cable (not supplied) S VIDEO VIDEO (yellow) AUDIO-L (white) AUDIO-R (red) Rear of TV VIDEO IN 1 3 S VIDEO VIDEO L(MONO) AUDIO R HD/DVD IN 4 Y PB PR L AUDIO R CENTER SPEAKER IN 180W (6 ) MAX L(MONO) AUDIO R AUDIO OUT (VAR/FIX) DVD player Note When you connect video equipment to both the VIDEO and the S VIDEO input jacks, make sure "Auto YC" in the (Setup) menu is set to "On" to view the S VIDEO input (see page 23). Tips • You can also use the VIDEO IN 2 jacks located on the front of the TV to connect your DVD player. • To take advantage of the Wide Screen Modes, set the aspect ratio of the output signal to 16:9 on your DVD player. For details, refer to the operating instructions supplied with your DVD player. • Use VIDEO 1/2/3 on the remote control to switch to the DVD player input. • If your DVD player is not equipped with S VIDEO, use a VIDEO cable (yellow) instead of the S VIDEO cable. 28
-
 1
1 -
2
-
3
-
4
-
5
-
6
-
7
-
8
-
9
-
10
-
11
-
12
-
13
-
14
-
15
-
16
-
17
-
18
-
19
-
20
-
21
-
22
-
 23
23 -
 24
24 -
 25
25 -
 26
26 -
 27
27 -
 28
28 -
 29
29 -
 30
30 -
 31
31 -
 32
32 -
 33
33 -
34
-
35
-
36
-
37
-
38
-
39
-
40
-
41
-
42
-
43
-
44
-
45
-
46
-
47
-
48
-
49
-
50
-
51
-
52
-
53
-
54
-
55
-
56
-
57
-
58
-
59
-
60
-
61
-
62
-
63
-
64
-
65
-
66
-
67
-
68
-
69
-
70
-
71
-
72
-
73
-
74
-
75
-
76
-
77
-
78
-
79
-
80
-
81
-
82
-
83
-
84
 |
 |
