Sony KLV-32S400A Operating Instructions - Page 26
Set-up menu, Display Area, KLV-40S400A only, Horizontal Shift, Vertical Shift, Auto Start-up, Language - klv features
 |
View all Sony KLV-32S400A manuals
Add to My Manuals
Save this manual to your list of manuals |
Page 26 highlights
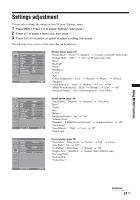
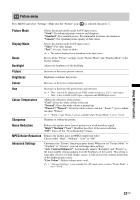
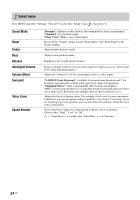
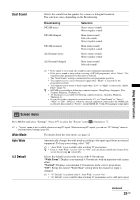
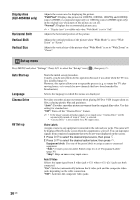
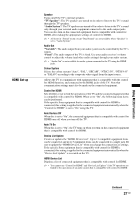
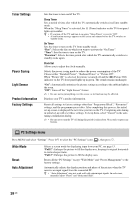
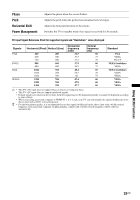
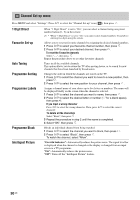
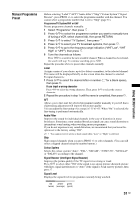
Display Area (KLV-40S400A only) Horizontal Shift Vertical Shift Vertical Size Adjusts the screen area for displaying the picture. "Full Pixel": Displays the picture for 1080/50i, 1080/60i, 1080/50p and 1080/60p sources (HDMI or component input only) or 1080/24p sources (HDMI input only) in the original size when parts of the picture are cut off. "Normal": Displays the recommended picture area. ~ • "Display Area" is available only when "Wide Mode" is set to "Full". Adjusts the horizontal position of the picture. Adjusts the vertical position of the picture when "Wide Mode" is set to "Wide Zoom" or "Zoom". Adjusts the vertical size of the picture when "Wide Mode" is set to "Wide Zoom" or "Zoom". Set-up menu Press MENU and select "Settings". Press F/f to select the "Set-up" icon ( ), then press . Auto Start-up Language Cinema Drive AV Set-up Starts the initial set-up procedure. Usually, you do not need to do this operation because it was done when the TV was first installed (page 6). However, this option allows you to repeat the process (e.g. to retune the TV after moving house, or to search for new channels that have been launched by broadcasters). Selects the language in which the menus are displayed. Provides smoother picture movement when playing DVD or VCR images taken on film, reducing picture blur and graininess. "Auto": Provides smoother picture movement than the original film video. Use this setting for standard use. "Off": Turns off the "Cinema Drive" feature. ~ • If the image contains irregular signals or too much noise, "Cinema Drive" will be automatically turned off even if "Auto" is selected. • "Cinema Drive" is not available for a PC input source. Video Labels Assigns a name to any equipment connected to the side and rear jacks. The name will be displayed briefly on the screen when the equipment is selected. You can skip input signals from connected equipment that you do not want displayed on the screen. 1 Press F/f to select the desired input source, then press . 2 Press F/f to select the desired option below, then press . Equipment labels: Uses one of the preset labels to assign a name to connected equipment. "Edit:": Creates your own label. Follow steps 2 to 4 of "Programme Labels" (page 30). "Skip": Skips an unnecessary input source. Auto S Video Selects the input signal from S video jack 1 when / 1 jacks are both connected. "On": Switches automatically between the S video jack and the composite video jacks depending on the cable connection. "Off": Activates the composite video jacks. 26 GB
-
 1
1 -
2
-
3
-
4
-
5
-
6
-
7
-
8
-
9
-
10
-
11
-
12
-
13
-
14
-
15
-
16
-
17
-
18
-
19
-
20
-
 21
21 -
 22
22 -
 23
23 -
 24
24 -
 25
25 -
 26
26 -
 27
27 -
 28
28 -
 29
29 -
 30
30 -
 31
31 -
32
-
33
-
34
-
35
-
36
 |
 |