Sony MXD-D5C Operating Instructions - Page 5
Hookups, Connecting the AC power cord, Demonstration mode, Getting Started
 |
View all Sony MXD-D5C manuals
Add to My Manuals
Save this manual to your list of manuals |
Page 5 highlights
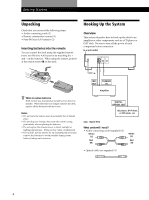
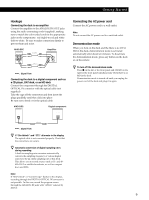
Getting Started Hookups Connecting the deck to an amplifier Connect the amplifier to the ANALOG IN/OUT jacks using the audio connecting cords (supplied), making sure to match the color-coded cords to the appropriate jacks on the components: red (right) to red and white (left) to white. Be sure to make connections firmly to prevent hum and noise. MXD-D5C ANALOG IN OUT L R ç Ç Amplifier TAPE / MD OUT IN L R ç: Signal flow Connecting the deck to a digital component such as a CD player, DAT deck, or an MD deck Connect the component through the DIGITAL OPTICAL IN connector with the optical cable (not supplied). Take the caps off the connectors and then insert the plugs parallelly until they click into place. Be sure not to bend or tie the optical cable. MXD-D5C DIGITAL OPTICAL IN Digital component DIGITAL OPTICAL OUT Connecting the AC power cord Connect the AC power cord to a wall outlet. Note Do not connect the AC power cord to a switched outlet. Demonstration mode When you turn on the deck and the there is no CD or MD in the deck, demonstration mode is activated automatically after about ten minutes. To deactivate the demonstration mode, press any button on the deck or on the remote. z To turn off the demonstration mode Press p on the left of the front panel and CLEAR on the right of the front panel simultaneously when there is no MD in the deck. Demonstration mode is turned off until you unplug the power cord of the deck and plug it in again. Ç ç: Signal flow z If "Din Unlock" and "C71" alternate in the display The optical cable is not connected properly. Check that the connections are secure. z Automatic conversion of digital sampling rates during recording A built-in sampling rate converter automatically converts the sampling frequency of various digital sources to the 44.1 kHz sampling rate of this deck. This allows you to record sources such as 32- and 48kHz DAT or satellite broadcasts, as well as compact discs and MDs. Note If "Din Unlock" or "Cannot Copy" flashes in the display, recording through the DIGITAL OPTICAL IN connector is not possible. In this case, record the program source through the ANALOG IN jacks with "ANLG" selected by INPUT. 5
-
 1
1 -
 2
2 -
 3
3 -
 4
4 -
 5
5 -
 6
6 -
 7
7 -
 8
8 -
 9
9 -
 10
10 -
 11
11 -
12
-
13
-
14
-
15
-
16
-
17
-
18
-
19
-
20
-
21
-
22
-
23
-
24
-
25
-
26
-
27
-
28
-
29
-
30
-
31
-
32
-
33
-
34
-
35
-
36
-
37
-
38
-
39
-
40
-
41
-
42
-
43
-
44
-
45
-
46
-
47
-
48
-
49
-
50
-
51
-
52
 |
 |
