Sony MZ-N910 Help - Page 15
The display window of the remote control, Remove the clip., Attach the clip in the opposite direction.
 |
View all Sony MZ-N910 manuals
Add to My Manuals
Save this manual to your list of manuals |
Page 15 highlights
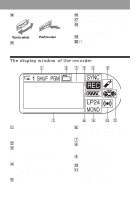
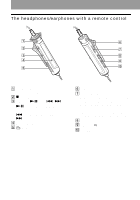
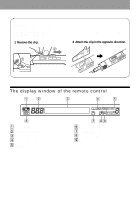
Using the clip for the remote control It may be hard for you to read the indications in the display if the remote control is attached upside down with the clip in its current position. In this case, attach the clip in the opposite direction as shown below. 1 Remove the clip. 2 Attach the clip in the opposite direction. 2 1 The display window of the remote control A B C D E F A Disc indication B Track number display C Character information display D Play mode indication E SOUND indication G HI F Battery level indication G Group indication H Bookmark indication I Melody timer indication 15
-
 1
1 -
2
-
3
-
4
-
5
-
6
-
7
-
8
-
9
-
 10
10 -
 11
11 -
 12
12 -
 13
13 -
 14
14 -
 15
15 -
 16
16 -
 17
17 -
 18
18 -
 19
19 -
 20
20 -
21
-
22
-
23
-
24
-
25
-
26
-
27
-
28
-
29
-
30
-
31
-
32
-
33
-
34
-
35
-
36
-
37
-
38
-
39
-
40
-
41
-
42
-
43
-
44
-
45
-
46
-
47
-
48
-
49
-
50
-
51
-
52
-
53
-
54
-
55
-
56
-
57
-
58
-
59
-
60
-
61
-
62
-
63
-
64
-
65
-
66
-
67
-
68
-
69
-
70
-
71
-
72
-
73
-
74
-
75
-
76
-
77
-
78
-
79
-
80
-
81
-
82
-
83
-
84
-
85
-
86
-
87
-
88
-
89
-
90
-
91
-
92
-
93
-
94
-
95
-
96
-
97
-
98
-
99
-
100
-
101
-
102
-
103
-
104
-
105
-
106
-
107
-
108
-
109
-
110
-
111
-
112
-
113
-
114
-
115
-
116
-
117
-
118
-
119
-
120
-
121
-
122
-
123
-
124
-
125
-
126
-
127
-
128
 |
 |

15
The display window of the remote control
A
Disc indication
B
Track number display
C
Character information display
D
Play mode indication
E
SOUND indication
F
Battery level indication
G
Group indication
H
Bookmark indication
I
Melody timer indication
1
2
Using the clip for the remote control
It may be hard for you to read the indications in the display if the remote control is attached
upside down with the clip in its current position. In this case, attach the clip in the opposite
direction as shown below.
1
Remove the clip.
2
Attach the clip in the opposite direction.
F
G
HI
B
A
C
D
E