Sony MZ-RH910 User Manual - Page 32
Recording from a microphone, To select microphone sensitivity, Recording from a, microphone
 |
View all Sony MZ-RH910 manuals
Add to My Manuals
Save this manual to your list of manuals |
Page 32 highlights
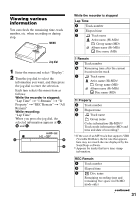
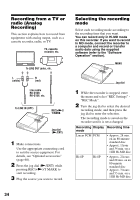
All Remain A Track number B Elapsed time C Disc name1) Remaining time after the current location on the disc and number of tracks after the current track 1) The title that is displayed varies according to the selected Main play mode. While recording Lap Time A Track number B Elapsed time Time mark indication1) C Remaining recording time Recording level meter (L • R) 1) Appears when "Time Mark" is set to "On". Notes • When a disc used in Hi-MD mode is inserted in the recorder, the free space will show as "2.0MB" when the remaining recording time becomes "-00:00". This is a system limitation, "2.0MB" being the capacity of the reserve domain. • Depending on the group settings, the operating conditions, and the disc settings, you may not be able to select certain indications or the indications may appear differently. z If you want to check the playing position or track name while playing, see "Viewing various information" (page 39). Recording from a microphone Stereo microphone* To MIC (PLUG IN POWER) REC(+N)/ T MARK MENU Jog dial (N/ENT) ∗ See "Optional accessories" (page 68). 1 Connect the stereo microphone to the MIC (PLUG IN POWER) jack. 2 Press the jog dial (N/ENT) while pressing REC(+N)/T MARK to start recording. To select microphone sensitivity You can select the microphone sensitivity depending on the volume of the sound source. 1 While the recorder is recording or stopped, enter the menu and select "REC Settings" - "MIC Sens". 32
-
 1
1 -
2
-
3
-
4
-
5
-
6
-
7
-
8
-
9
-
10
-
11
-
12
-
13
-
14
-
15
-
16
-
17
-
18
-
19
-
20
-
21
-
22
-
23
-
24
-
25
-
26
-
 27
27 -
 28
28 -
 29
29 -
 30
30 -
 31
31 -
 32
32 -
 33
33 -
 34
34 -
 35
35 -
 36
36 -
 37
37 -
38
-
39
-
40
-
41
-
42
-
43
-
44
-
45
-
46
-
47
-
48
-
49
-
50
-
51
-
52
-
53
-
54
-
55
-
56
-
57
-
58
-
59
-
60
-
61
-
62
-
63
-
64
-
65
-
66
-
67
-
68
-
69
-
70
-
71
-
72
-
73
-
74
-
75
-
76
-
77
-
78
-
79
-
80
-
81
-
82
-
83
-
84
-
85
-
86
-
87
-
88
-
89
-
90
-
91
-
92
-
93
-
94
-
95
-
96
-
97
-
98
-
99
-
100
-
101
-
102
-
103
-
104
-
105
-
106
-
107
-
108
-
109
-
110
-
111
-
112
-
113
-
114
-
115
 |
 |
