Sony MZ-RH910 User Manual - Page 61
Connecting the recorder to your computer, Make sure that the REC indication
 |
View all Sony MZ-RH910 manuals
Add to My Manuals
Save this manual to your list of manuals |
Page 61 highlights
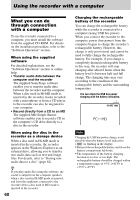
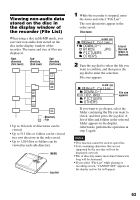
Connecting the recorder to your computer When you connect the dedicated USB cable directly to the USB connecting jack on the recorder, power (bus power) is supplied from the USB port of the computer. This allows the recorder to be used without power being supplied from the battery. Note When using Windows ME or Windows 98SE • If you connect the recorder to the computer with the disc mode on the recorder set to "HiMD" (factory setting), and then insert a 60/74/ 80-minute standard disc, the operation mode of the disc may automatically change to HiMD mode even if you do not record anything. • When you disconnect the dedicated USB cable, the message "Unsafe Removal of Device" appears in the computer display. This is not a problem. Merely click "OK" to make the message disappear. Computer To the USB port Dedicated USB cable To the USB cable connecting jack 1 Insert a recordable disc into the recorder. 2 Make sure the recorder is stopped and HOLD is released. 3 Open the cover of the USB connecting jack on the recorder and connect the dedicated USB cable to the recorder and to the computer. 4 Check the connections. When the connections have been properly made, "PC - - MD" appears in the display. When you unplug the dedicated USB cable from the computer or remove the disc from the recorder Be sure to remove the recorder or the disc as follows. If not, damage to the data may occur. 1 Make sure that the "REC" indication is not displayed in the display window of the recorder. 2 Press x on the recorder. "EJECT DISC OK" appears in the display. Depending on the conditions, it may take some time until "EJECT DISC OK" appears in the display. 3 Unplug the dedicated USB cable from the computer or remove the disc from the recorder. Make sure to open the cover. 61
-
 1
1 -
2
-
3
-
4
-
5
-
6
-
7
-
8
-
9
-
10
-
11
-
12
-
13
-
14
-
15
-
16
-
17
-
18
-
19
-
20
-
21
-
22
-
23
-
24
-
25
-
26
-
27
-
28
-
29
-
30
-
31
-
32
-
33
-
34
-
35
-
36
-
37
-
38
-
39
-
40
-
41
-
42
-
43
-
44
-
45
-
46
-
47
-
48
-
49
-
50
-
51
-
52
-
53
-
54
-
55
-
 56
56 -
 57
57 -
 58
58 -
 59
59 -
 60
60 -
 61
61 -
 62
62 -
 63
63 -
 64
64 -
 65
65 -
 66
66 -
67
-
68
-
69
-
70
-
71
-
72
-
73
-
74
-
75
-
76
-
77
-
78
-
79
-
80
-
81
-
82
-
83
-
84
-
85
-
86
-
87
-
88
-
89
-
90
-
91
-
92
-
93
-
94
-
95
-
96
-
97
-
98
-
99
-
100
-
101
-
102
-
103
-
104
-
105
-
106
-
107
-
108
-
109
-
110
-
111
-
112
-
113
-
114
-
115
 |
 |
