Sony MZ-RH910 User Manual - Page 34
Recording from a TV or radio (Analog Recording), Selecting the recording mode, REC Mode.
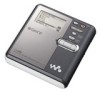 |
View all Sony MZ-RH910 manuals
Add to My Manuals
Save this manual to your list of manuals |
Page 34 highlights
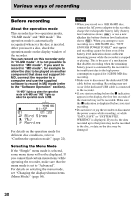
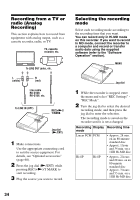
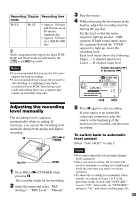
Recording from a TV or radio (Analog Recording) This section explains how to record from equipment with analog output, such as a cassette recorder, radio, or TV. TV, cassette recorder, etc. To LINE OUT jacks, etc. L (white) R (red) Line cable RK-G129, RK-G136, etc. To LINE IN (OPT) REC(+N)/ T MARK Jog dial (N/ENT) 1 Make connections. Use the appropriate connecting cord to suit the source equipment. For details, see "Optional accessories" (page 68). 2 Press the jog dial (N/ENT) while pressing REC(+N)/T MARK to start recording. 3 Play the source you want to record. Selecting the recording mode Select each recording mode according to the recording time that you want. You can record only in Hi-MD mode on this recorder. If you want to record in MD mode, connect the recorder to a computer and record or transfer audio data using the supplied software (refer to the "Software Operation" section). MENU Jog dial 1 While the recorder is stopped, enter the menu and select "REC Settings" "REC Mode". 2 Turn the jog dial to select the desired recording mode, and then press the jog dial to enter the selection. The recording mode is saved on the recorder until it is next changed. Recording Display Recording time mode Linear PCM PCM • Approx. 28 min. on an 80-minute standard disc • Approx. 1 hour and 34 min. on a 1GB Hi-MD disc Hi-SP Hi-SP • Approx. 2 hours and 20 min. on an 80-minute standard disc • Approx. 7 hours and 55 min. on a 1GB Hi-MD disc 34
-
 1
1 -
2
-
3
-
4
-
5
-
6
-
7
-
8
-
9
-
10
-
11
-
12
-
13
-
14
-
15
-
16
-
17
-
18
-
19
-
20
-
21
-
22
-
23
-
24
-
25
-
26
-
27
-
28
-
 29
29 -
 30
30 -
 31
31 -
 32
32 -
 33
33 -
 34
34 -
 35
35 -
 36
36 -
 37
37 -
 38
38 -
 39
39 -
40
-
41
-
42
-
43
-
44
-
45
-
46
-
47
-
48
-
49
-
50
-
51
-
52
-
53
-
54
-
55
-
56
-
57
-
58
-
59
-
60
-
61
-
62
-
63
-
64
-
65
-
66
-
67
-
68
-
69
-
70
-
71
-
72
-
73
-
74
-
75
-
76
-
77
-
78
-
79
-
80
-
81
-
82
-
83
-
84
-
85
-
86
-
87
-
88
-
89
-
90
-
91
-
92
-
93
-
94
-
95
-
96
-
97
-
98
-
99
-
100
-
101
-
102
-
103
-
104
-
105
-
106
-
107
-
108
-
109
-
110
-
111
-
112
-
113
-
114
-
115
 |
 |
