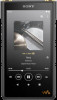
Sony NW-WM1AM2 Help Guide - Page 29
Parts and controls
 |
View all Sony NW-WM1AM2 manuals
Add to My Manuals
Save this manual to your list of manuals |
Page 29 highlights
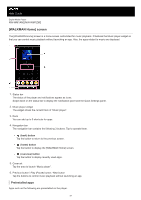
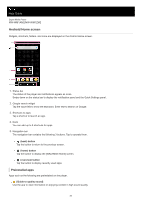
Help Guide Digital Media Player NW-WM1AM2/NW-WM1ZM2 Parts and controls 1. Touch screen Tap icons or items on the screen to operate the player. 2. Charge lamp The lamp lights up while the player is charging. 3. USB Type-C port Connect the player to a running computer with the supplied USB Type-C cable. You can charge the player or enjoy the music on a computer with the USB-DAC function. 4. Built-in antenna The Wi-Fi antenna and Bluetooth antenna are built in. Do not cover the antennas while you use them. 5. (power) button Press the button to turn the screen on or off. Hold down the button for 5 seconds to turn on the player. Hold down the button for 2 seconds to turn off or restart the player. If operations become unstable, hold down the button for 10 seconds to force the player to restart. 6. +(*1)/- (volume) buttons Press the buttons to adjust the volume. 7. Playback operating buttons (play/pause) (*1): Press the button to start or pause playback. (previous track)/ (next track): Press the buttons to jump to the beginning of the current track, previous track, or next track. Hold down the buttons to fast-rewind or to fast-forward playback. 8. Headphone jack (Stereo Mini) (*2) Connect headphones with a stereo mini plug. Push in the headphone plug until it clicks into place. Connect the headphones properly. Otherwise, the output sound will be impaired. 9. Headphone jack (Balanced Standard) (*2) Connect headphones with a balanced standard plug. Push in the headphone plug until it clicks into place. Connect the headphones properly. Otherwise, the output sound will be impaired. 29
-
 1
1 -
2
-
3
-
4
-
5
-
6
-
7
-
8
-
9
-
10
-
11
-
12
-
13
-
14
-
15
-
16
-
17
-
18
-
19
-
20
-
21
-
22
-
23
-
 24
24 -
 25
25 -
 26
26 -
 27
27 -
 28
28 -
 29
29 -
 30
30 -
 31
31 -
 32
32 -
 33
33 -
 34
34 -
35
-
36
-
37
-
38
-
39
-
40
-
41
-
42
-
43
-
44
-
45
-
46
-
47
-
48
-
49
-
50
-
51
-
52
-
53
-
54
-
55
-
56
-
57
-
58
-
59
-
60
-
61
-
62
-
63
-
64
-
65
-
66
-
67
-
68
-
69
-
70
-
71
-
72
-
73
-
74
-
75
-
76
-
77
-
78
-
79
-
80
-
81
-
82
-
83
-
84
-
85
-
86
-
87
-
88
-
89
-
90
-
91
-
92
-
93
-
94
-
95
-
96
-
97
-
98
-
99
-
100
-
101
-
102
-
103
-
104
-
105
-
106
-
107
-
108
-
109
-
110
-
111
-
112
-
113
-
114
-
115
-
116
-
117
-
118
-
119
-
120
-
121
-
122
-
123
-
124
-
125
-
126
-
127
-
128
-
129
-
130
-
131
-
132
-
133
-
134
-
135
-
136
-
137
-
138
-
139
-
140
-
141
-
142
-
143
-
144
-
145
 |
 |
