Sony PCV-L640 Reference Manual - Page 47
CMOS Setup Options, The computer
 |
View all Sony PCV-L640 manuals
Add to My Manuals
Save this manual to your list of manuals |
Page 47 highlights
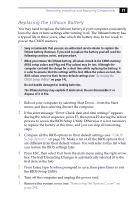
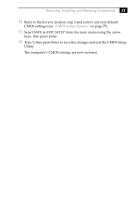
Removing, Installing, and Replacing Components 33 14 Refer to the list you made in step 3 and restore any non-default CMOS settings (see "CMOS Setup Options" on page 75). 15 Select SAVE & EXIT SETUP from the main menu using the arrow keys, then press Enter. 16 Type Y, then press Enter to save the changes and exit the CMOS Setup Utility. The computer's CMOS settings are now restored.
-
 1
1 -
2
-
3
-
4
-
5
-
6
-
7
-
8
-
9
-
10
-
11
-
12
-
13
-
14
-
15
-
16
-
17
-
18
-
19
-
20
-
21
-
22
-
23
-
24
-
25
-
26
-
27
-
28
-
29
-
30
-
31
-
32
-
33
-
34
-
35
-
36
-
37
-
38
-
39
-
40
-
41
-
 42
42 -
 43
43 -
 44
44 -
 45
45 -
 46
46 -
 47
47 -
 48
48 -
 49
49 -
 50
50 -
 51
51 -
 52
52 -
53
-
54
-
55
-
56
-
57
-
58
-
59
-
60
-
61
-
62
-
63
-
64
-
65
-
66
-
67
-
68
-
69
-
70
-
71
-
72
-
73
-
74
-
75
-
76
-
77
-
78
-
79
-
80
-
81
-
82
-
83
-
84
-
85
-
86
-
87
-
88
-
89
-
90
-
91
-
92
-
93
-
94
-
95
-
96
-
97
-
98
-
99
-
100
-
101
-
102
-
103
-
104
-
105
-
106
-
107
-
108
-
109
-
110
-
111
-
112
-
113
-
114
-
115
-
116
-
117
-
118
-
119
-
120
 |
 |

Removing, Installing, and Replacing Components
33
14
Refer to the list you made in step 3 and restore any non-default
CMOS settings (see
“
CMOS Setup Options
”
on page 75).
15
Select SAVE & EXIT SETUP from the main menu using the arrow
keys, then press Enter.
16
Type Y, then press Enter to save the changes and exit the CMOS Setup
Utility.
The computer
’
s CMOS settings are now restored.