Sony PCV-LX910 System Reference Manual - Page 55
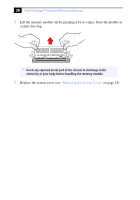
Replace the system cover see, and gently press down until the drive is firmly into position.
 |
View all Sony PCV-LX910 manuals
Add to My Manuals
Save this manual to your list of manuals |
Page 55 highlights
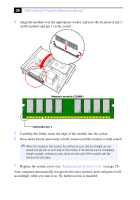
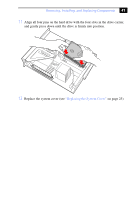
Removing, Installing, and Replacing Components 41 11 Align all four pins on the hard drive with the four slots in the drive carrier, and gently press down until the drive is firmly into position. 12 Replace the system cover (see "Replacing the System Cover" on page 25).
-
 1
1 -
2
-
3
-
4
-
5
-
6
-
7
-
8
-
9
-
10
-
11
-
12
-
13
-
14
-
15
-
16
-
17
-
18
-
19
-
20
-
21
-
22
-
23
-
24
-
25
-
26
-
27
-
28
-
29
-
30
-
31
-
32
-
33
-
34
-
35
-
36
-
37
-
38
-
39
-
40
-
41
-
42
-
43
-
44
-
45
-
46
-
47
-
48
-
49
-
 50
50 -
 51
51 -
 52
52 -
 53
53 -
 54
54 -
 55
55 -
 56
56 -
 57
57 -
 58
58 -
 59
59 -
 60
60 -
61
-
62
-
63
-
64
-
65
-
66
-
67
-
68
-
69
-
70
-
71
-
72
-
73
-
74
-
75
-
76
-
77
-
78
-
79
-
80
-
81
-
82
-
83
-
84
-
85
-
86
-
87
-
88
-
89
-
90
-
91
-
92
-
93
-
94
-
95
-
96
-
97
-
98
-
99
-
100
-
101
-
102
-
103
-
104
-
105
-
106
-
107
-
108
-
109
-
110
-
111
-
112
 |
 |

Removing, Installing, and Replacing Components
41
11
Align all four pins on the hard drive with the four slots in the drive carrier,
and gently press down until the drive is firmly into position.
12
Replace the system cover (see
“Replacing the System Cover”
on page 25).