Sony PCV-LX910 System Reference Manual - Page 57
Covering an Open I/O Slot, Fit the bottom end of the slot cover removed earlier between the chassis
 |
View all Sony PCV-LX910 manuals
Add to My Manuals
Save this manual to your list of manuals |
Page 57 highlights
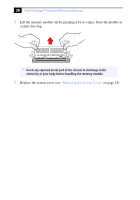
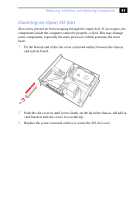
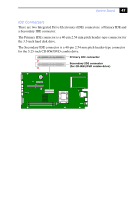
Removing, Installing, and Replacing Components 43 Covering an Open I/O Slot Slot covers prevent air from escaping through the empty hole. If air escapes, the components inside the computer cannot be properly cooled. This may damage some components, especially the main processor (which generates the most heat). 1 Fit the bottom end of the slot cover (removed earlier) between the chassis and system board. 2 Push the slot cover in until it rests firmly on the lip in the chassis. All add-in card brackets and slot covers rest on this lip. 3 Replace the screw (removed earlier) to secure the I/O slot cover.
-
 1
1 -
2
-
3
-
4
-
5
-
6
-
7
-
8
-
9
-
10
-
11
-
12
-
13
-
14
-
15
-
16
-
17
-
18
-
19
-
20
-
21
-
22
-
23
-
24
-
25
-
26
-
27
-
28
-
29
-
30
-
31
-
32
-
33
-
34
-
35
-
36
-
37
-
38
-
39
-
40
-
41
-
42
-
43
-
44
-
45
-
46
-
47
-
48
-
49
-
50
-
51
-
 52
52 -
 53
53 -
 54
54 -
 55
55 -
 56
56 -
 57
57 -
 58
58 -
 59
59 -
 60
60 -
 61
61 -
 62
62 -
63
-
64
-
65
-
66
-
67
-
68
-
69
-
70
-
71
-
72
-
73
-
74
-
75
-
76
-
77
-
78
-
79
-
80
-
81
-
82
-
83
-
84
-
85
-
86
-
87
-
88
-
89
-
90
-
91
-
92
-
93
-
94
-
95
-
96
-
97
-
98
-
99
-
100
-
101
-
102
-
103
-
104
-
105
-
106
-
107
-
108
-
109
-
110
-
111
-
112
 |
 |

Removing, Installing, and Replacing Components
43
Covering an Open I/O Slot
Slot covers prevent air from escaping through the empty hole. If air escapes, the
components inside the computer cannot be properly cooled. This may damage
some components, especially the main processor (which generates the most
heat).
1
Fit the bottom end of the slot cover (removed earlier) between the chassis
and system board.
2
Push the slot cover in until it rests firmly on the lip in the chassis. All add-in
card brackets and slot covers rest on this lip.
3
Replace the screw (removed earlier) to secure the I/O slot cover.