Sony PDWU1 User Manual (PDW-U1 Professional Disc Drive Unit Operation Manual F - Page 15
Rear Panel
 |
View all Sony PDWU1 manuals
Add to My Manuals
Save this manual to your list of manuals |
Page 15 highlights
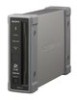
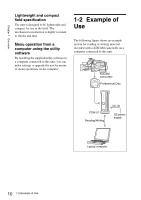
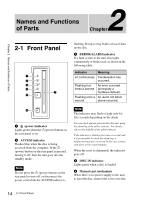
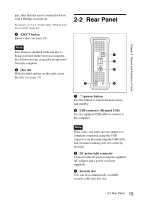
Chapter 2 Names and Functions of Parts part, then turn the screw counterclockwise with a Phillips screwdriver. For details, see 3-4-5 "To Eject Discs With the Unit Powered Off" (page 21). f EJECT button Ejects a disc (see page 21). 2-2 Rear Panel Note This button is disabled while the disc is being accessed. Either stop accessing the disc before ejecting, or eject by an operation from the computer. g Disc slot With the label surface on the right, insert the disc (see page 21). 1 2 DC IN 12V 3 5 4 a 1 (power) button Use this button to switch between active and standby. b USB connector (Hi-speed USB) Use the supplied USB cable to connect to the computer. Note If the video and audio are not output on a computer connected using the USB connector, try disconnecting the USB cable, and reconnect making sure it is correctly inserted. c DC power inlet connector Connect to the AC power using the supplied AC adaptor and a power cord (not supplied). d Security slot You can fit a commercially available security cable into this slot. 15 2-2 Rear Panel
-
 1
1 -
2
-
3
-
4
-
5
-
6
-
7
-
8
-
9
-
 10
10 -
 11
11 -
 12
12 -
 13
13 -
 14
14 -
 15
15 -
 16
16 -
 17
17 -
 18
18 -
 19
19 -
 20
20 -
21
-
22
-
23
-
24
-
25
-
26
-
27
-
28
-
29
-
30
-
31
-
32
-
33
-
34
-
35
-
36
-
37
-
38
 |
 |
