Sony RDR-HX900 Operating Instructions - Page 66
Press TITLE LIST to turn on the Title List, Select Erase Titles, and press ENTER. - reset
 |
UPC - 027242644328
View all Sony RDR-HX900 manuals
Add to My Manuals
Save this manual to your list of manuals |
Page 66 highlights
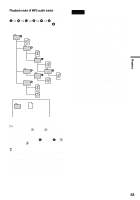
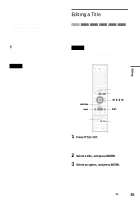
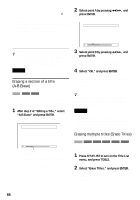
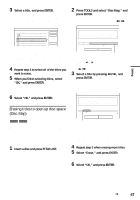
"Protect Title": Protects the title. Select "On" when the Protection display appears. " " appears next to the protected title. To cancel the protection, select "Off." "Title Name": Allows you to enter or re-enter a title name (page 43). "Set Thumbnail": Changes the title's thumbnail picture that appears in the Title List (page 38). "A-B Erase": Erases a section of the title (see below). z Hints • You can erase multiple titles at one time (page 66), or erase all of the titles on the disc at once (page 40). • You can label or re-label DVDs (page 40). Note You cannot protect Playlist titles. Erasing a section of a title (A-B Erase) 2 Select point A by pressing m/M, and press ENTER. The display for setting point B appears. A-B Erase (Set point B) 2 5ch 8:00PM - 9:00PM A A 0:12:34 B 0:23:45 3 Select point B by pressing m/M, and press ENTER. The display asks for confirmation. To reset either point A or B, select "Change A" or "Change B," and go to step 2 or 3. 4 Select "OK," and press ENTER. The scene is erased, and the display asks whether to erase another scene. To continue, select "Yes," and repeat from step 2. To finish, select "No." HDD +RW -RWVR You can select a section (scene) in a title and erase it. Note that erasing scenes in a title cannot be undone. 1 After step 2 of "Editing a Title," select "A-B Erase" and press ENTER. The display for setting point A appears. A-B Erase (Set point A) 2 5ch 8:00PM - 9:00PM z Hint A chapter mark is inserted after the scene was erased. The chapter mark divides the title into separate chapters on either side of the mark. Notes • Images or sound may be momentarily interrupted at the point where you erase a section of a title. • Sections shorter than five seconds may not be erased. • For DVD+RWs, the erased section may be slightly different from the points you selected. Erasing multiple titles (Erase Titles) Playback point A 0:12:34 B -:- -:- - • When the title is protected, the display asks for confirmation. To continue, select "Change," and when the protection display appears, select "Off." HDD +RW -RWVR -RWVideo +R -R You can select and erase two or more titles at one time using the TOOLS menu. 1 Press TITLE LIST to turn on the Title List menu, and press TOOLS. The TOOLS menu appears. 2 Select "Erase Titles," and press ENTER. The display for selecting titles to be erased appears. 66
-
 1
1 -
2
-
3
-
4
-
5
-
6
-
7
-
8
-
9
-
10
-
11
-
12
-
13
-
14
-
15
-
16
-
17
-
18
-
19
-
20
-
21
-
22
-
23
-
24
-
25
-
26
-
27
-
28
-
29
-
30
-
31
-
32
-
33
-
34
-
35
-
36
-
37
-
38
-
39
-
40
-
41
-
42
-
43
-
44
-
45
-
46
-
47
-
48
-
49
-
50
-
51
-
52
-
53
-
54
-
55
-
56
-
57
-
58
-
59
-
60
-
 61
61 -
 62
62 -
 63
63 -
 64
64 -
 65
65 -
 66
66 -
 67
67 -
 68
68 -
 69
69 -
 70
70 -
 71
71 -
72
-
73
-
74
-
75
-
76
-
77
-
78
-
79
-
80
-
81
-
82
-
83
-
84
-
85
-
86
-
87
-
88
-
89
-
90
-
91
-
92
-
93
-
94
-
95
-
96
-
97
-
98
-
99
-
100
-
101
-
102
-
103
-
104
-
105
-
106
-
107
-
108
-
109
-
110
-
111
-
112
-
113
-
114
-
115
-
116
-
117
-
118
-
119
-
120
 |
 |