Sony RDR-HX900 Operating Instructions - Page 74
Dubbing a Single Title (Title Dub), Select Dubbing and press ENTER.
 |
UPC - 027242644328
View all Sony RDR-HX900 manuals
Add to My Manuals
Save this manual to your list of manuals |
Page 74 highlights
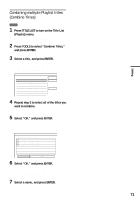
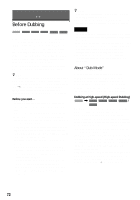
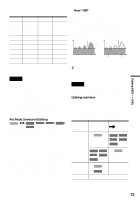
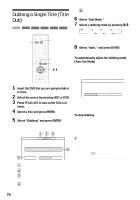
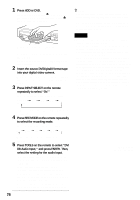
Dubbing a Single Title (Title Dub) HDD +RW -RWVR -RWVideo +R -R E Dubbing mode and the space that remains after dubbing (approximate). 6 Select "Dub Mode." 7 Select a dubbing mode by pressing M/m. tFast* t HQ t HSP t SP SLP T EP T LP T HDD 123 456 789 0 DVD * Appears when High-speed Dubbing is available for the title (page 72). 8 Select "Start," and press ENTER. TITLE LIST TOOLS M/m, ENTER To automatically adjust the dubbing mode (Auto Dub Mode) The recorder adjusts the dubbing mode in order to fit a title on the disc. If there is insufficient disc space in the selected dubbing mode, the following display appears after step 8. 1 Insert the DVD that you are going to dub to or from. 2 Select the source by pressing HDD or DVD. 3 Press TITLE LIST to turn on the Title List menu. 4 Select a title and press ENTER. The sub-menu appears. 5 Select "Dubbing" and press ENTER. The display for selecting the dubbing mode appears. Title Dub There is not enough memory for the dubbing, Select "Auto Dub Mode" or adjust the mode. Auto Dub Mode Reset Cancel Select "Auto Dub Mode" and press ENTER to start dubbing. To manually select another dubbing mode, select "Reset," and go to step 7. To stop dubbing Press TOOLS to turn on the TOOLS menu. Or, while the Title List menu is displayed, press ENTER to display the sub-menu. Select "Stop Dubbing," and press ENTER. When asked for confirmation, select "Yes," and press ENTER. Title Dub 2.0GB 2.6GB This title will be dubbed. Set the dub mode. 1 World Cup Final Rec Mode : SP Dub Mode SP 2.0GB Start Cancel A Size of the title (approximate). B Direction of dubbing. C Available space on the disc to be dubbed (approximate). D Information about the title to be dubbed. 74 z Hints • If disc space is still insufficient for the selected dubbing mode, erase unnecessary parts of the title, or free up disc space by erasing titles on the disc (page 65). • You can turn off the recorder without affecting the dubbing. Press "/1 during dubbing. • You can start Title Dubbing by selecting "DUBBING" from the System Menu.
-
 1
1 -
2
-
3
-
4
-
5
-
6
-
7
-
8
-
9
-
10
-
11
-
12
-
13
-
14
-
15
-
16
-
17
-
18
-
19
-
20
-
21
-
22
-
23
-
24
-
25
-
26
-
27
-
28
-
29
-
30
-
31
-
32
-
33
-
34
-
35
-
36
-
37
-
38
-
39
-
40
-
41
-
42
-
43
-
44
-
45
-
46
-
47
-
48
-
49
-
50
-
51
-
52
-
53
-
54
-
55
-
56
-
57
-
58
-
59
-
60
-
61
-
62
-
63
-
64
-
65
-
66
-
67
-
68
-
 69
69 -
 70
70 -
 71
71 -
 72
72 -
 73
73 -
 74
74 -
 75
75 -
 76
76 -
 77
77 -
 78
78 -
 79
79 -
80
-
81
-
82
-
83
-
84
-
85
-
86
-
87
-
88
-
89
-
90
-
91
-
92
-
93
-
94
-
95
-
96
-
97
-
98
-
99
-
100
-
101
-
102
-
103
-
104
-
105
-
106
-
107
-
108
-
109
-
110
-
111
-
112
-
113
-
114
-
115
-
116
-
117
-
118
-
119
-
120
 |
 |
