Sony SCD-XA5400ES Operating Instructions - Page 14
Connecting a digital, component with the coaxial, digital input jack, Connecting the AC power - connections to a receiver
 |
View all Sony SCD-XA5400ES manuals
Add to My Manuals
Save this manual to your list of manuals |
Page 14 highlights
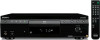
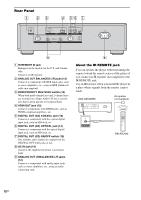
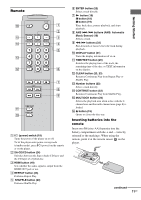
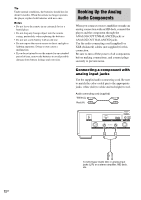
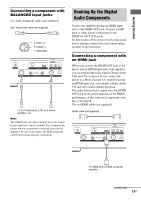
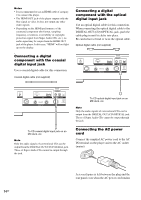
Notes • It is recommended to use an HDMI cable of category 2 to connect the player. • The HDMI OUT jack of the player outputs only the blue signal as video. It does not output any other video signals. • Depending on the HDMI performance of the connected component (the format, sampling frequency, resolution, receivability of copyright protection signal from Super Audio CDs, etc.), no audio signal may be output from the HDMI OUT jack of the player. In this case, "HDMI" will not light up on the display. Connecting a digital component with the coaxial digital input jack Use a coaxial digital cable for this connection. Coaxial digital cable (not supplied) Connecting a digital component with the optical digital input jack Use an optical digital cable for this connection. When connecting the optical digital cable to the DIGITAL OUT (CD) OPTICAL jack, push the cable plug in until it clicks into place. Be careful not to bend or twist the optical cable. Optical digital cable (not supplied) To CD coaxial digital input jack on an MD deck, etc. Note Only the audio signals of conventional CDs can be output from the DIGITAL OUT (CD) COAXIAL jack. Those of Super Audio CDs cannot be output through the jack. To CD optical digital input jack on an MD deck, etc. Note Only the audio signals of conventional CDs can be output from the DIGITAL OUT (CD) OPTICAL jack. Those of Super Audio CDs cannot be output through the jack. Connecting the AC power cord Connect the supplied AC power cord to the AC IN terminal on the player and to the AC outlet (mains). A several space is left between the plug and the rear panel even when the AC power cord (mains 14GB
-
 1
1 -
2
-
3
-
4
-
5
-
6
-
7
-
8
-
 9
9 -
 10
10 -
 11
11 -
 12
12 -
 13
13 -
 14
14 -
 15
15 -
 16
16 -
 17
17 -
 18
18 -
 19
19 -
20
-
21
-
22
-
23
-
24
-
25
-
26
-
27
-
28
-
29
-
30
-
31
-
32
-
33
-
34
-
35
-
36
-
37
-
38
-
39
-
40
-
41
-
42
-
43
-
44
-
45
-
46
-
47
-
48
-
49
-
50
-
51
-
52
-
53
-
54
-
55
-
56
-
57
-
58
-
59
-
60
 |
 |