Sony TC-WE605S Operating Instructions - Page 11
Adjusting Bias and Recording\rLevel Calibration\rAutomatically, Updating the calibration setting
 |
View all Sony TC-WE605S manuals
Add to My Manuals
Save this manual to your list of manuals |
Page 11 highlights
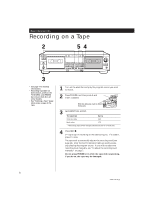
Advanced Recording Operations Advanced Recording Operations Adjusting Bias and Recording Level Calibration Automatically Since there are many different types of cassettes on the market, your tape deck automatically sets the appropriate equalization characteristics and bias current for each tape type (ATS: Automatic Tape Selection). However, you can get better recording results by doing the automatic bias current and the recording level calibration. You can do automatic calibration on either deck (TC-WA8ESA/WE805S only) or only on deck B (on all other models). DECK A / DECK B ª / · POWER DIRECTION MODE A a RELAY ØON øOFF PITCH CONTROL - + RESET MEMORY A COUNTER B RESET MEMORY g RMS/START RMS SET CHECK - RMS + DISPLAY 0(AMS) (AMS)) AUTO CAL(STARTP) DECK A DECK B 0(AMS) DUBBING A B A+B REC HIGH/NORMAL START(DECK BP) (AMS)) p CLEAR ª BACK PAUSE REC MUTE REC PRr · p FRONT DOLBY NR OFF ON ON FILTER B C S ª· PAUSE REC MUTE REC PRr § § AUTO 4 3 REC LEVEL 5 6 7 2 8 1 0 9 10 FADER ARL π SYNCHRO PHONES PAUSE P ª / · PAUSE P 1 Insert the cassette you want to record on into deck B or into either deck (TC-WA8ESA/WE805S only). Make sure the record-protect tabs on the cassette have not been removed. 2 Press DECK A or DECK B on the TC-WA8ESA and WE805S, or AUTO CAL on all other models until "CAL" appears in the display. 3 Press · or ª to select the side of the tape to be recorded. To select Press The front side · The reverse side ª 4 Press PAUSE P to start the automatic calibration procedure. The automatic calibration procedure starts (i.e., recording test tones, rewinding, and playing back). During the calibration, the counter changes from 9 to 0. CAL B REC CA. L9 When the automatic calibration procedure ends, the tape rewinds to the original position, the counter returns to normal and the tape deck stops. 5 Start the actual recording (see page 6). To cancel the automatic calibration function Press p on the deck you're using. If "A" or "B" on the TC-WA8ESA and WE805S or "CAL" on all other models flashes continuously The automatic calibration procedure has been interrupted by: - The end of the tape. Reverse the tape direction or rewind the tape to a new position that allows recording of the test tone. - Damaged tape or dirty heads. Change the cassette or clean and demagnetize the heads (see page 19). Updating the calibration setting If you insert a cassette and "[A] CAL" or "CAL [B]" on the TC-WA8ESA and WE805S or "CAL" on all other models appears in the display, it means that automatic calibration data in that deck for that tape type (I, II or IV) exists. However, we recommend that you repeat the automatic calibraion procedure each time you insert a new cassette since cassettes of the same type also vary in their characteristics. Before recalibrating, be sure to turn off "[A] CAL" or "CAL [B]" on the TC-WA8ESA and WE805S or "CAL" on all other models by pressing DECK A or DECK B on the TC-WA8ESA and WE805S or AUTO CAL on all other models. Then start from Step 2 of the automatic calibration procedure. 11 3-810-716-11(1)
-
 1
1 -
2
-
3
-
4
-
5
-
 6
6 -
 7
7 -
 8
8 -
 9
9 -
 10
10 -
 11
11 -
 12
12 -
 13
13 -
 14
14 -
 15
15 -
 16
16 -
17
-
18
-
19
-
20
-
21
-
22
-
23
-
24
 |
 |
