Sony TC-WE605S Operating Instructions - Page 4
Unpacking, Hooking Up the System, Where do I go next?
 |
View all Sony TC-WE605S manuals
Add to My Manuals
Save this manual to your list of manuals |
Page 4 highlights
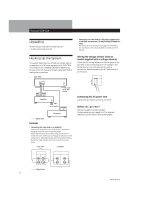
Getting Started Unpacking Check that you received the following items: • Audio connecting cords (2) • Connecting the tape deck to a CD player eqipped with a CONTROL A1 connector (TC-WE805S/WE705S/WE605S only) For information on connections through the CONTROL A1 connectors, refer to the pamphlet included with this manual. Hooking Up the System This section describes how to hook up the tape deck to an amplifier or a CD player equipped with CONTROL A1 connectors (TC-WE805S/WE705S/WE605S only). Be sure to turn off the power of each component before making the connections. Tape deck Setting the voltage selector (only on models supplied with a voltage selector) Check that the voltage selector on the rear panel of the tape deck is set to the local power line voltage. If not, set the selector to the correct position using a screwdriver before connecting the AC power cord to an AC outlet. VOLTAGE 220V 240V 120V ç Ç REC OUT TAPE IN Amplifier to an AC outlet to a wall outlet CONTROL A1 CD player ç: Signal flow Hookups • Connecting the tape deck to an amplifier Connect the amplifier to the LINE IN/OUT connectors using the supplied audio connecting cords. When connecting an audio connecting cord, be sure to match the color-coded cord to the appropriate jacks on the components: Red (right) to Red and White (left) to White. Be sure to make connections firmly to avoid hum and noise. Tape deck Ç Amplifier LINE IN OUT L R TAPE REC OUT IN L L R R Connecting the AC power cord Connect the AC power cord to an AC outlet. Where do I go next? Now you're ready to use your tape deck. For basic operations, go to pages 5 to 7; for advanced operations, go to the sections starting from page 8. ç: Signal flow 4 ç 3-810-716-11(1)
-
 1
1 -
 2
2 -
 3
3 -
 4
4 -
 5
5 -
 6
6 -
 7
7 -
 8
8 -
 9
9 -
 10
10 -
11
-
12
-
13
-
14
-
15
-
16
-
17
-
18
-
19
-
20
-
21
-
22
-
23
-
24
 |
 |
