Sony TC-WE605S Operating Instructions - Page 6
Recording on a Tape
 |
View all Sony TC-WE605S manuals
Add to My Manuals
Save this manual to your list of manuals |
Page 6 highlights
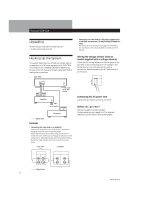
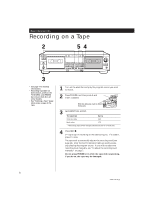
Basic Operations Recording on a Tape 2 54 POWER DIRECTION MODE A a RELAY ØON øOFF PITCH CONTROL - + RESET MEMORY A COUNTER B RESET MEMORY g RMS/START RMS SET CHECK - RMS + DISPLAY 0(AMS) (AMS)) AUTO CAL(STARTP) DECK A DECK B 0(AMS) DUBBING A B A+B REC HIGH/NORMAL START(DECK BP) (AMS)) p CLEAR ª BACK PAUSE REC MUTE REC PRr · p FRONT DOLBY NR OFF ON ON FILTER B C S ª· PAUSE REC MUTE REC PRr § § AUTO 4 3 REC LEVEL 5 6 7 2 8 1 0 9 10 FADER ARL π SYNCHRO PHONES 3 • See page 4 for hookup information. • Recording is possible on both decks A and B on the TC-WA8ESA and WE805S, but only on deck B on all other models. • See "Dubbing a Tape" (page 13) to make a copy of the tape. 1 Turn on the amplifier and play the program source you want to record. 2 Press POWER, and then press § and insert a cassette. With the side you want to record facing you 3 Set DIRECTION MODE. To record on Set to Only one side A Both sides* a * Recording stops when the tape reaches the end of reverse side. 4 Press REC r. · lights up for recording on the side facing you. If it doesn't, press · once. The tape deck automatically adjusts the recording level (see page 12). After the AUTO indicator lights up continuously, stop playing the program source. If you wish to adjust the recording level manually, see "To adjust the recording level manually" on page 7. Do not press POWER or § while the tape deck is operating. If you do so, the tape may be damaged. 6 3-810-716-11(1)
-
 1
1 -
 2
2 -
 3
3 -
 4
4 -
 5
5 -
 6
6 -
 7
7 -
 8
8 -
 9
9 -
 10
10 -
 11
11 -
 12
12 -
13
-
14
-
15
-
16
-
17
-
18
-
19
-
20
-
21
-
22
-
23
-
24
 |
 |
