Sony VGC-RT150Y User Guide - Page 147
cable and the Serial ATA cable to the new drive., Replace the hard disk bay cover.
 |
UPC - 027242751026
View all Sony VGC-RT150Y manuals
Add to My Manuals
Save this manual to your list of manuals |
Page 147 highlights
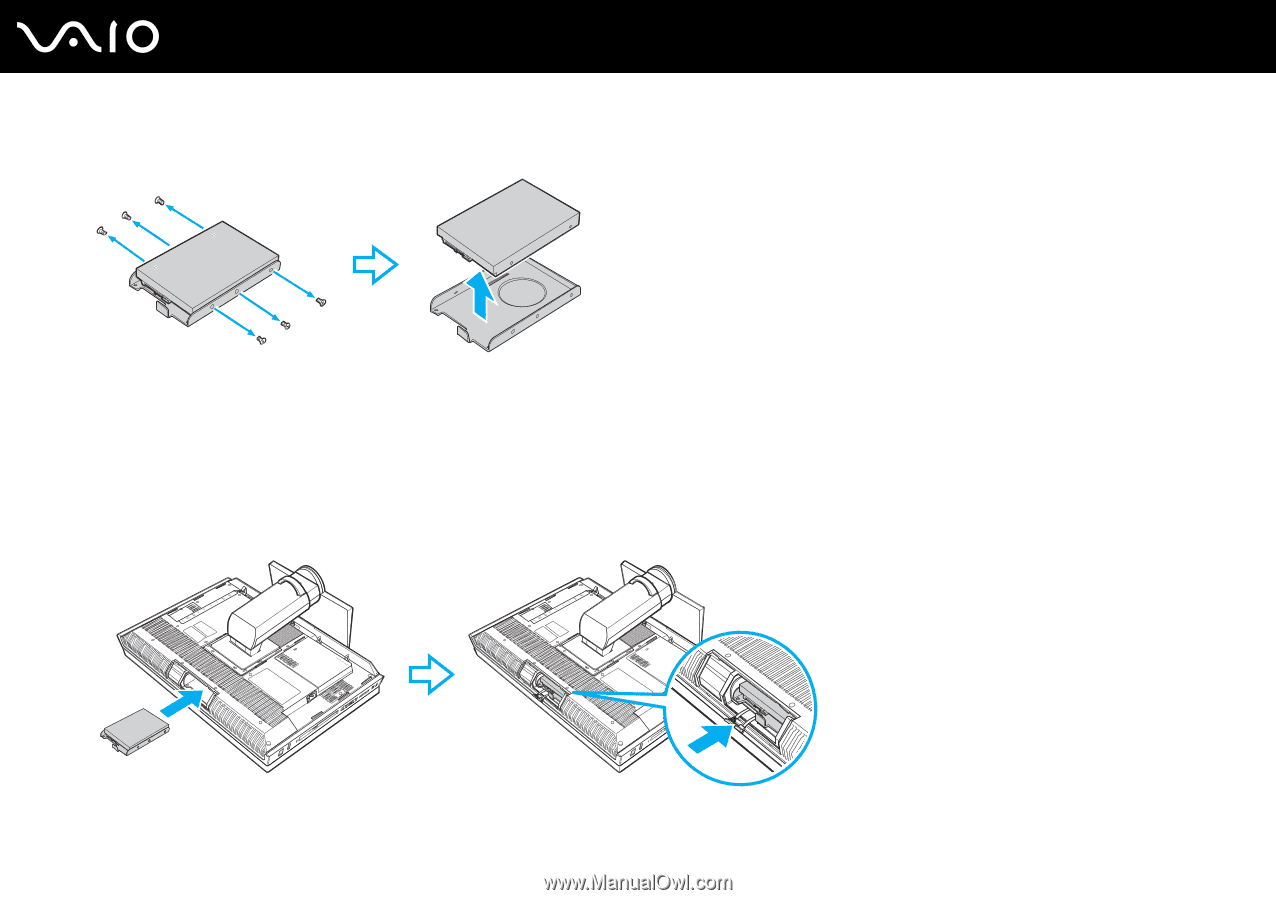
9 Remove the six screws from the drive holder and take out the hard disk drive. n 147 N Upgrading Your VAIO Computer 10 Place a new hard disk drive into the drive holder and align the holes on each side of the holder. 11 Secure the drive to the drive holder with screws, through the holes on each side of the holder. ! A new hard disk drive comes with the necessary screws. Do not overtighten these screws when securing the drive to the drive holder. 12 Slide the drive holder with the new drive into the hard disk bay until it clicks into place and connect the Serial ATA power cable and the Serial ATA cable to the new drive. 13 Secure the drive holder with the screws that you removed in step 7. 14 Replace the hard disk bay cover.
-
 1
1 -
2
-
3
-
4
-
5
-
6
-
7
-
8
-
9
-
10
-
11
-
12
-
13
-
14
-
15
-
16
-
17
-
18
-
19
-
20
-
21
-
22
-
23
-
24
-
25
-
26
-
27
-
28
-
29
-
30
-
31
-
32
-
33
-
34
-
35
-
36
-
37
-
38
-
39
-
40
-
41
-
42
-
43
-
44
-
45
-
46
-
47
-
48
-
49
-
50
-
51
-
52
-
53
-
54
-
55
-
56
-
57
-
58
-
59
-
60
-
61
-
62
-
63
-
64
-
65
-
66
-
67
-
68
-
69
-
70
-
71
-
72
-
73
-
74
-
75
-
76
-
77
-
78
-
79
-
80
-
81
-
82
-
83
-
84
-
85
-
86
-
87
-
88
-
89
-
90
-
91
-
92
-
93
-
94
-
95
-
96
-
97
-
98
-
99
-
100
-
101
-
102
-
103
-
104
-
105
-
106
-
107
-
108
-
109
-
110
-
111
-
112
-
113
-
114
-
115
-
116
-
117
-
118
-
119
-
120
-
121
-
122
-
123
-
124
-
125
-
126
-
127
-
128
-
129
-
130
-
131
-
132
-
133
-
134
-
135
-
136
-
137
-
138
-
139
-
140
-
141
-
 142
142 -
 143
143 -
 144
144 -
 145
145 -
 146
146 -
 147
147 -
 148
148 -
 149
149 -
 150
150 -
 151
151 -
 152
152 -
153
-
154
-
155
-
156
-
157
-
158
-
159
-
160
-
161
-
162
-
163
-
164
-
165
-
166
-
167
-
168
-
169
-
170
-
171
-
172
-
173
-
174
-
175
-
176
-
177
-
178
-
179
-
180
-
181
-
182
-
183
-
184
-
185
-
186
-
187
-
188
-
189
-
190
-
191
-
192
-
193
-
194
-
195
-
196
-
197
-
198
-
199
-
200
-
201
-
202
-
203
-
204
-
205
-
206
-
207
-
208
-
209
-
210
-
211
-
212
-
213
-
214
-
215
-
216
-
217
-
218
-
219
-
220
 |
 |
147
n
N
Upgrading Your VAIO Computer
9
Remove the six screws from the drive holder and take out the hard disk drive.
10
Place a new hard disk drive into the drive holder and align the holes on each side of the holder.
11
Secure the drive to the drive holder with screws, through the holes on each side of the holder.
!
A new hard disk drive comes with the necessary screws. Do not overtighten these screws when securing the drive to the drive holder.
12
Slide the drive holder with the new drive into the hard disk bay until it clicks into place and connect the Serial ATA power
cable and the Serial ATA cable to the new drive.
13
Secure the drive holder with the screws that you removed in step 7.
14
Replace the hard disk bay cover.