Sony VGC-RT150Y User Guide - Page 76
Connecting and Using the HDMI-Compatible Device
 |
UPC - 027242751026
View all Sony VGC-RT150Y manuals
Add to My Manuals
Save this manual to your list of manuals |
Page 76 highlights
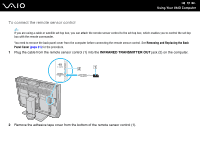
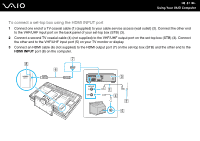
n 76 N Using Your VAIO Computer Connecting and Using the HDMI-Compatible Device You need to connect the HDMI-compatible device to your computer with an HDMI cable to display the HDMI input from the device on the computer. ! Be sure to use an HDMI cable approved by HDMI Licensing, LLC. To connect your computer to the HDMI-compatible device ✍ You need to remove the back panel cover from the computer before setting up the HDMI connection. See Removing and Replacing the Back Panel Cover (page 21) for the procedure. For information on how to connect cables to the computer, see Connecting a Power Source and Cables (page 23). If you enable the Auto Input Sensing feature with the OSD menu, turning on the connected device will automatically select the HDMI input. For instructions on how to enable or disable the Auto Input Sensing feature, see Changing the Display and Sound Settings for the HDMI Input (page 78). 1 Connect an HDMI cable (not supplied) to the HDMI output port on the device and the other end to the HDMI INPUT port on the computer. 2 Turn on the connected device. ✍ You do not need to turn on your computer to switch the display input. 3 Press the HDMI SELECT button to switch the display input to the HDMI input. The HDMI SELECT indicator light (HDMI SELECT button) illuminates in green. ✍ Unless you have switched the display input to the computer input since the last time you viewed the HDMI input on the computer, you do not need to change the display input. If you want to change the display input, press the HDMI SELECT button.
-
 1
1 -
2
-
3
-
4
-
5
-
6
-
7
-
8
-
9
-
10
-
11
-
12
-
13
-
14
-
15
-
16
-
17
-
18
-
19
-
20
-
21
-
22
-
23
-
24
-
25
-
26
-
27
-
28
-
29
-
30
-
31
-
32
-
33
-
34
-
35
-
36
-
37
-
38
-
39
-
40
-
41
-
42
-
43
-
44
-
45
-
46
-
47
-
48
-
49
-
50
-
51
-
52
-
53
-
54
-
55
-
56
-
57
-
58
-
59
-
60
-
61
-
62
-
63
-
64
-
65
-
66
-
67
-
68
-
69
-
70
-
 71
71 -
 72
72 -
 73
73 -
 74
74 -
 75
75 -
 76
76 -
 77
77 -
 78
78 -
 79
79 -
 80
80 -
 81
81 -
82
-
83
-
84
-
85
-
86
-
87
-
88
-
89
-
90
-
91
-
92
-
93
-
94
-
95
-
96
-
97
-
98
-
99
-
100
-
101
-
102
-
103
-
104
-
105
-
106
-
107
-
108
-
109
-
110
-
111
-
112
-
113
-
114
-
115
-
116
-
117
-
118
-
119
-
120
-
121
-
122
-
123
-
124
-
125
-
126
-
127
-
128
-
129
-
130
-
131
-
132
-
133
-
134
-
135
-
136
-
137
-
138
-
139
-
140
-
141
-
142
-
143
-
144
-
145
-
146
-
147
-
148
-
149
-
150
-
151
-
152
-
153
-
154
-
155
-
156
-
157
-
158
-
159
-
160
-
161
-
162
-
163
-
164
-
165
-
166
-
167
-
168
-
169
-
170
-
171
-
172
-
173
-
174
-
175
-
176
-
177
-
178
-
179
-
180
-
181
-
182
-
183
-
184
-
185
-
186
-
187
-
188
-
189
-
190
-
191
-
192
-
193
-
194
-
195
-
196
-
197
-
198
-
199
-
200
-
201
-
202
-
203
-
204
-
205
-
206
-
207
-
208
-
209
-
210
-
211
-
212
-
213
-
214
-
215
-
216
-
217
-
218
-
219
-
220
 |
 |