Stihl FSA 90 R Instruction Manual - Page 19
Connecting Charger to, Power Supply, Charging the Battery - test
 |
View all Stihl FSA 90 R manuals
Add to My Manuals
Save this manual to your list of manuals |
Page 19 highlights
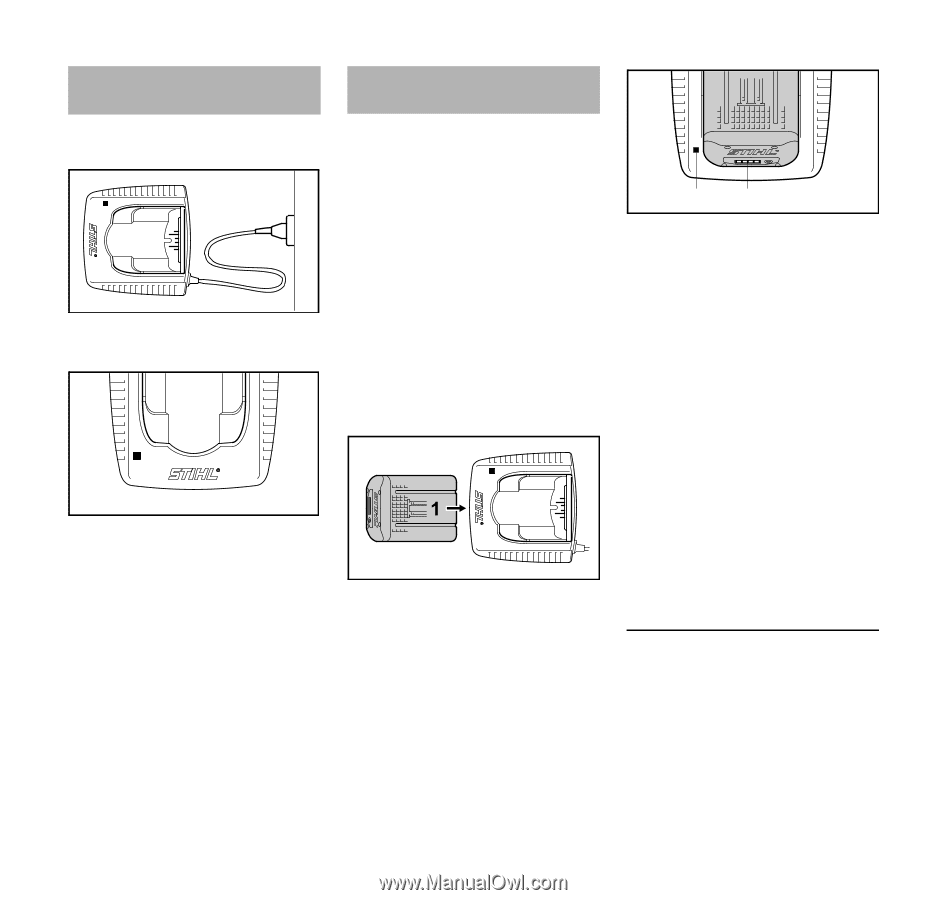
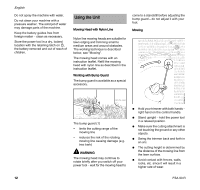
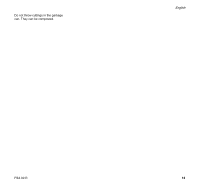
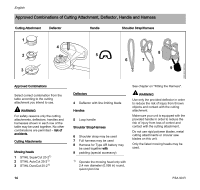
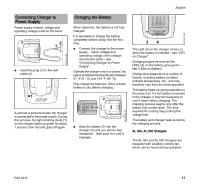
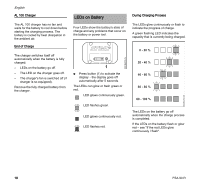
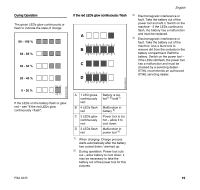
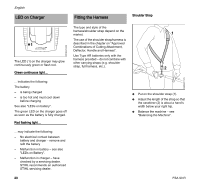
English 3901BA014 KN Connecting Charger to Power Supply Power supply (mains) voltage and operating voltage must be the same. 2 1 N Insert the plug (1) in the wall outlet (2). 1 A self test is performed after the charger is connected to the power supply. During this process, the light emitting diode (1) on the charger lights up green for about 1 second, then red and goes off again. 3901BA019 KN 3901BA015 KN Charging the Battery When delivered, the battery is not fully charged. It is advisable to charge the battery completely before using it for the first time. N Connect the charger to the power supply - mains voltage and operating voltage of the charger must be the same - see "Connecting Charger to Power Supply". Operate the charger only in a closed, dry space at ambient temperatures between 41 °F (5 ° C) and 104 °F (40 °C). Only charge dry batteries. Allow a damp battery to dry before charging. 2 N Slide the battery (1) into the charger (2) until you start to feel resistance - then push it in until it engages. 3901BA009 KN 34 The LED (3) on the charger comes on when the battery is inserted - see "LED on Charger" Charging begins as soon as the LEDs (4) on the battery glow green - see "LEDs on Battery". Charge time depends on a number of factors, including battery condition, ambient temperature, etc., and may therefore vary from the times specified. The battery heats up during operation in the power tool. If a hot battery is inserted in the charger, it may be necessary to cool it down before charging. The charging process begins only after the battery has cooled down. The time required for cooling may prolong the charge time. The battery and charger heat up during the charging process. AL 300, AL 500 Chargers The AL 300 and AL 500 chargers are equipped with a battery cooling fan, which can be heard during operation. FSA 90 R 17
-
 1
1 -
2
-
3
-
4
-
5
-
6
-
7
-
8
-
9
-
10
-
11
-
12
-
13
-
 14
14 -
 15
15 -
 16
16 -
 17
17 -
 18
18 -
 19
19 -
 20
20 -
 21
21 -
 22
22 -
 23
23 -
 24
24 -
25
-
26
-
27
-
28
-
29
-
30
-
31
-
32
-
33
-
34
-
35
-
36
-
37
-
38
-
39
-
40
-
41
-
42
-
43
-
44
-
45
-
46
-
47
-
48
-
49
-
50
-
51
-
52
-
53
-
54
-
55
-
56
-
57
-
58
-
59
-
60
-
61
-
62
-
63
-
64
-
65
-
66
-
67
-
68
-
69
-
70
-
71
-
72
-
73
-
74
-
75
-
76
 |
 |