Stihl FSA 90 R Instruction Manual - Page 23
Balancing the Machine
 |
View all Stihl FSA 90 R manuals
Add to My Manuals
Save this manual to your list of manuals |
Page 23 highlights
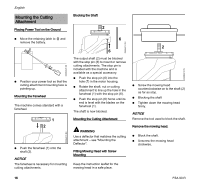
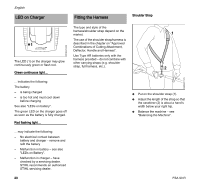
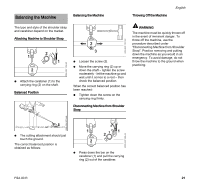
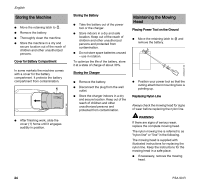
Balancing the Machine Balancing the Machine Throwing Off the Machine English The type and style of the shoulder strap and carabiner depend on the market. Attaching Machine to Shoulder Strap 2 1 1 2 N Attach the carabiner (1) to the carrying ring (2) on the shaft. Balanced Position 0000-GXX 1056-A0 2 3 N Loosen the screw (3). N Move the carrying ring (2) up or down the shaft - tighten the screw moderately - let the machine go and wait until it comes to a rest - then check the balanced position. When the correct balanced position has been reached: N Tighten down the screw on the carrying ring firmly. Disconnecting Machine from Shoulder Strap 0000-GXX 1057-A0 WARNING The machine must be quickly thrown off in the event of imminent danger. To throw off the machine, use the procedure described under "Disconnecting Machine from Shoulder Strap". Practice removing and putting down the machine as you would in an emergency. To avoid damage, do not throw the machine to the ground when practicing. 0000-GXX-0573-A0 0000-GXX 1058-A0 N The cutting attachment should just touch the ground. The correct balanced position is obtained as follows: 1 1 2 2 N Press down the bar on the carabiner (1) and pull the carrying ring (2) out of the carabiner. FSA 90 R 21
-
 1
1 -
2
-
3
-
4
-
5
-
6
-
7
-
8
-
9
-
10
-
11
-
12
-
13
-
14
-
15
-
16
-
17
-
 18
18 -
 19
19 -
 20
20 -
 21
21 -
 22
22 -
 23
23 -
 24
24 -
 25
25 -
 26
26 -
 27
27 -
 28
28 -
29
-
30
-
31
-
32
-
33
-
34
-
35
-
36
-
37
-
38
-
39
-
40
-
41
-
42
-
43
-
44
-
45
-
46
-
47
-
48
-
49
-
50
-
51
-
52
-
53
-
54
-
55
-
56
-
57
-
58
-
59
-
60
-
61
-
62
-
63
-
64
-
65
-
66
-
67
-
68
-
69
-
70
-
71
-
72
-
73
-
74
-
75
-
76
 |
 |
