Sub-Zero BI-36S Built-In Installation Guide - Page 3
Built-In Refrigeration, Sub-Zero Built-In Refrigeration, Before You Start
 |
View all Sub-Zero BI-36S manuals
Add to My Manuals
Save this manual to your list of manuals |
Page 3 highlights
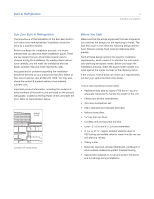
Built-In Refrigeration 3 subzero.com/specs Sub-Zero Built-In Refrigeration The importance of the installation of the Sub-Zero built-in unit cannot be overemphasized. Installation should be done by a qualified installer. Before you begin the installation process, it is recommended that you read this entire installation guide. There are key details that you should take special care to observe during the installation. By reading these instructions carefully, you will make the installation process easier, problem-free and most importantly, safe. Any questions or problems regarding the installation should be directed to your authorized Sub-Zero dealer or Sub-Zero customer care at 800-222-7820. You may also check the contact & support section of our website, subzero.com. Important product information, including the model and serial numbers of the built-in unit are listed on the product rating plate, located on the top frame of the unit inside the door. Refer to the illustration below. RATING PLATE Location of rating plate. Before You Start Make sure that the actual equipment that was shipped to you matches the design you are expecting to install. The Sub-Zero built-in line offers the following design alternatives: framed, overlay, flush inset and stainless steel models. Each of these design options has specific installation requirements, which means it is vital that the unit match your planning and space needs. Before you begin the installation process, check the exact model number you need against the model number on the shipping carton. If the unit you receive does not match your requirements, contact your authorized Sub-Zero dealer. TOOLS AND MATERIALS REQUIRED • Appliance dolly able to support 700 lbs (317 kg) and adequate manpower to handle the weight of the unit. • Phillips and slotted screwdrivers. • Torx drive screwdriver set. • Allen, standard and crescent wrenches. • Various sized pliers. • 3/8" hex bolt nut driver. • Cordless drill and assorted drill bits. • Level-2' (.6 m) and 4' (1.2 m) recommended. • 4' (1.2 m) of 1/4" copper, braided stainless steel or PEX tubing and saddle valve for water line (do not use self-piercing valves). • Tubing cutter. • Masonite, plywood, pressed fiberboard, cardboard or other suitable material to protect finished flooring. • Appropriate materials to cover and protect the home and furnishings during installation.
-
 1
1 -
 2
2 -
 3
3 -
 4
4 -
 5
5 -
 6
6 -
 7
7 -
 8
8 -
 9
9 -
10
-
11
-
12
-
13
-
14
-
15
-
16
-
17
-
18
-
19
-
20
-
21
-
22
-
23
-
24
-
25
-
26
-
27
-
28
-
29
-
30
-
31
-
32
-
33
-
34
-
35
-
36
-
37
-
38
-
39
-
40
 |
 |
